Learning Management System (LMS) websites have seen a significant surge in recent times. More and more people are learning online, schools, colleges and universities have embraced online learning and anyone with knowledge to share can do it on the internet.
Online learning has always been there, but COVID-19 made it more popular than ever.
This presents an amazing opportunity. The research shows that eLearning market has grown by 900% since 2000. If you want to share your knowledge, the appetite is there to learn. The technology is there too.
So, if you’re looking to create your own eLearning platform, you’re in the right place!
We use all our experience of WordPress, web design and learning management software system design to create a simple, step-by-step walkthrough of setting up your own LMS website using the Astra theme and Tutor LMS plugin.
Benefits of an LMS Website
Due to the temporary closure of schools and universities, there was an increase in the demand for online education. This caused the rise of eLearning. Students, as a result, are now very familiar with the concept of learning online.
For educators and course creators looking to set up robust online platforms, the open source LMS that fits your needs provides practical guidance on creating flexible and scalable learning management systems that cater to diverse learners.
By leveraging such platforms, instructors can deliver engaging content, track student progress, and provide personalized learning experiences efficiently.
Fortune business insights predict that the global LMS market will rise from $10.4 billion in 2020 to $13.8 billion by the end of 2021. That is a massive increase and it will only rise exponentially from there.
But the LMS market has been saturated already, so how do you set yourself apart?
To stand out from the crowd you need to employ some clever tactics.
Custom e-learning software development can give your platform a unique edge. With a tailor-made system, you can integrate specialized features and functionalities that cater to your specific educational niche, providing students with a personalized and interactive learning experience.
Choosing an easy-to-use LMS like the one highlighted by GoSkills can also be a game-changer, helping retain students through simplicity and user-friendly design
Jungleworks suggests having a well-designed user interface to attract students.
So, your website will stand out if it looks and feels premium. You could also have multiple instructors onboard your site to increase credibility and quality of education.
More instructors mean you have more courses that students can sign up for, giving you an edge over others.
How to Get Started
We are going to focus on creating an LMS website with WordPress and some powerful plugins. This offers maximum customizability and ease of use.
While there are many ways to get the job done, a CMS like WordPress provides the power and flexibility required for online learning. It’s also very easy to use, which is a bonus!
WordPress LMS Plugin
WordPress allows us to use a nifty plugin, Tutor LMS. It’s an LMS plugin that comes with a plethora of features that we shall explore shortly.
Tutor LMS has a free and paid version, but the free version offers plenty enough to get us started.
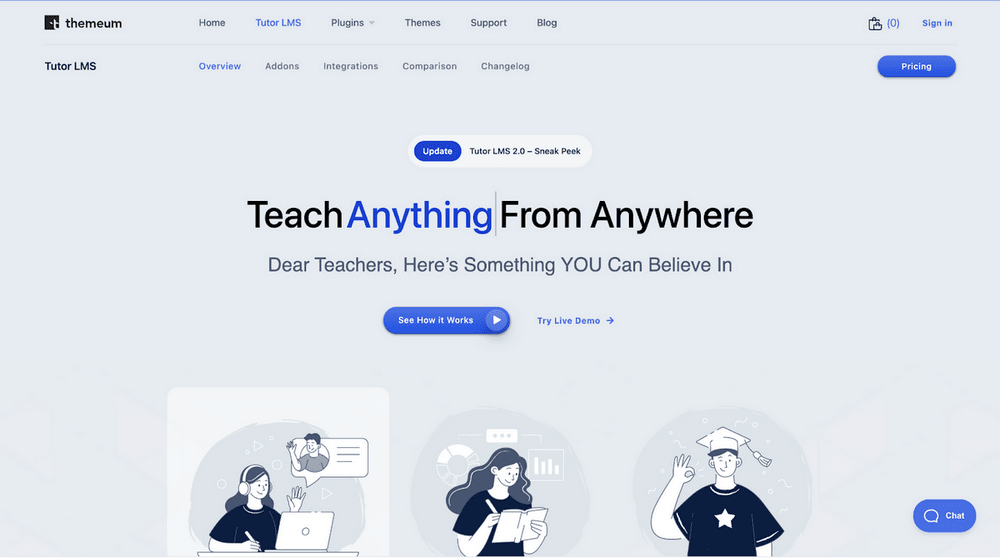
Tutor LMS is trusted by over 40,000+ active users. You can create every aspect of a course with multiple quiz preparation modules and so much more.
The feature-rich course builder was built with non-technical users in mind. Easy to create and deploy and you can add lessons with the click of a button.
Designing LMS Website
Once we have decided on a plugin, we now need to choose a theme for our online course website.
The design needs to attract consumers and help us provide the authority we need to encourage people to sign up for the course.
We understand that not many course creators are tech wizards. Many do not have the time to design a full website. That’s why we can wholeheartedly recommend Astra.

Astra is one of the most popular WordPress themes there is. It has over 1 million downloads and over 5,000 stellar reviews.
It offers an abundance of Starter Templates that work with popular page builders like Elementor and Beaver Builder and fully supports Gutenberg.
Astra makes designing your website a one day task.
Setting up LMS Website With WordPress
We’ll assume you have a web host, domain name and WordPress installed for this guide.
To start off you first need to install Elementor and Astra.
Following that you must download the Tutor LMS plugin from the WordPress plugin store.
The Design Components
As we had previously recommended, we are going to be using Astra as the theme for our site and use their respective Starter Templates.
For this we require two components:
- Astra theme
- Astra Starter Templates plugin
Starting off let us download the Astra theme first.
Navigate to the Appearance tab of WordPress, click on Themes > Add New and search for Astra.
Hit Install then Activate to get Astra.
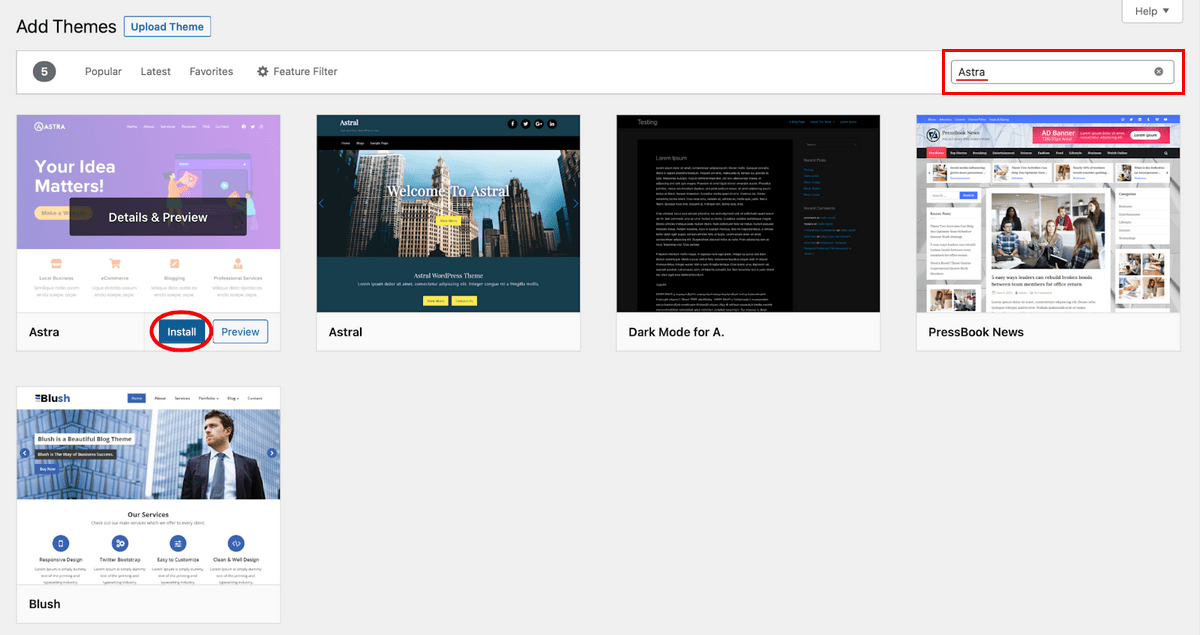
After you activate Astra we have one more small task remaining.
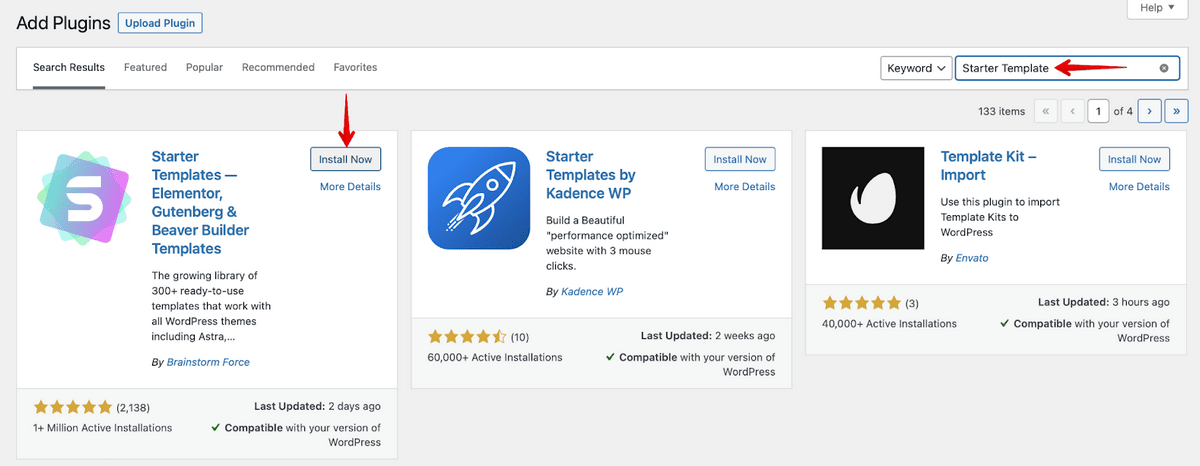
You now need to go to the plugin menu in WordPress and click Add New. From there search for Starter Templates and install and activate the plugin by Brainstorm Force.
This lets us use the wide variety of starter packs Astra offers.
Adding a Starter Template to Your Site
The next task is to import a template to our site. Your WordPress appearance tab will now have 2 new categories available:
- Astra Options
- Starter Templates
If you go to the Starter Template tab, you can find the range of starter sites Astra offers. The free version offers a wide range of site templates and with the Pro version, you have over 180+ templates to choose from.
Let us import one of these templates to see how our site would look.
When you fire up the starter template option from Appearances we are greeted with this screen.
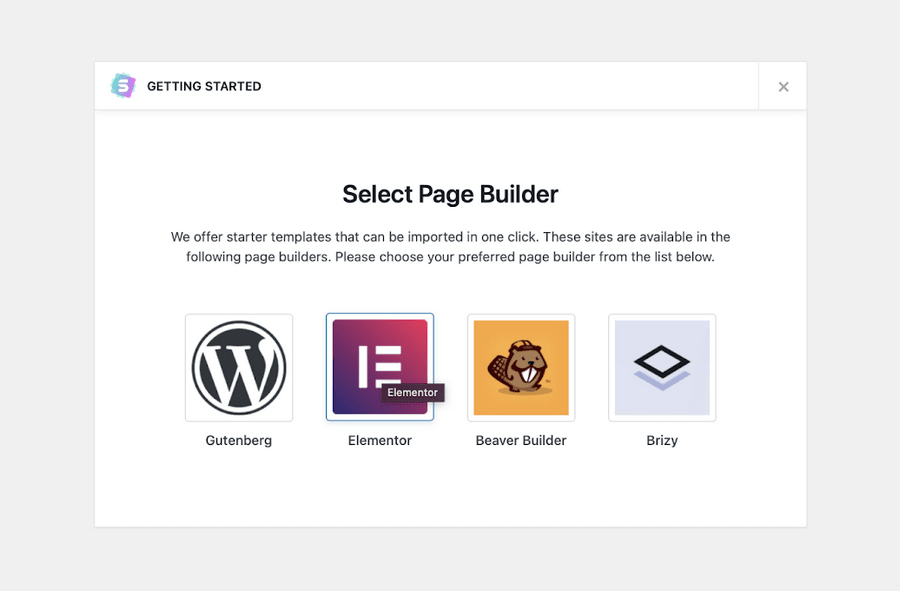
Here we are going to choose the Elementor page builder.
You can now see the starter templates you can import, the premium templates are marked by a premium tag on the top.
You can filter for only the free version templates. We are going to be selecting the Brandstore starter template.
- Select Appearance and Starter Templates from the side menu.
- Select Brandstore from the examples in the centre.
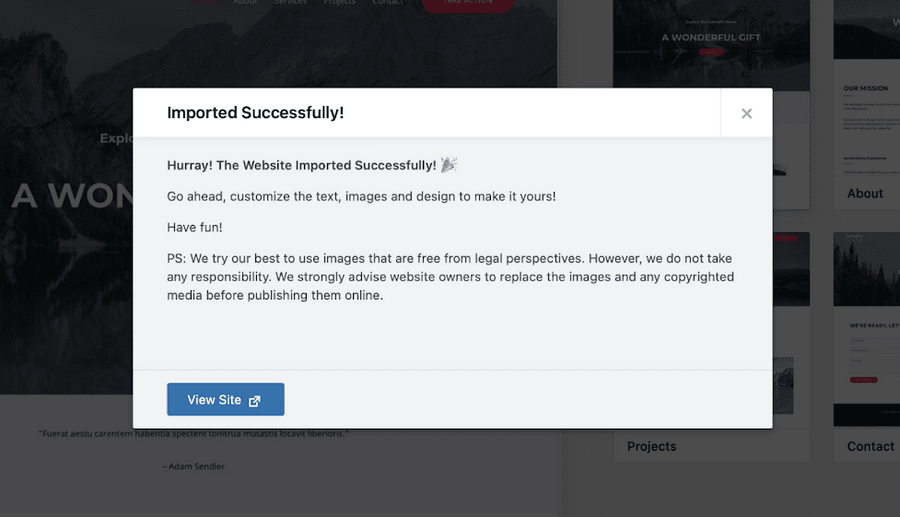
- Select Import Complete Site and allow the process to complete.
Customizing Our Site
Once we have imported the starter template, we can go to our WordPress admin dashboard and customize the site.
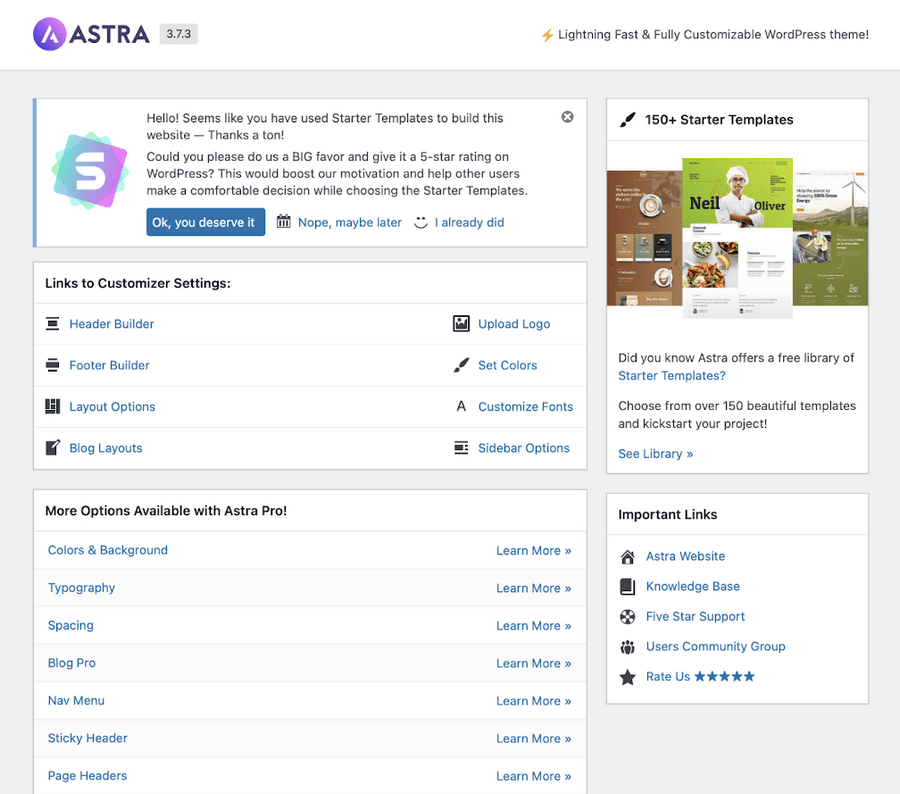
You can customize your website in a couple of ways. You can use the Astra Options panel or edit individual pages.
To use the Astra Options panel:
- Select Appearance and Astra Options from the WordPress dashboard menu
- Select an option from the page and edit accordingly
Using this single page you can edit your header, footer, layout, colors, typography, navigation and every part of your website.
To modify per page:
- Select Pages and All Pages
- Select Edit under the page you want to edit
If you use the Gutenberg block editor, you’ll see the page come up with the blocks all ready to edit.
Since we are using the Elementor page builder, you’ll see an option to Edit with Elementor.
Select that to bring up the Elementor interface where you can make all the changes you like.

There are a ton of customization options accessible from this menu. We can go to the Global option and change the typography, buttons, and much more.
Additionally, we can go to Appearance > Astra Options to upload a logo or customize the fonts we use.
Here we can see many other features that are only offered with the Astra Pro version.
Installing Tutor LMS
We have seen how to add the theme for our site now let us see how to get our LMS plugin up and running.
Navigate to the Plugin menu of WordPress and search for Tutor LMS.
Hit Install Now and Activate it.

Tutor LMS will now be ready to use.
Add a Course With Tutor LMS
With Tutor LMS installed we can go straight to creating a course. The backend admin panel of Tutor LMS lets us configure every detail from one page.
Click on Add New Course from the course page.
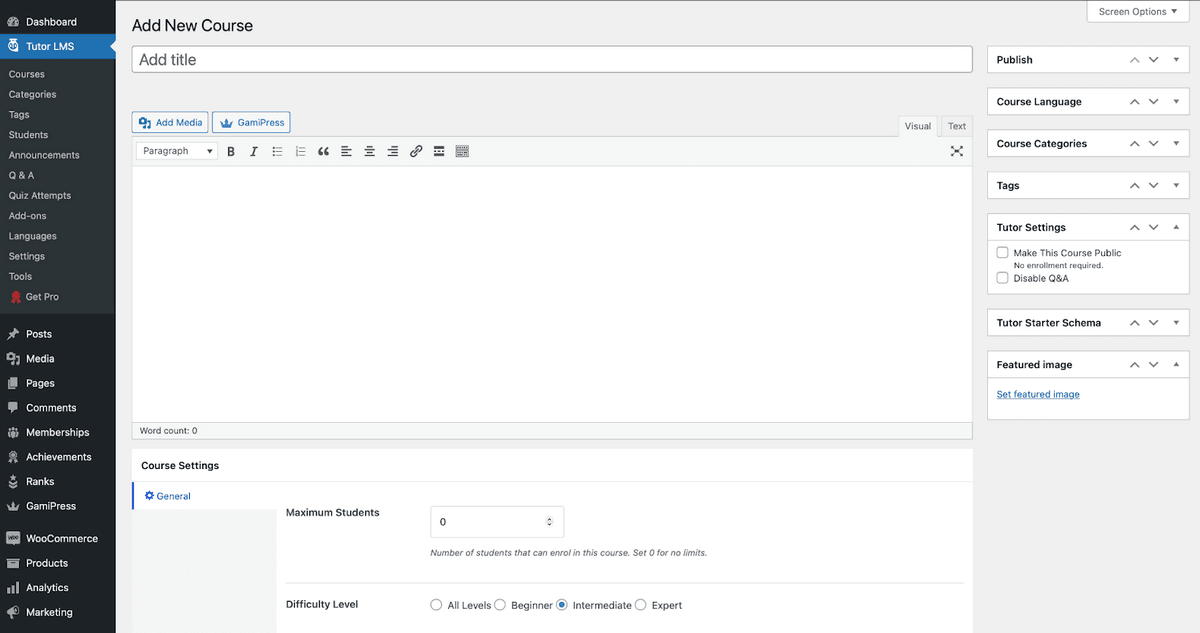
Add a meaningful title for your course and a description so readers will understand what they are signing up for.
You can also set how many students can enroll for the course, and determine a difficulty level for your course content.
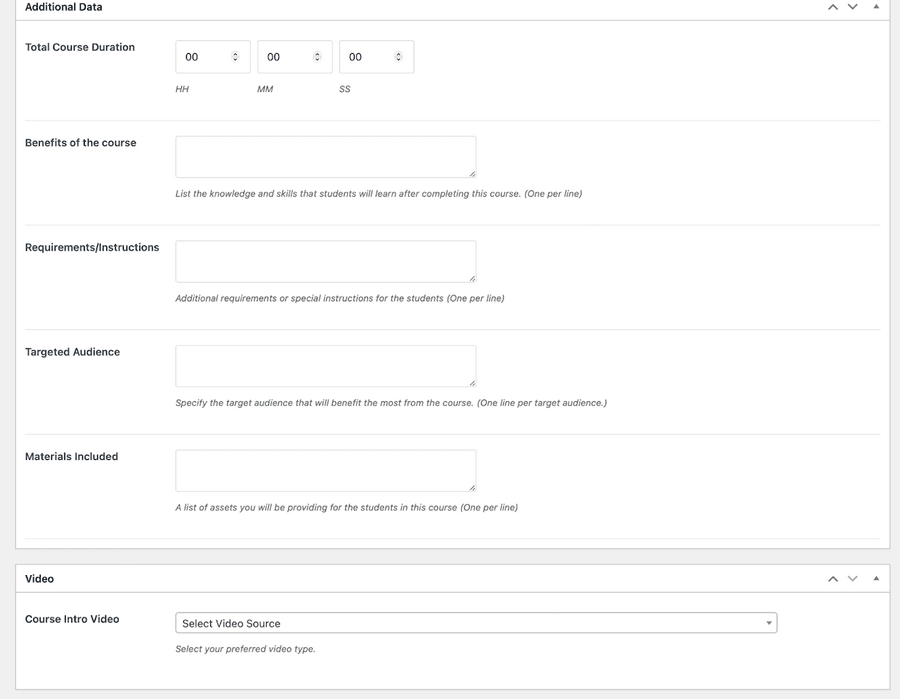
Additional Data for Your New Course
There are a lot of customizable options within Tutor LMS.
There is an intuitive embedded video player which lets you link videos from YouTube and other mediums or upload straight from your device. You can even have a Q&A section with your students where you can interact with them.
How to Create a Quiz for Your Course
Saving the best for last, there is the Quiz Builder. The quiz builder lets us create many types of quizzes for students.
We can have multiple choice or long essay type questions among many others.
We can have multiple choice or long essay type questions among many others. Before assigning long-form tasks, it’s always a good idea to check your essay for plagiarism to ensure originality.
To further help learners strengthen their writing skills, you can also provide them with English Grammar Practice to boost accuracy and confidence.
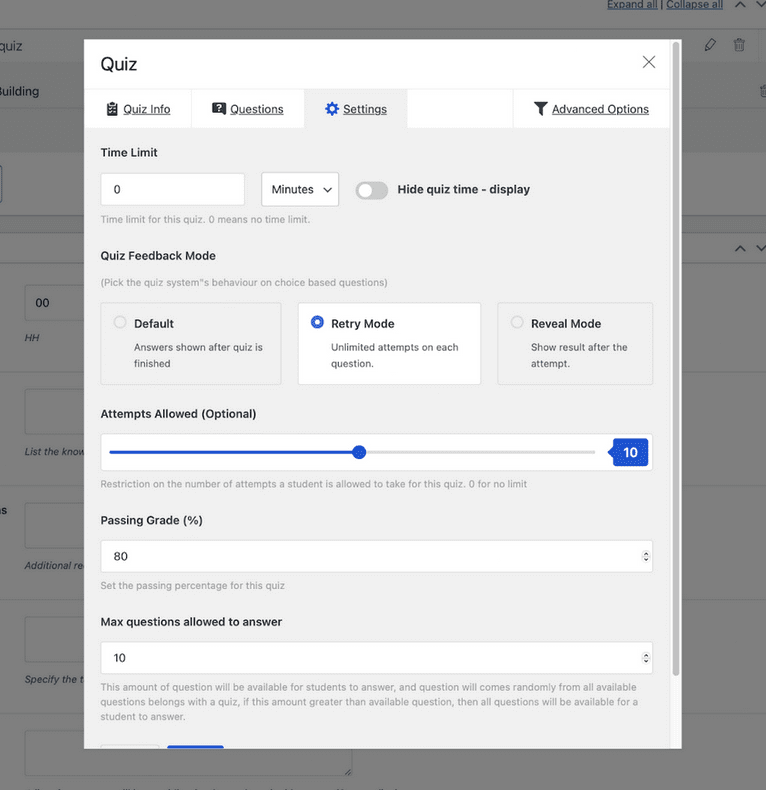
Most notably we can set limits and timers to quizzes with an auto-grading system. Students can take the quizzes at their convenience and the grade is shown automatically.
This is a great time saver for an instructor!
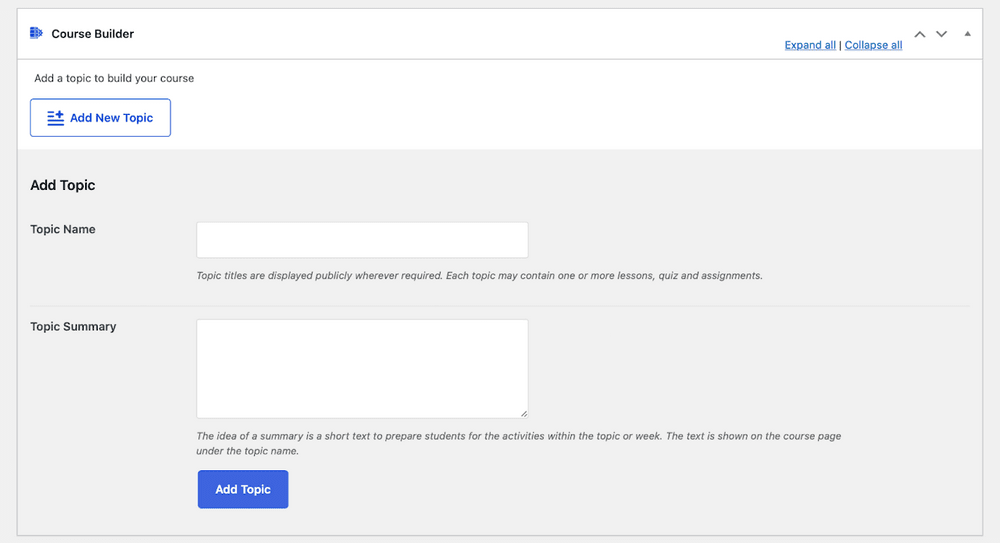
Step 1: Add a New Topic
To start creating a quiz we first need to add a topic.
From the course creation page if we scroll down a bit we can see the Course Builder section.
From there we hit Add New Topic to create a new topic for our course.
Once we have done that we hit Add Topic and we can move on to the next step.
Step 2: Creating a Lesson
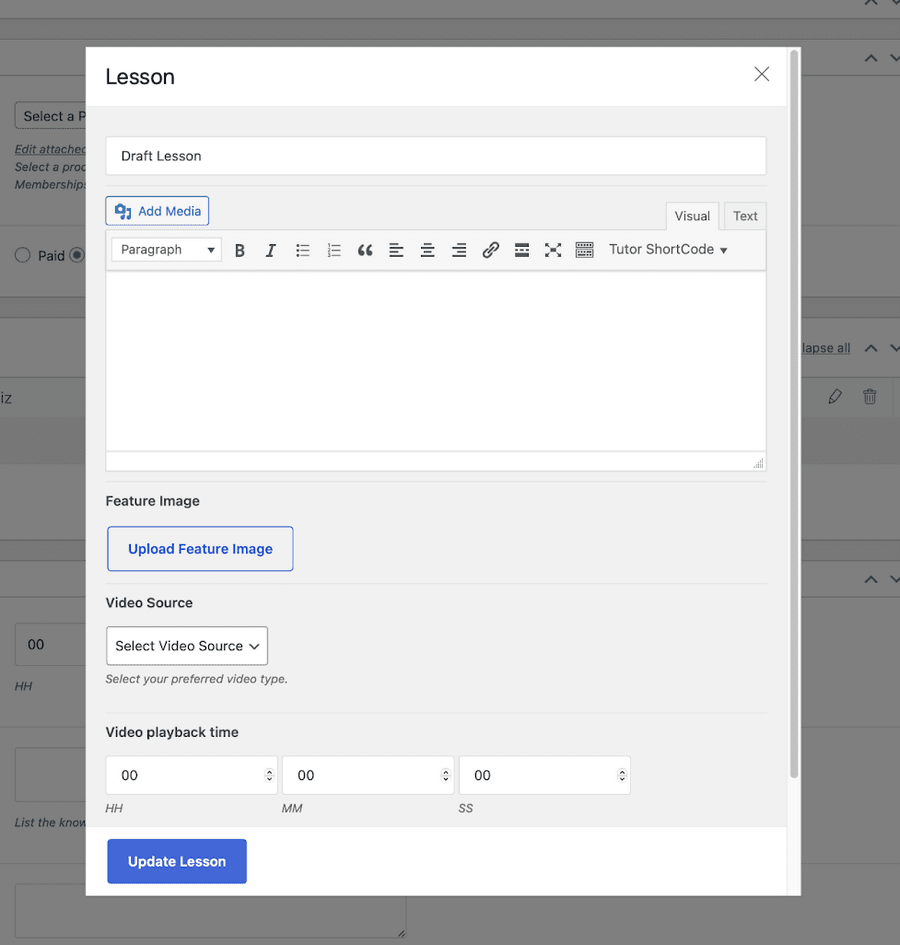
After a topic has been created we can now create a quiz and a lesson.
To create a lesson, click on the topic you have created and you will now see a new Lesson button.
Click on that and you will see a pop-up window where you can add the lesson details. You can configure the lesson with videos if you like.
Step 3: Creating a Quiz
After lesson setup, we finally can now start creating our quiz. We click on the topic we want to add a quiz to followed by a click on the Quiz button.
First, we need to set a name and description (if we like) for our quiz.
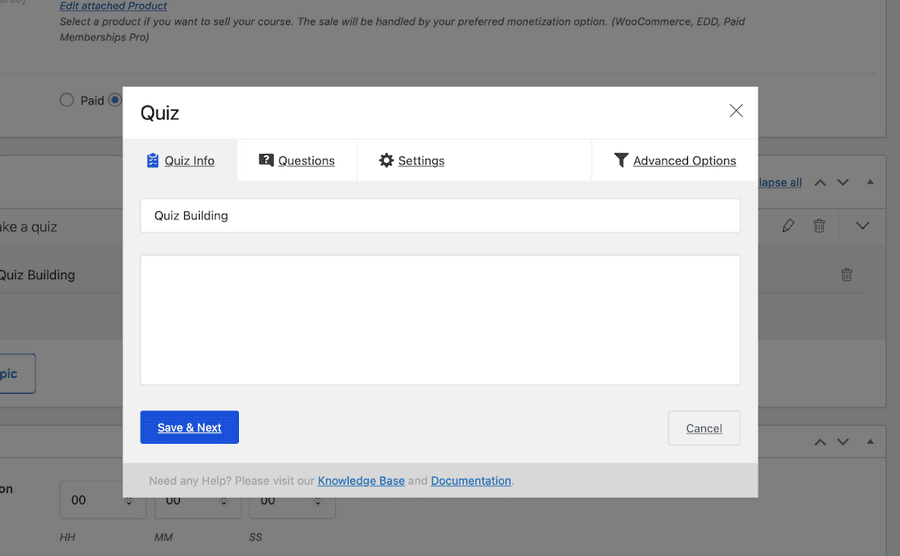
Click Save & Next and we go to the next step.
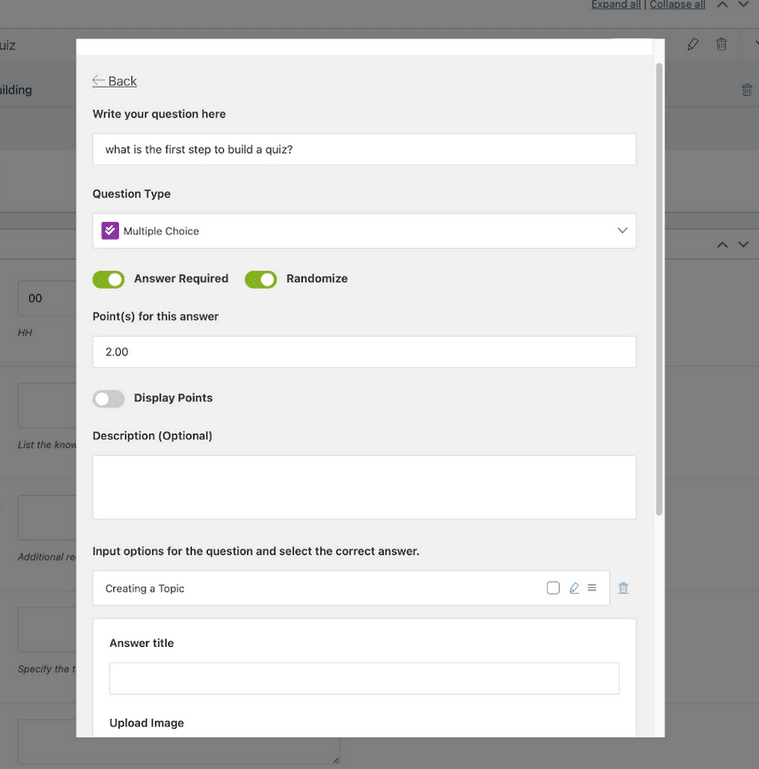
After the initial setup for your quiz, we can then set the questions and grades. You can have different questions with different grade points, depending on the type of question you set.
For multiple-choice questions, there is a nifty Randomize option that jumbles up the choices.
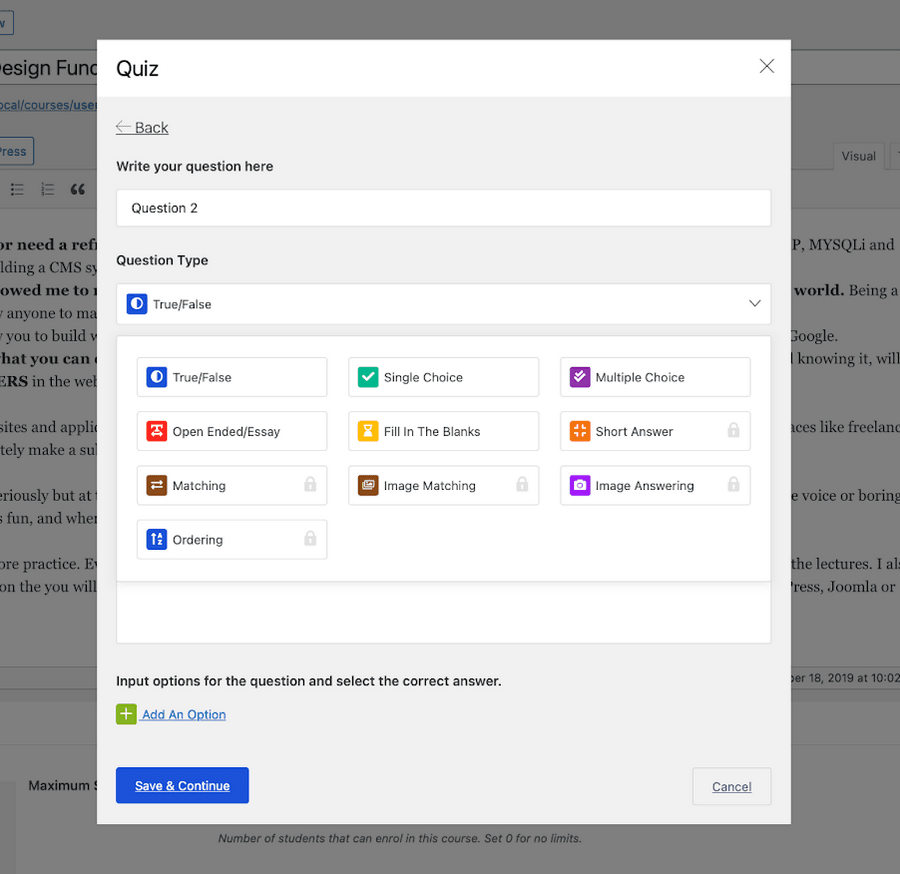
Some quiz types are locked behind the Pro version of Tutor LMS. But the free ones are enough for us to get the job done.
The quiz builder has a lot of other extra settings as well for added customizability. Feel free to have a play around with them until you’re completely happy.
WooCommerce Integration and Monetization
All your hard work won’t come to much if you cannot monetize your courses. Fortunately, Tutor LMS supports full integration with WooCommerce.
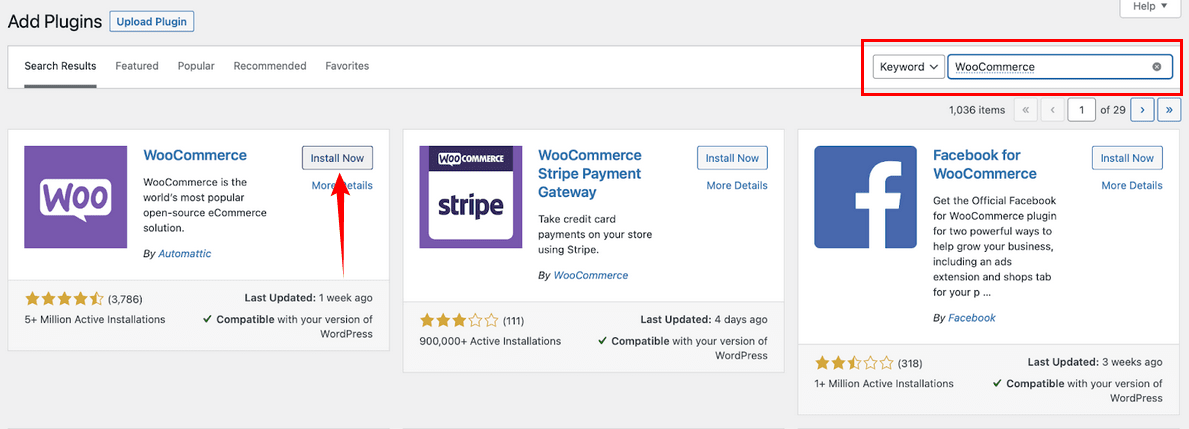
To enable WooCommerce you will of course need to download and activate the plugin from WordPress if you don’t already have it.
Similar to the Tutor LMS plugin installation process, go to the Plugin menu of WordPress admin and search for WooCommerce.
Install and Activate WooCommerce before proceeding.
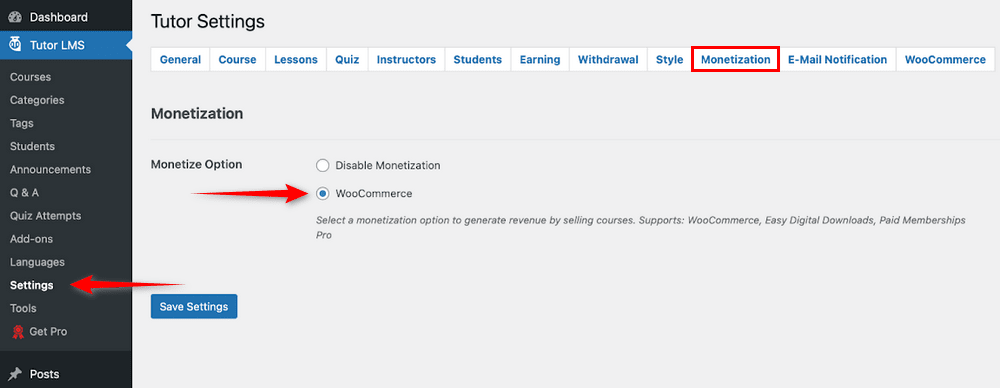
Navigate to Dashboard > Tutor LMS > Settings > Monetization (Tab) > WooCommerce (Enable).
How do we now earn from our courses? We need to have a Product to sell through WooCommerce. And the product then has to be linked to the course we want to sell.
From your WordPress Admin dashboard navigate to the Products tab and click on Add New.
For simplicity, we are going to set the name of the product the same as the course we want to monetize.
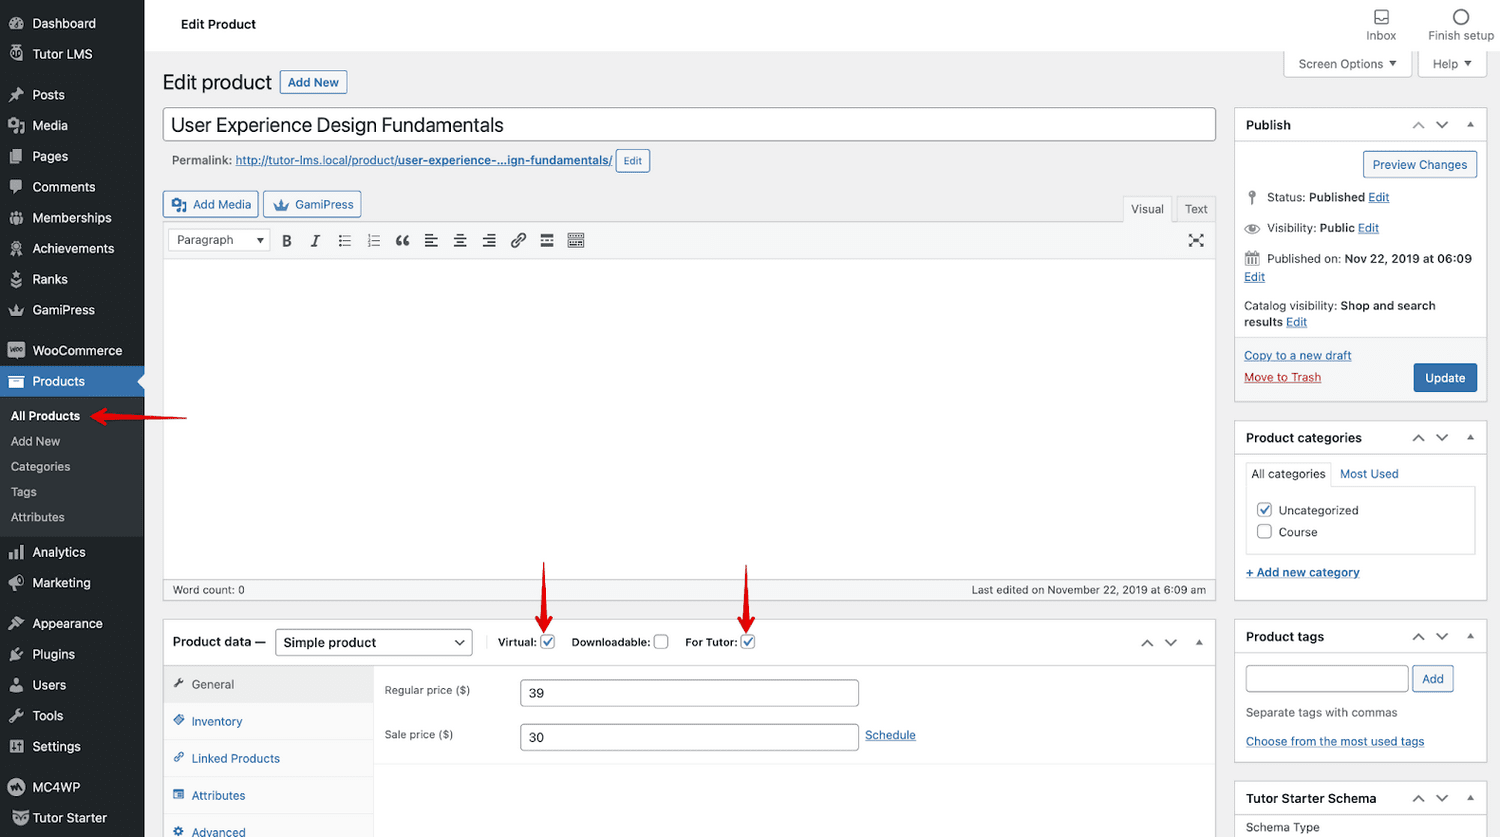
Set the type of product and select the two marked boxes. Finish the process by setting the price for the product. You can opt-in for a sale price as well if you wish.
One last task for us to do now. We need to go to the back end of the Tutor LMS course page and click on Edit Course for the course we want to monetize.
Scroll down and find the Add Product dropdown menu and add the product you just created.
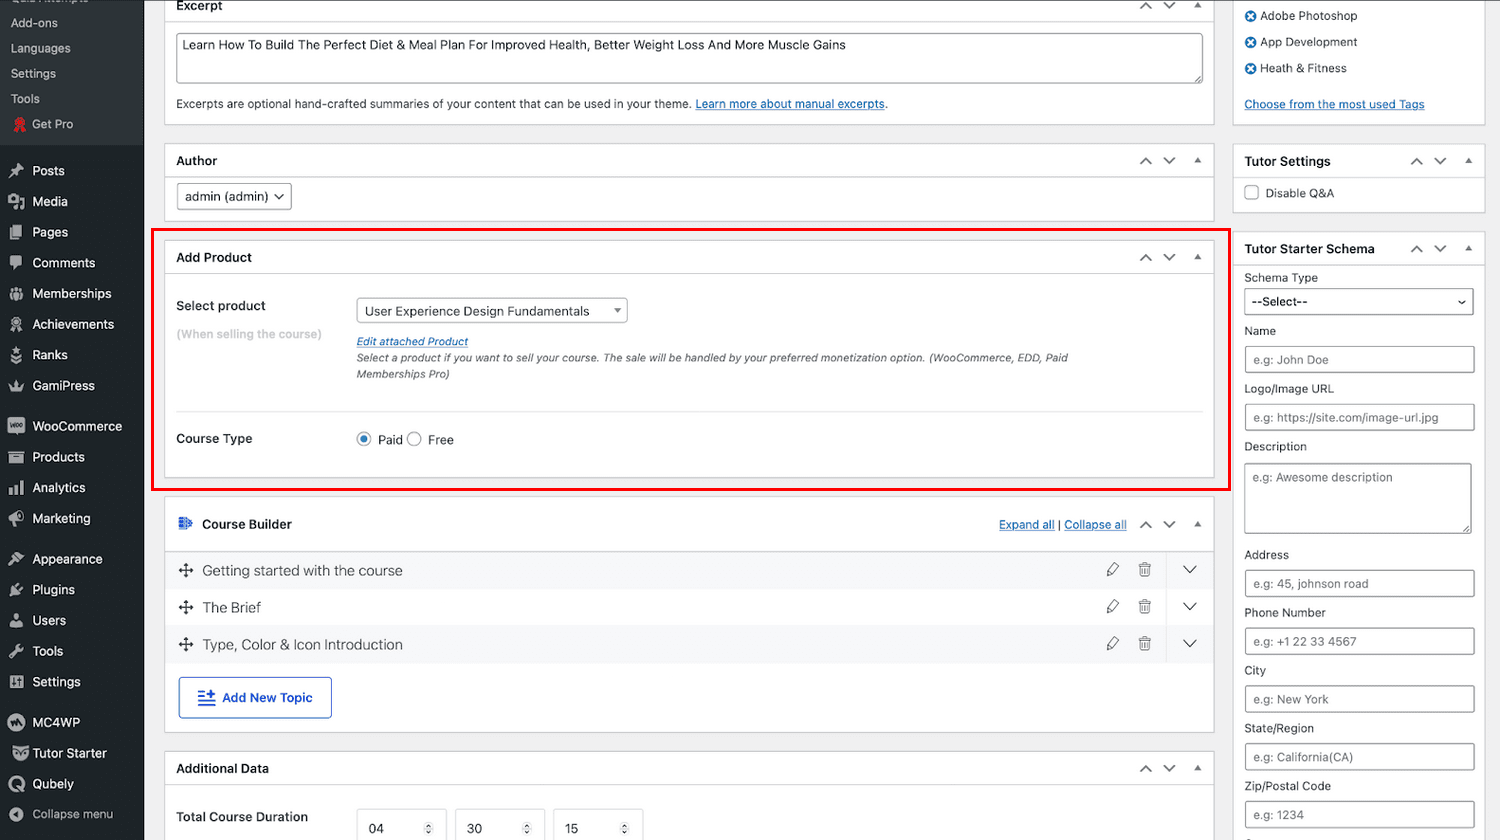
This tags your course with WooCommerce, select Paid in the course type and you can start generating revenue. Students can now purchase this product from your site.
Payment Methods
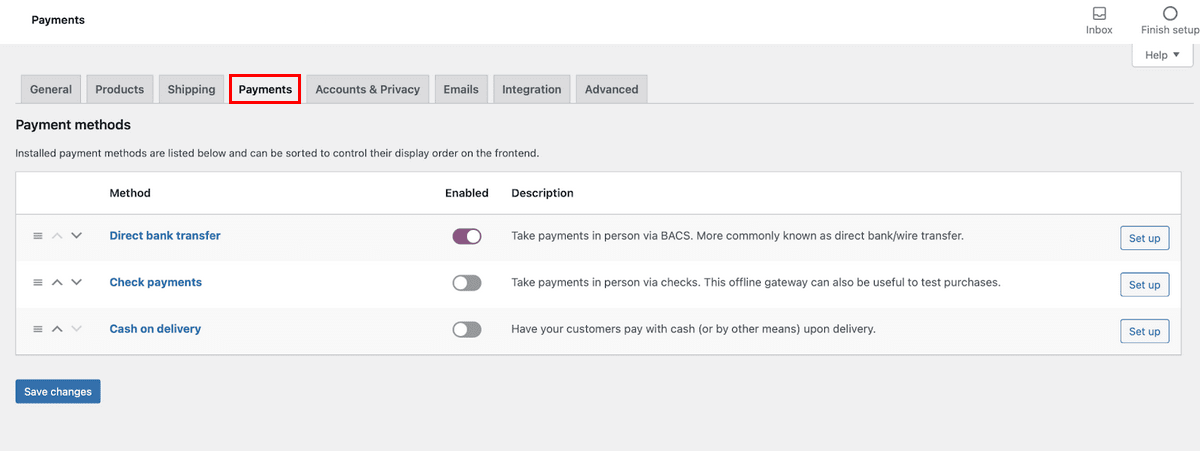
We have monetized our course, but how are we going to accept the money that comes in with every purchase?
For that, we go to WooCommerce settings and navigate to Payments. Here we can see all the different types of payment methods.
For the next course that you want to monetize, just follow these steps to create a product first and then add the product to the course.
One last pointer, and this is only for creators who have multiple instructors on their eLearning site.
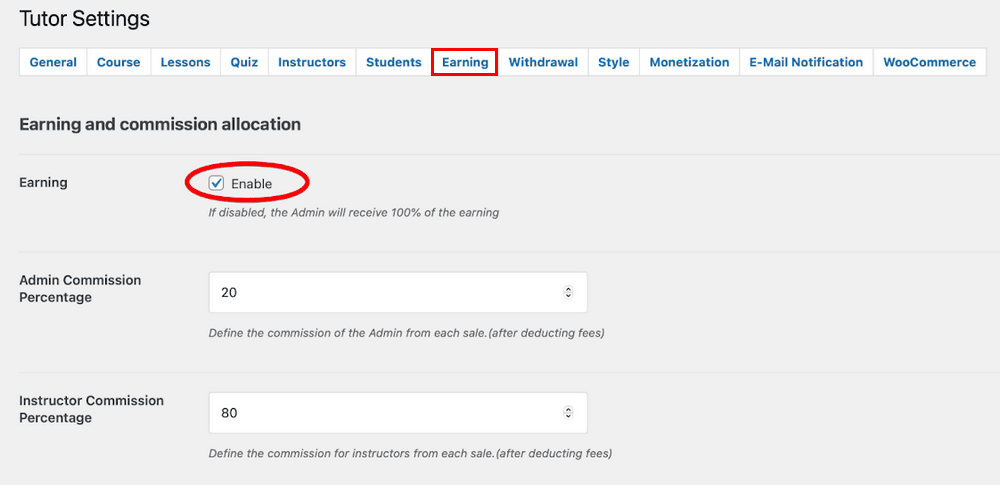
If you want to determine an easy way to share commissions from a sale between multiple instructors, Tutor LMS has you covered.
Just go to Tutor LMS Settings > Earnings and enable earnings.
From this page, you can set the amount of commission you want each instructor to receive.
Final Thoughts
With that, we are finally at the end of our LMS setup journey. Or are we? We have actually completed only one leg of the journey, the second phase is to make sure we can actually make our eLearning site popular and successful.
We need to have marketing plans that can help us reach the maximum potential of our eLearning site. Unfortunately, that’s outside the scope of this article but is something we’ll tackle another time.
You should now have a good idea of how to start building and setting up your eLearning site and customize it.
We have showcased the free versions of both the tools we used. The free versions come with more than enough features to have us up and running.
But there are plenty of features hidden behind the pro versions of both Astra and Tutor LMS. You can look further into the prices of these tools if you want to expand your site further in the future.
As always, be sure to let us know your experience with building an eLearning site and reach out to us if you need any support. Have a good one!


