Building your own website can be fun, easy and save you a lot of money. You’ll also get a real sense of personal achievement and learn a lot of useful skills along the way.
Whether you’re starting a business or upgrading an existing website, this guide will help you every step of the way.
To make sure your time is well spent, we’ll show you the easy way to install WordPress. We’ll then show you how to build your website using the Astra theme and Starter Templates.
You’ll need a domain name and web hosting, so we’ll explain how you can register a domain name and set up a web hosting account at the same time.
We’ll also explain how to set things up if you’re using different companies for hosting and domain name management.
By the end, you’ll know everything you need to know about how to install WordPress and build an incredible website for your business.
Ok, we’ve got lots to cover, so let’s get started!
The all in one domain name and web hosting option
With the all in one web hosting option, you can register a domain name and sign up for web hosting at the same time. This is by far the easiest way to get a website up and running.
If you have a domain name pre-registered with a different company, you can transfer your domain name to your host during the signup process.
To transfer a domain name to a new registrar, you’ll need your domain name’s AUTH code.
This is a code of random letters and numbers that is assigned to a domain name. The code acts like a ‘key’ that authorizes domain name transfers.
You’ll be able to find this within your domain dashboard. Ask their customer support if you’re unsure.
Once the domain name transfer is complete, the hosting company will be both your domain name registrar and your web hosting provider.
Mind you, if you lack experience with the platform, it’s best to partner up with a WordPress agency with a track record of successful projects.
Choosing a web host
Web hosting is a global business. Hosting companies can have their business headquarters in one country, and their data centers located in many other countries.
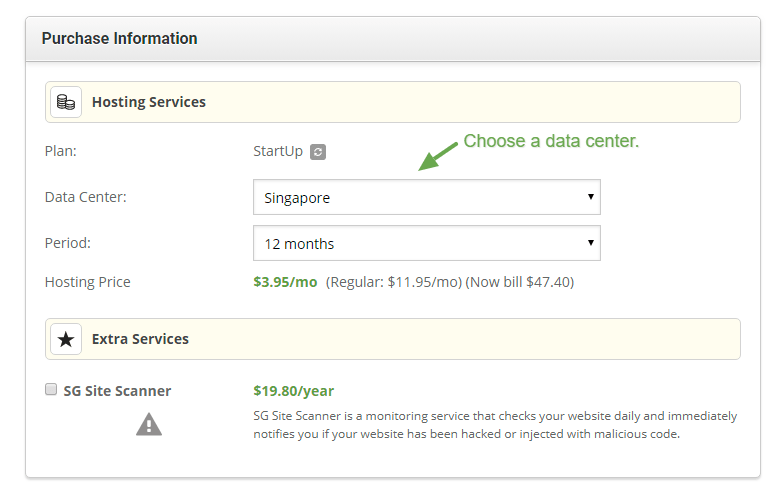
During the web hosting signup process, many companies give you the option to choose the location of your data center.
A data center is where the web servers are physically located. Choose a data center that is closest to your target market, as this can make the website faster for visitors.
Here are three web hosting companies that offer an ‘all in one’ hosting and domain management solution:
Choosing your hosting plan
Most web hosts offer at least three different web hosting plans. As the plans get more expensive, you will get more disk space, data, and features.
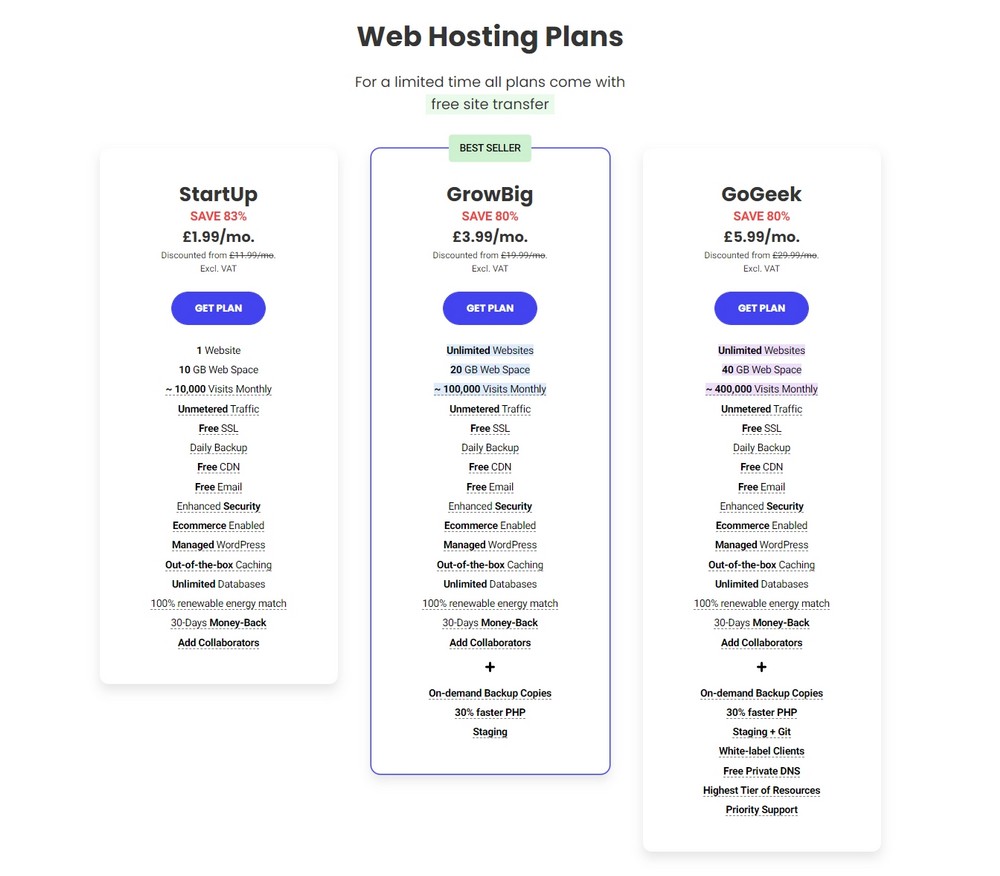
If you have a small business website, most entry-level shared hosting plans will be sufficient. For example, the StartUp plan from SiteGround will suit the needs of most small business websites.
If requirements change, or you want to host multiple websites, you can always upgrade to a larger plan at a later date.
When evaluating a host, always check the fuller explanation of the hosting plan. If you are unsure of anything, ask the online sales support.
If you want to do an automatic installation of WordPress, make sure your preferred hosting company offers a ‘one-click’ WordPress installation service. Most hosts do have this feature but it might pay to double check.
Signing up to a hosting plan
Before committing to a plan, check the price, as you may be offered a discounted price if you pay for a year in advance, with the price going up at the end of this period.
Most hosting companies make it very easy to sign up.
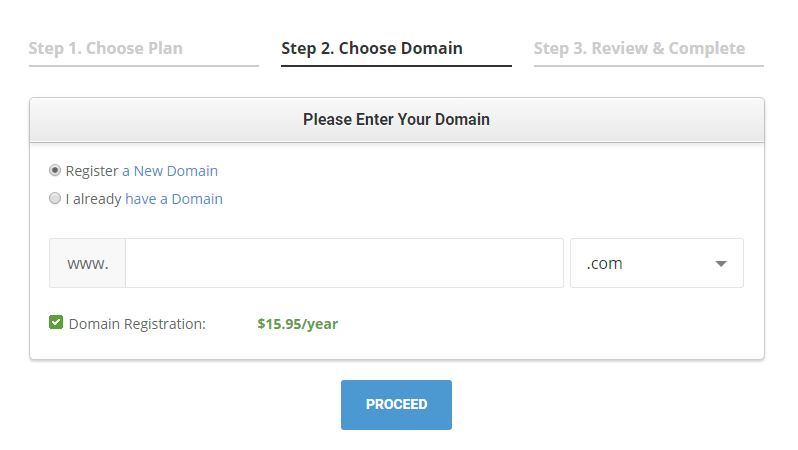
Simply click on the signup button under the plan you’ve chosen. Follow the on-screen instructions, and assign a domain name to the hosting plan.
You can either register a new domain name at this point or transfer your existing domain name.
Once you’ve completed account signup, you’ll receive login details for your account. The login will give you access to your web hosting control panel.
From within your web hosting control panel, there will usually be an option to perform a one-click installation of WordPress.
Where you find the one-click option can differ between web hosting companies. Look for anything that says Apps, Installers, or Software.
Tips for registering your domain name
Choosing the right domain name is much more challenging than the act of registering it. You’ll want a domain name that matches your business name and is easy to type and read online.
If your business operates on a national or local level or within an economic territory, you should consider using your country code (for example, co.uk for businesses located in the United Kingdom, .de for Germany, .es for Spain and so on).
Some territories restrict who can use their country code, so first check that your business is eligible to use it.
There are also the traditional domain name options like .com which anyone can register.
Once you’ve got a shortlist of domain name options, it’s time to find out what’s available.
You can do this by searching for a domain name registrar. If you want a country-specific domain name, you may need to register your domain name with a local registrar.
With most domain registrars, the process is:
- Type in your desired domain name into a search box i.e my-company-name. Be sure not to make any typos.
- Select your domain extension (eg .com, .net, .au).
- Click on the search button.
- The search results will show if the domain name is available and what it will cost to register.
- Select the domain you want to register.
- Doubler check the spelling of your chosen domain name, just in case.
- Create an account with the registrar and pay for the domain name for a set period of time (usually a year or two).
- You’ll be sent login details for your domain name account. The account login will allow you to renew the domain name each year and edit the technical records for your domain name.
To check if your domain name is ‘live’ on the internet, type the domain name into your web browser and press enter.
If the domain name is live, you’ll see a parking page with a message from your domain registrar.
If you don’t see the message right away, continue setting up as it can take a little while for everything to be visible on the web.
Pointing your domain name to your web hosting account
By ‘pointing’ we mean that when you type your domain name into a web browser it goes to your web hosting parking page.
If you registered your domain name with your web host, your domain name will point to your hosting account automatically. If not, check with your hosting company.
If you’ve used separate companies for web hosting and domain name registration, you’ll need to create or change the ‘A’ record for your domain name. The ‘A’ stands for ‘address’ and is part of your domain names’ DNS (domain name system) settings.
To change the ‘A’ record of your domain name, log in to your account with your domain name registrar. Locate the domain name’s zone management settings. This might also be called your DNS settings.
Once you’ve found the zone settings, make the ‘value’ of your domain name’s A record the IP (Internet Protocol) address of your web hosting account.

An IP address is a number separated by dots. You can get the IP address of your hosting account from your hosting company.
Your host will most likely send you the IP address of your web hosting account in their welcome email. The IP address is also often shown within your hosting control panel.
If you want to use the www version of your domain name with your website, you’ll need a CNAME record. Type your domain name into the CNAME box.
In addition to setting up your DNS, If you use your hosting plan to send and receive email, consider setting up DMARC for your email domain to enhance its security and secure it against phishing attempts.
How to install WordPress on web host
Like most things WordPress related, there are often several ways to achieve the same outcome. WordPress installation can be done in two ways, you can install it manually or use a one-click installation tool.
For a relatively stress-free experience, we recommend the one-click WordPress installation option.
If you’d like to try the manual WordPress installation, we’ve included brief instructions, along with a link to the official WordPress installation guide.
If you’d rather have experts handle the setup and customization for you, a professional WordPress development service can handle everything from installation to optimization.
Knowing the manual WordPress installation method is useful if you have to troubleshoot anything later. We appreciate it isn’t for everyone though.
If you’re not keen on the manual installation method, skip to ‘How to Automatically install WordPress’.
Method 1: Manually install WordPress
This is the more technical method of installing WordPress. The following instructions assume that your domain name is pointing to your web hosting account and you have your login details to hand.
To perform a manual WordPress installation:
- Download the WordPress files from the official WordPress download page at https://wordpress.org/download/ (it will be a ZIP file containing folders and files).
- Unzip the file on your computer. Make a note of where you have unzipped the file. If you face any issues, try to re-download the file or use a tool like BetterZip to extract corrupt ZIP file.
- Log in to your web hosting control panel
- Locate the database wizard option
- Create a new database and a database user with ‘all privileges’
- Copy the name of the database, the name of the user, and the users’ password into a text file, as you will need to copy and paste these details later
- Locate the unzipped WordPress file on your computer and open it
- Rename the file wp-config-sample.php to wp-config.php
- Open the wp-config.php file in a text editor like Notepad
- Find the MySQL settings within the wp-config.php file
- Enter the database name, username and password, and hostname you entered earlier. The hostname will usually be ‘localhost’
- Save the changes
- Using an FTP program, connect to your web hosting account
- Upload all of the WordPress files from your computer to your web server’s www or public_html folder
- Type your domain name into a web browser and press Enter
You’ll now see the screen below where you can pick your installation language
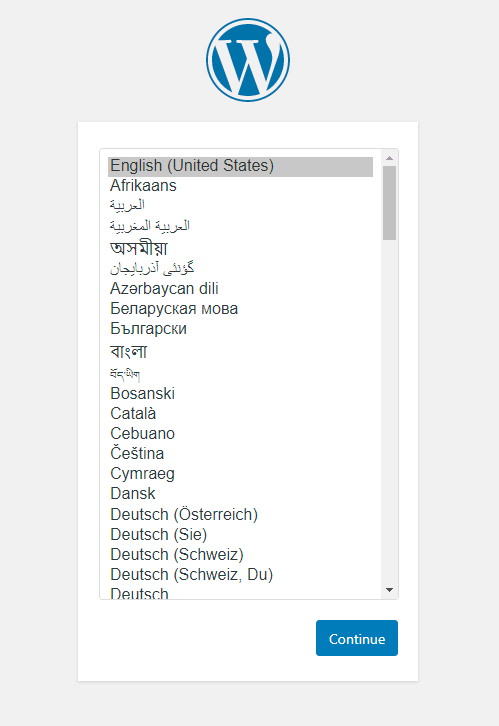
Welcome screen – next you’ll see the screen below. This is the ‘famous five-minute WordPress installation.
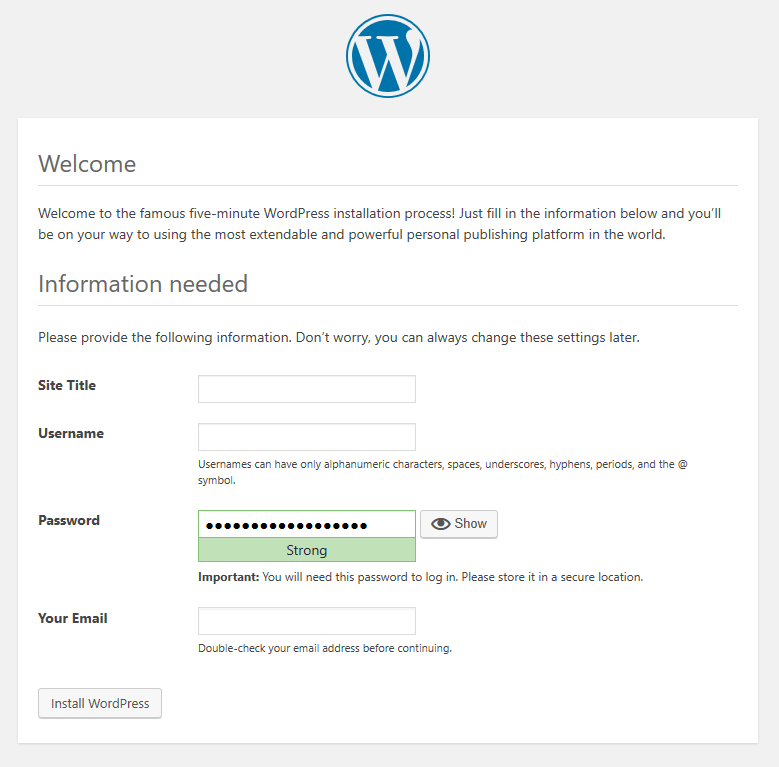
The site title is the name of your website. Enter a username for your login (don’t use admin), and use a strong password. Add your email address and double check it is correct.
Copy and save your WordPress username and password somewhere safe like a password manager.
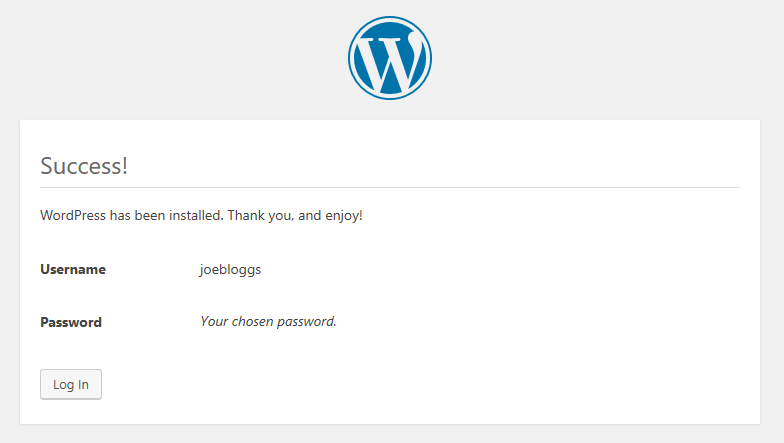
Click on the Install WordPress button. WordPress will now be installed and you should see the following screen:
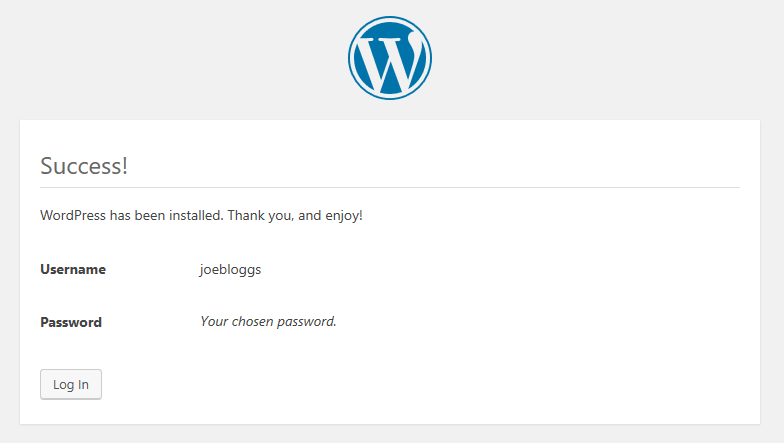
Click on the Log In button to log in to your website admin dashboard
Your login URL will be www.yourwebsite.com/wp-admin but this button will take you to your dashboard this time.
For detailed WordPress instructions, you can also visit https://wordpress.org/support/article/how-to-install-wordpress/.
The official WordPress installation guide includes troubleshooting common installation problems.
Most installation issues are caused by a database connection issue or missing WordPress files.
If you have a database connection problem, go back and check your database name, username, password, and hostname.
Method 2: Automatically install WordPress
Automatically installing WordPress is also called the ‘one-click’ WordPress install. There’s a little bit more to it than one click, but it’s still quite easy.
You’ll need your web hosting login details, so you can access your web hosting control panel.
Web hosting control panels include Plesk or cPanel, although some hosting companies create their own.
To automatically install WordPress:
Log in to your web hosting control panel
Find the apps auto-installer – This is often called Softaculous. You may have something similar with a different name

Click on the WordPress logo. You’ll be redirected to a screen like the one below. It will list information about the WordPress version you’ll be installing.
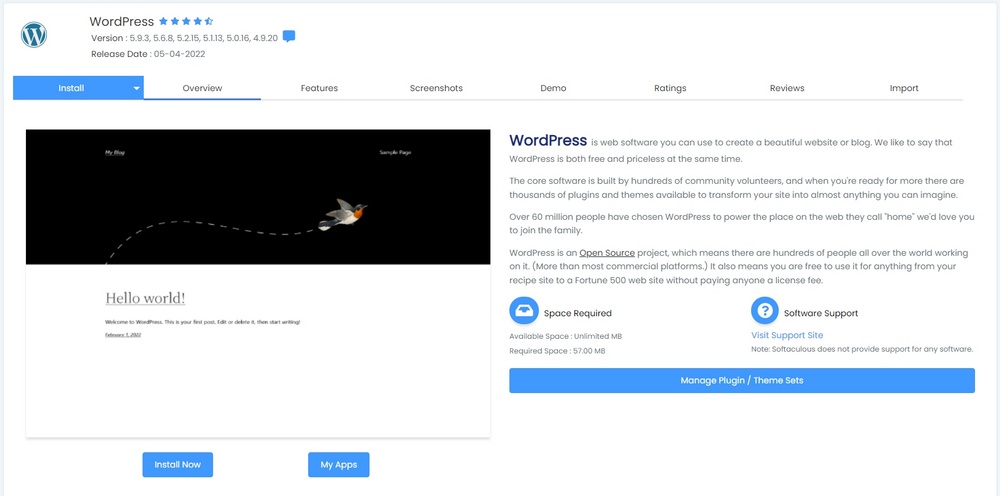
Click on the Install Now button
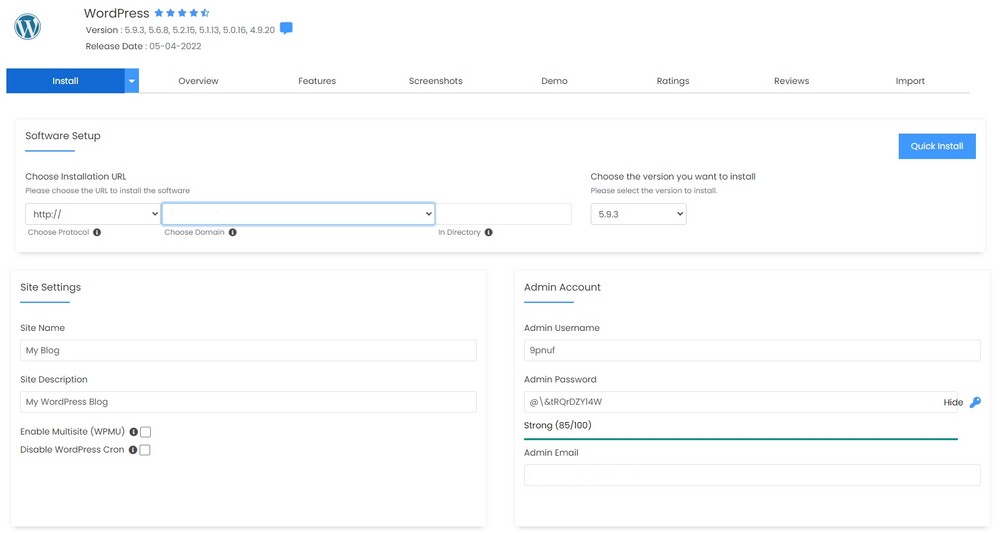
- Choose the WordPress version – This will default to the latest version of WordPress, which is the one you want
- Choose Protocol (the installation URL) – If you have a secure certificate installed choose the https:// protocol
- Choose domain – Your options here will be the www or non-www versions of your domain
- Choose a directory for the installation – Leave this box blank as you ideally want WordPress installed to http://www.yourwebsite.com and not a sub-directory
Site settings:

- Site Name – This will generally be the name of your business. This can be changed later
- Site description – This can be a keyword that describes your business. It can also be changed later
- Multisite – Keep the multisite option unchecked
Account Admin – The admin account is your WordPress login, so you want to keep a record of the username and password in a safe place

- Admin Username – Enter a username for your account. Don’t use admin for your username as it makes your site less secure
- Admin Password – Enter a strong password into the box or use the password generator by clicking on the key icon
- Admin Email – Enter your email address. This is the address that will get all of the WordPress notifications. It is also the email address that will get a password reset notification if you forget your password and request a new one
- Choose Language – WordPress can be set up for different languages. The default language is English
- Select Plugin Sets – This is an optional step that enables you to install a series of plugins alongside WordPress. You can also do this later
- Advanced Options – This section contains optional extras around security and updates. If you are not sure, you can safely skip them and use the defaults
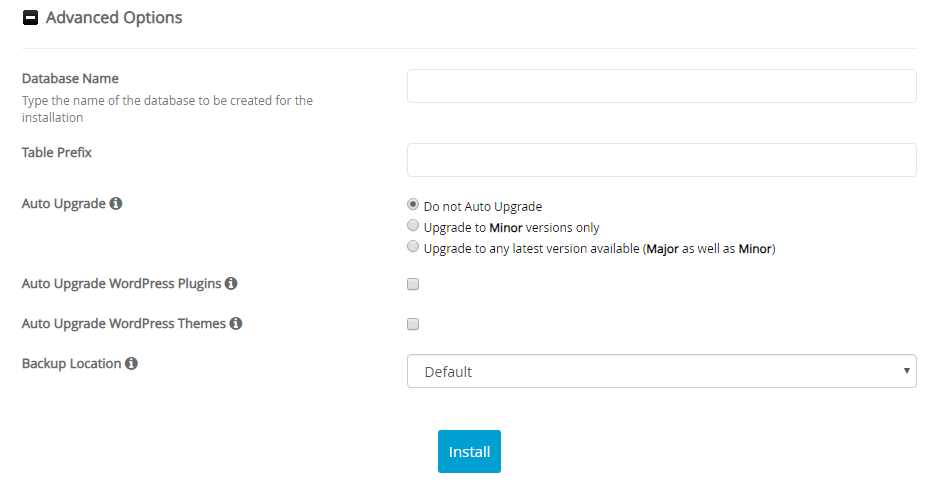
If you do decide to complete this section, here’s what you need to know:
- Database name – Allows you to overwrite the default database name. This can help with security. You can also leave this blank to use the default
- Table prefix – You can change the prefix used for your database tables. This can also help with security. You can also leave this blank
- Auto upgrade – Whether WordPress should update itself automatically. The upgrade options are:
- Do not Auto Upgrade – You will have to log in and update WordPress whenever there is a minor or major update
- Upgrade to Minor versions only – This will auto-update WordPress versions that are between major updates. Minor updates are often released to fix security issues
- Upgrade to Major as well as Minor versions – This means WordPress will be automatically upgraded when major and minor updates are available
- Auto Upgrade Plugins – If ticked, your plugins will automatically update when new versions are available. This can improve the security of your website. Plugin updates can sometimes break a website, so it can be good to manage these carefully
- Auto Update themes – The WordPress themes will automatically update when new versions are available
- Email installation details to – Enter your email address
- Install– click the install button – This will start the WordPress install process
Congratulations, you did it. WordPress has now been fully configured!
What your website visitors will see
Anyone visiting your website address immediately after your WordPress installation will see Hello World.
This is a dummy blog post shown on the homepage of your website.

The default WordPress theme will also be active. It’s looking fairly basic right now, so we need to replace this blog post with a nice ‘coming soon’ page.
Creating a coming soon page in WordPress
Your WordPress website is now live on the web for anyone to see.
You may want to change the main page from the default ‘Hello World’ blog post to what is called a ‘coming soon’ page.
The coming soon page hides the rest of the website from public view so you can build your website in private. It also tells visitors what’s going on and when to expect a working website.
You can add your logo design and a welcome message to the coming soon page.
To set up a coming soon page:
- Log into WordPress at www.yourwebsite.com/wp-admin
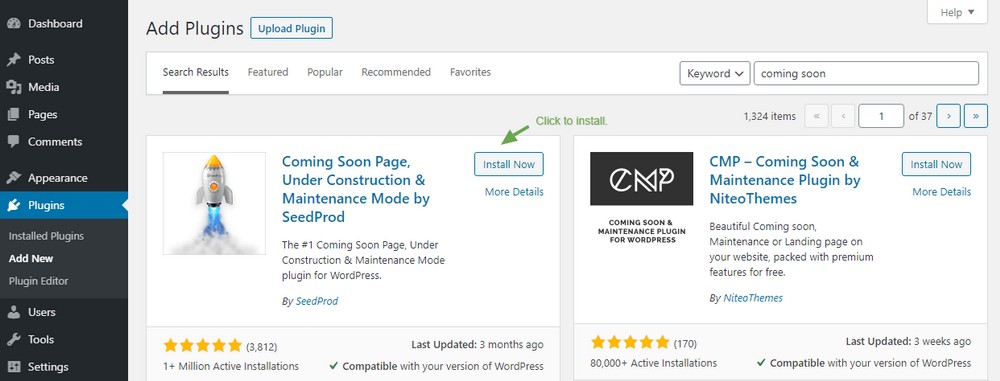
- From the left menu, choose Plugins > Add New
- Type ‘coming soon’ into the keyword box
- Locate the Coming Soon Page plugin by SeedProd
- Click the Install Now button
- Click the Activate button
The SeedProd plugin will now be installed and active on your site.
Coming soon page options
Now we need to work through the tabs so visitors to your website get a nice welcome message.
Each tab will give you different options. Unless you have the pro version of the plugin, you won’t be able to set up the Subscribers tab.
Visit the SeedProd website to learn more about the additional pro features.

Content > General
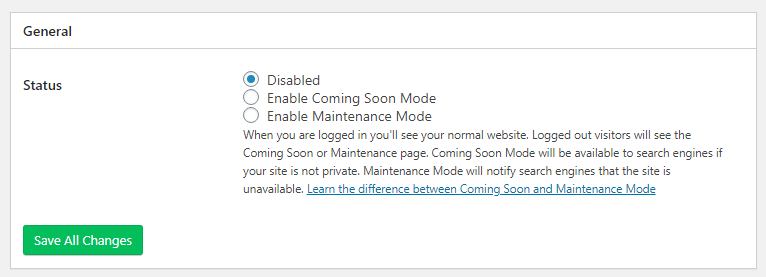
- Status – change the status from ‘Disabled’ to ‘Enable Coming Soon Mode’.
- Click Save All Changes.
The coming soon page will now be the public page of your website.
Next, we’ll add a logo and your welcome text. We do this from the Page Settings section found at Content > Page Settings.
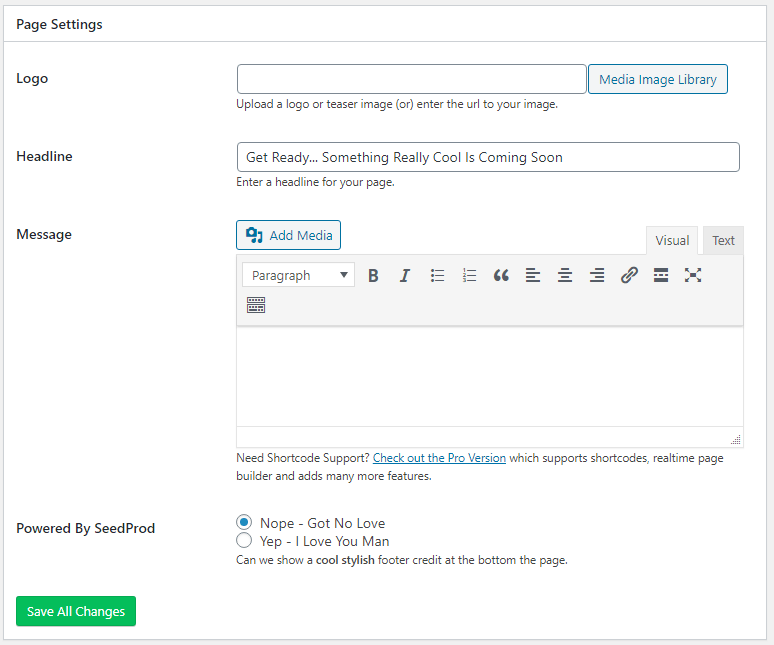
- Logo – Upload your logo or another image
- Headline – The main heading on the page
- Message – Your welcome text shown under the heading
Content > Header
From the Header tab, you can set up search engine optimization of the coming soon page. You can also add a Favicon and the Google Analytics tracking code.
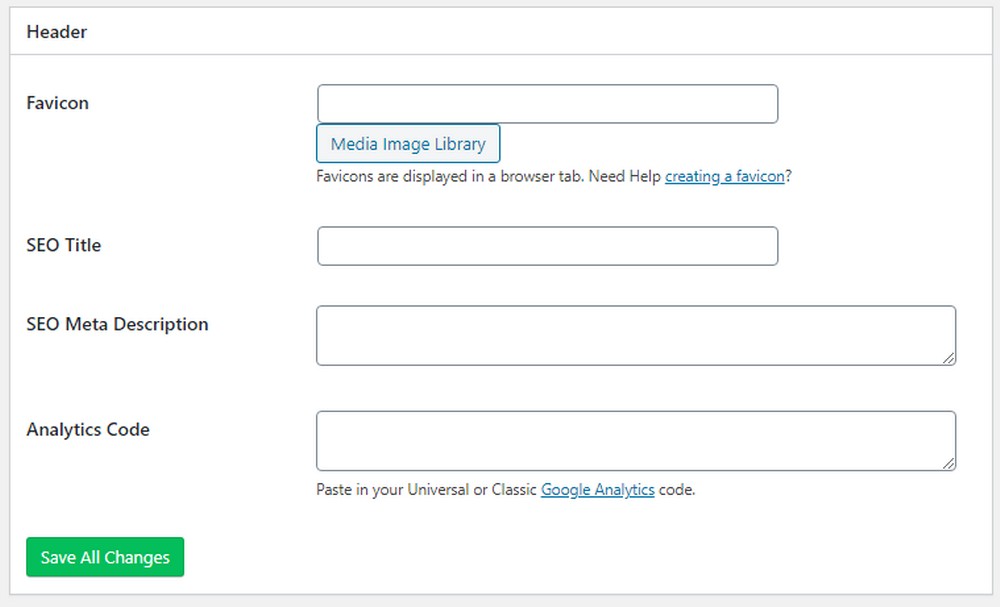
- Favicon – A graphic that shows within the browser location bar
- SEO Title – Adds an SEO title tag for the search engines. Use a keyword phrase to describe your business along with your business name
- SEO Meta Description – Write a short paragraph that describes your business
- Google Analytics – Add your tracking code if you want to track visitors
Design tab
The design tab controls the look of the coming soon page.
Your coming soon page can have a background color or you can upload an image for the background. If you use a background image, it should be at least 1920px wide, as it needs to cover the full width of a desktop screen.
If you choose a dark background image, go to the Text options and set the text, headline and link colors to white.
Click on the Live Preview tab to see how the coming page looks.
Now that you have a nice coming soon page set up, we can move to the next step of installing a WordPress theme!
How to install WordPress theme
When it comes to WordPress themes you’ve got a lot of choices. There are thousands of free themes you can install from the Appearance > Themes section of WordPress.
You can also buy premium WordPress themes directly from a theme developer. Premium themes are usually supplied as a ZIP file that you upload to your themes section.
When you installed WordPress (either automatically or manually) the default WordPress theme was also installed and activated on your website.
The default WordPress theme is named after the year it was released. So if you are doing this work in 2026, the Twenty Twenty Two theme will be the active theme.
To install any free WordPress theme:
Click on Appearance > Themes > Add New
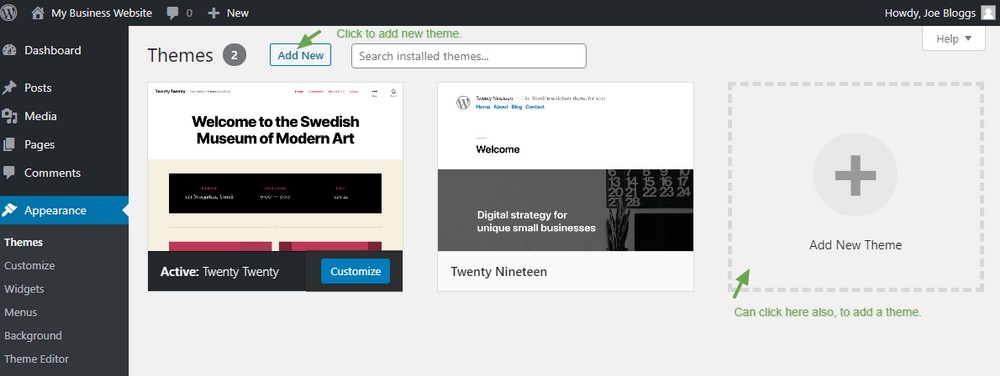
Next, you will see a screen with theme options
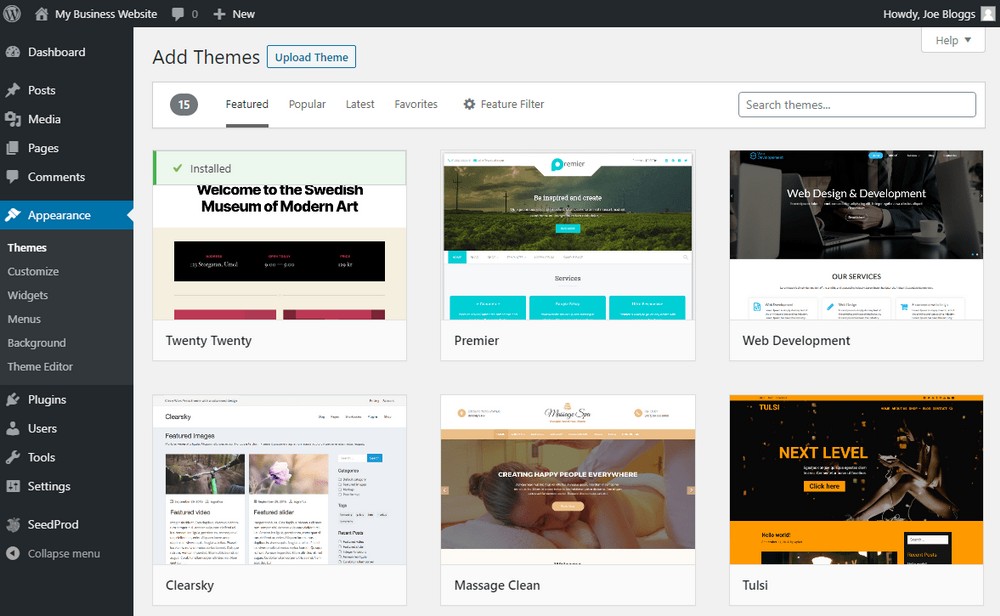
Hover over each theme thumbnail and click on the preview button to view how it will look on your site
Click on the Install button to install the theme
Click on the Activate button to activate the theme
That theme will now control the look of your website
To keep things nice and easy, we recommend installing the Astra theme.
Astra has professional page templates you can import into your website. The templates can create the entire look for your website and get you online quickly.
Installing the Astra WordPress theme
- Go to Appearance > Themes
- Click the Add New button.
- Within the Search themes box, type in the word Astra.
- The Astra theme thumbnail image will be displayed
- Click on the Install button and the theme will be installed
- Click on Activate to make the Astra theme active
- You will now see the Themes with a message thanking you for installing Astra
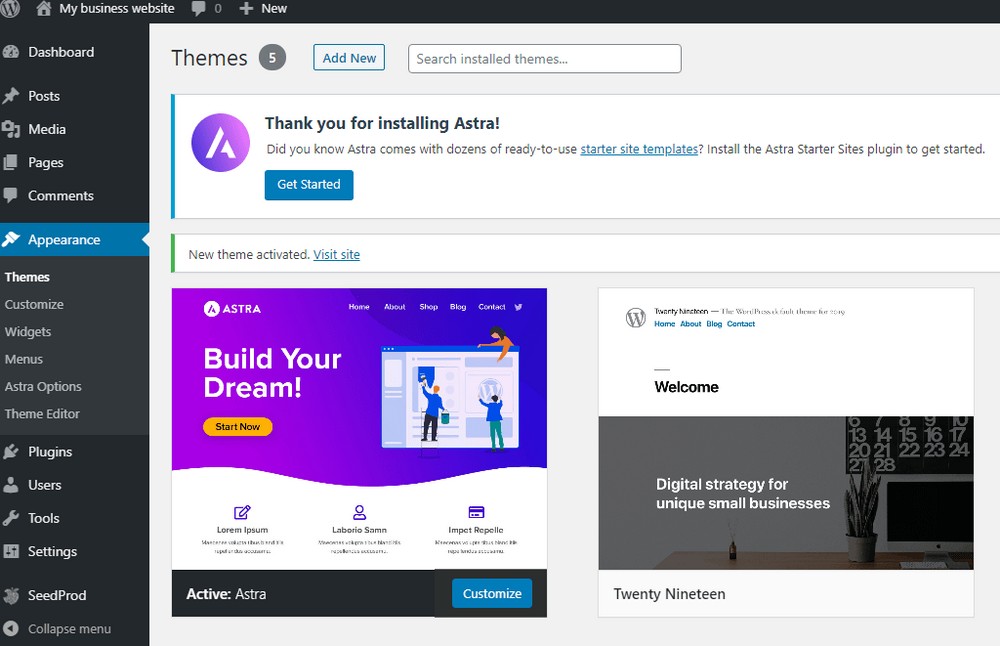
Next, we’re going to install the Astra Starter Sites plugin, so you can import ready-made website templates.
Creating business website with WordPress
Fast track your website build by using professionally designed page templates from Astra. The Astra templates are compatible with the leading page builder plugins.
When you install an Astra Starter Templates, it will also;
- Automatically import any additional plugins the page templates need.
- Automatically create multiple pages with dummy text and images you can change.
- And, if you’ve previously imported a Starter Template, you can delete it when you import a new one.
To import the starter Template, we first need to install the Starter Templates Plugin.
From the Plugins section, click add new and search for Starter Templates.
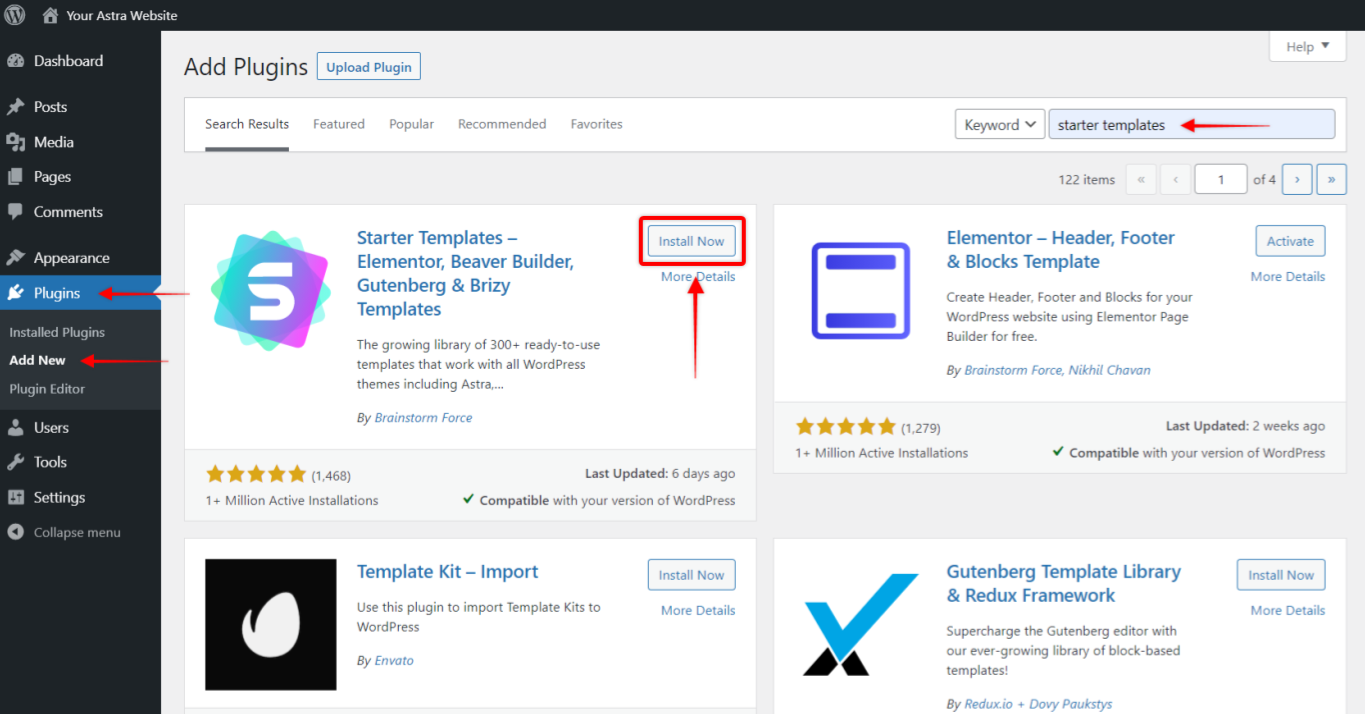
Click install now and activate the plugin.
You’ll see a welcome screen with the page builder select option. A page builder allows you to drag and drop content blocks or modules onto a web page.
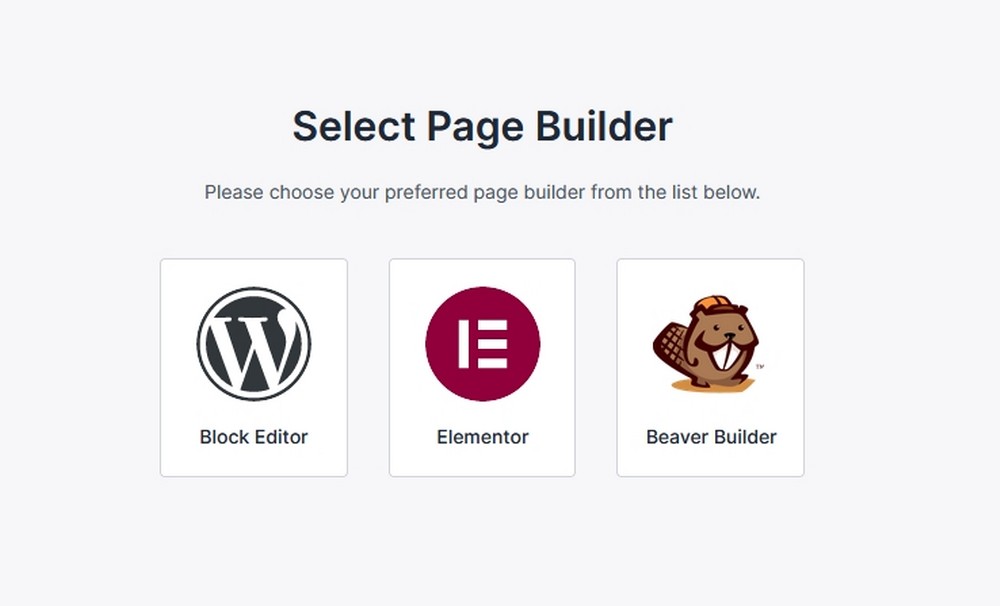
Choose your preferred page builder. If you select Elementor or Beaver Builder, the free version of the plugin will be installed. Elementor and Beaver Builder also have paid plugin versions you can upgrade to later, but it’s entirely optional.
You’ll now be taken to the template screen. If you have an agency license, you can install an Agency template. Otherwise, you’ll need to use the free ones
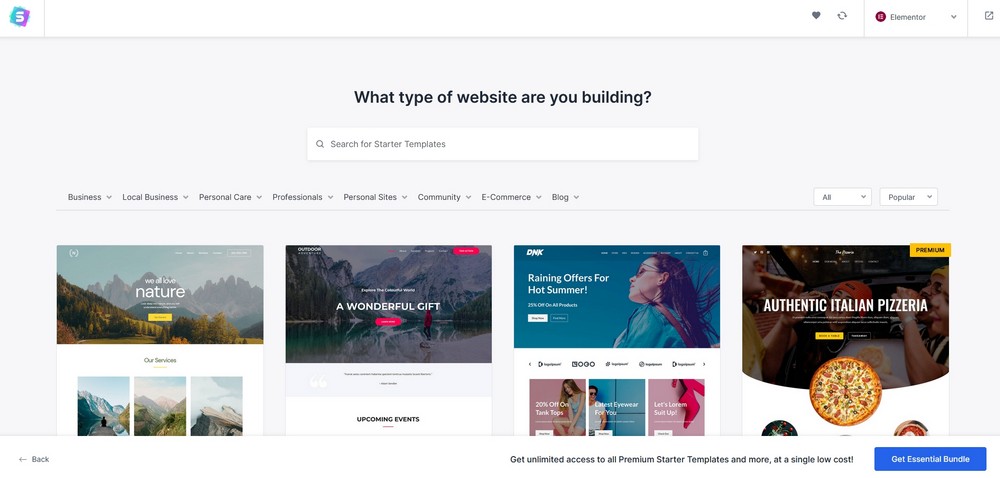
Hover over each thumbnail to get a scrolling view of what it looks like. Or click on the Preview button
Once you’ve found one you like, click on the thumbnail
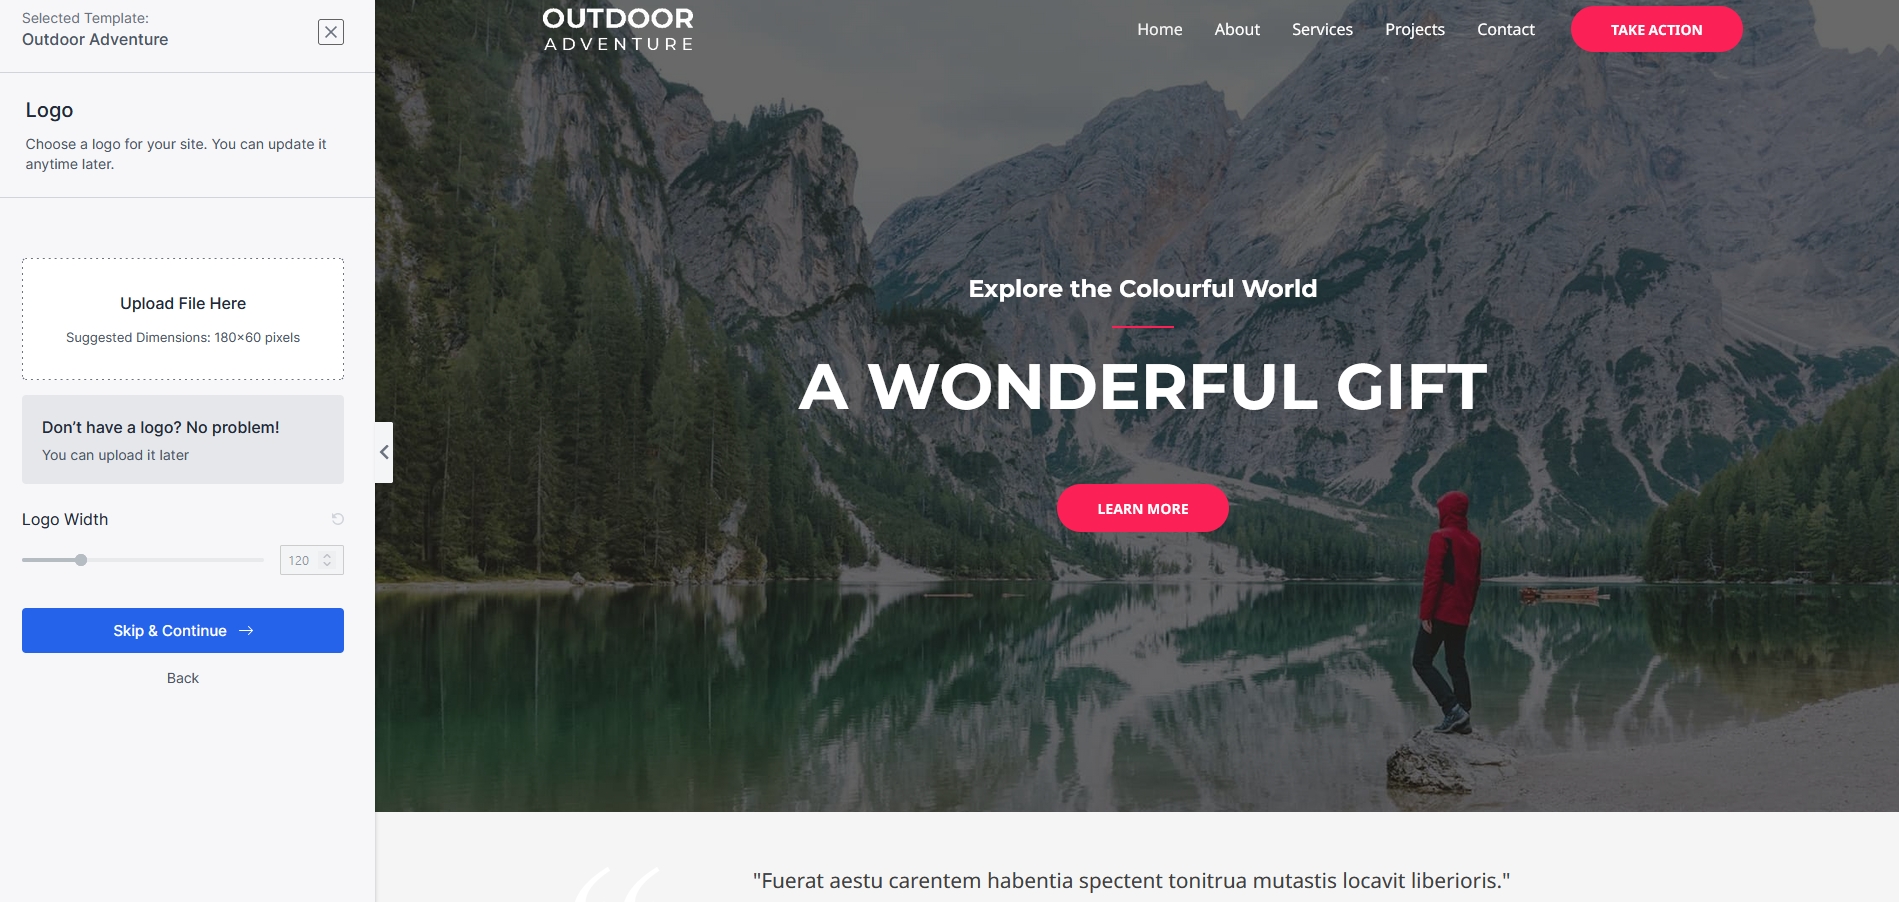
Choose a logo on the next page or use the blue Skip & Continue button
Select the default color and fonts for your site then select the blue Continue button
Enter some details into the next screen then select Submit & Build My Website
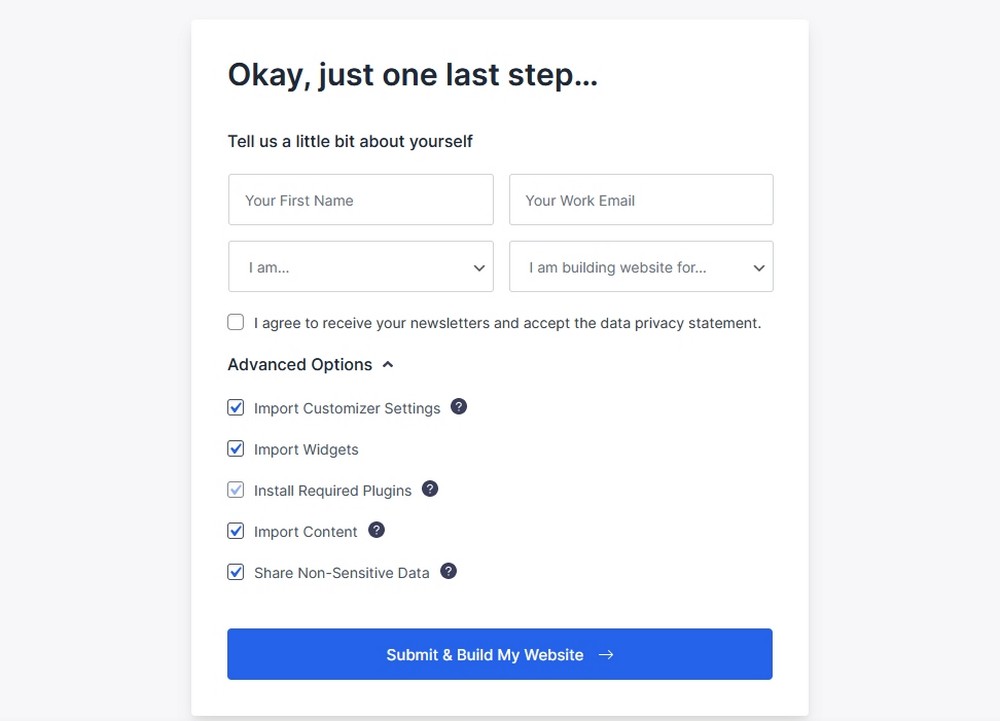
Wait for everything to be imported. Keep your browser window open during this process. It can take a minute or two to complete
Once the import has finished you will see the message below:

Click on the View Your Website button to see what your new website looks like

Customizing your website
To make the starter site your own, start by adding your logo.
From the top menu, click on Customize

Upload your logo from the Header > Site Identity > Site Logo.
For more detailed instructions, view the online documentation at https://wpastra.com/docs-category/astra-customizer-settings/.
Editing your page content
You can edit each page using the page builder that was installed with the Starter Template.
Just select Pages > Edit with Elementor or the page builder you selected
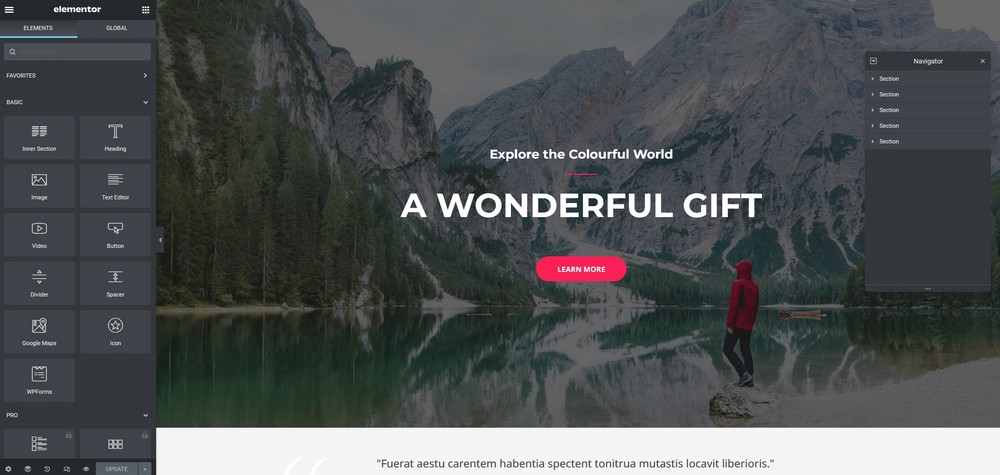
You’ll see the page builder blocks on the left and you can select any element on the page and customize it individually.
Changing the default settings in WordPress
When WordPress installs, it comes with some default settings. These might not be correct for your requirements (such as language and timezone). You should review the settings and adjust to your needs.
Settings > General
Listed below are the settings you will want to change.
Click on the Settings > General option from the left side menu of your WordPress dashboard
- Site Title – The site title appears in the browser window when someone views your site. It is generally your business name
- Tagline – A short description of what your website is about. It can be a business byline
- Site Language – Set to United States English. If you want the WordPress admin to be in your own language you can change it here
- Timezone – Set the timezone so the publish date is correct for your posts and pages. This is done by choosing a city in your timezone or choosing a UTC time
- Date format – Set to your personal preference. If you have an international readership the default setting will avoid any confusion
Writing settings
- These can stay the same unless you want to set up the post via email service. This allows you to create a post via email and requires a secret email account
Reading settings
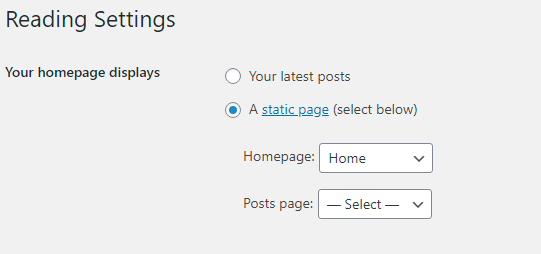
- Your homepage displays – Set to blog posts by default. For business websites, you’ll probably want to change this to your home page
- Blog pages show at most – Sets the number of blog posts that will be shown on blog archive pages

- Search engine visibility – If you want your site to show up in the search engines, make sure this box is unchecked
Discussion settings
- The discussion settings control how the commenting works on your website. You can keep the default settings unless you want to manually approve every comment before it appears on your website
- Avatars – Images displayed beside someone’s name when they leave a comment. You can set an audience rating for Gravatars or turn them off completely. To show an avatar with their comments, your visitors will need an account with Gravatar
Media settings
- When you upload an image to WordPress it will automatically create a thumbnail version of the image, along with a medium and large image version
- You can keep the default pixel sizes or change to your requirements
Permalinks
- This setting changes the URL structure for each page or post on your website
- Changing the URL structure can enhance your website’s search engine friendliness, contributing to its performance as Google ranking factors
- The ‘Plain’ setting is the least search engine friendly
- The ‘Post name’ setting is generally recommended for business websites
Privacy
- Most countries have some privacy legislation in place, so it’s important to understand your obligations
- To help you get started, WordPress creates a boilerplate privacy page that you can use with your own edits
Installing WordPress plugins
WordPress plugins can add a lot of new functionality to your website, from adding new features, making it more secure and helping you to back up your website.
There are thousands of free plugins you can install to your website via the plugins section.
They are created by third party developers and many of the plugins will have a commercial version you can purchase directly from the developer.
That much choice can be good and bad.
It’s great to have so much to choose from, but it can be confusing and there is always the possibility of a plugin developing security problems, or becoming incompatible with your version of WordPress (or another plugin).
It pays to be conservative with your plugin choices.
Here are our top tips to help you navigate your choice of plugins:
- Only install plugins that are in the official WordPress plugin repository. You can find these online at https://wordpress.org/plugins/ or from the plugins section of your WordPress dashboard
- Before buying a commercial plugin, check they have a free version in the plugin repository. Check if they have a refund policy
- Read a plugin’s reviews. A few user issues here and there can be expected. A plugin with mostly bad reviews is best avoided
- Make sure the plugin has been tested with your version of WordPress.
- Use plugins that have a lot of active installations (tens of thousands)
- Delete any unused plugins
We recommend the following WordPress plugins:
- Security – Protect your website against intrusion attempts – try WordFence, iThemes, Sucuri. Install MalCare for comprehensive site security, as it comes with a firewall, scanner, and malware cleaner, purpose-built for WordPress sites.
- Search engine optimisation – Make your website more search engine friendly, try Yoast SEO, All in One SEO
- Contact forms – Allows you to create and add a form on your website – try Contact Form 7, WPForms
- Backups – Create a secondary backup of your website (in addition to any hosting backups) – try UpdraftPlus, Duplicator, All-in-One WP Migration. BlogVault is an excellent WordPress backup plugin, and has integrated staging and migration capabilities as well.
- Caching – Speed up your website, optimize Core Web Vitals and the PageSpeed Insights score in a few clicks with WP Rocket. The plugin will automatically enable 80% of web performance best practices as soon as you activate it.
- Image compression – Reduce the size of images to help your website load faster – try Imagify, Smush, ShortPixel
How to install WordPress plugin
From your WordPress admin dashboard:

- Click on Plugins > Add New
- From the Add Plugins screen, type the name of the plugin you want to install into the search plugins box
- The plugin details will be displayed on the screen
- Click on the Install Now button. The plugin will be installed on your website. The installing button will turn into an Activate button once installed
- Click on the Activate button to start using the plugin
- The plugin will activate and add a link to its settings on your WordPress admin menu
- If you decide not to use the plugin, deactivate it, and delete it
Summing up and ‘going live’
If you’ve worked through each stage of this how-to guide, you should have an excellent foundation to get a brand-new website live under your domain name.
As you’ve got a ‘coming soon’ page hiding the rest of the website, you can take your time to change each page with your own text and images.
When you are logged into your website as an administrator, you can view the rest of the website and check each page as you go.
When you are ready to ‘go live’, turn off the coming soon page by changing the coming soon page status to Disabled.
Also, double-check that your WordPress reading settings are not set to discourage search engines – or you risk never being found online.
That’s it, your website is now live for the whole world to see!


