
- Getting Started with Ultimate Addons for Elementor
- Getting Started with Ultimate Addons for Elementor Pro
- How To Install The Ultimate Addons For Elementor Pro Plugin?
- How to Get License Key of Ultimate Addons for Elementor?
- Activate Ultimate Addons for Elementor Pro License
- How Can I Upgrade the License?
- How to Update Ultimate Addons for Elementor Plugin?
- How to update any plugin manually through FTP?
- About Beta Versions
- About Beta Versions
- How to Enable / Disable Widgets in UAE to Reduce Server Requests?
- How to White Label UAE?
- Getting Started with Ultimate Addons for Elementor Pro
- UAE Saved Sections
- How to create Google API key in Google Maps Widget of UAE?
- White Screen /500 Error After Plugin Installation
- How to Increase the Memory Limit of your site?
- Unable to see the Font Awesome 5 Icons in UAE’s widgets?
- Introducing User Registration Form Widget
- How to Create a User Registration Form using Elementor?
- How to Create a User Registration Form with Only Email Field in Elementor?
- Frequently Asked Questions about User Registration Forms
- Google reCAPTCHA v3 in User Registration Form for Elementor
- Honeypot field in User Registration Form for Elementor
- Filters/Actions for User Registration Form Widget
- How to Integrate hCaptcha with UAE Login & Registration Forms
- How to Create a Facebook App ID for Login Form Widget?
- How to Create a Google Client ID for Login Form Widget?
- Introducing a New Login Form Widget for Elementor
- Filters/Actions for Login Form Widget
- Google reCAPTCHA v3 in Login Form for Elementor
- How to Integrate hCaptcha with UAE Login & Registration Forms
- How to Open a Modal Popup on the Click of an Elementor Widget?
- Modal Popup Widget
- How to Trigger a Modal Popup on the Click of a Menu Element?
- How To Close a Modal Popup on the Click of a Button or Text?
- How to Insert a Video in the UAE Modal Popup?
- What are the Various Options to Close a Modal Popup in UAE?
- How to Display a Modal Popup on Exit Intent?
- Modal Popup JS Triggers
- Woo – Products Widget
- How to display exact WooCommerce product with Query Builder?
- How to set Grid and Carousel layout for WooCommerce products?
- Filters/Actions for WooCommerce Products
- How to enable Quick View for WooCommerce Products?
- How to Exclude WooCommerce Products with Woo-Products Widget?
- How to Set Featured Products in WooCommerce?
- Woo – Products Carousel Does Not Display Correctly?
- How to Display Related Products with Woo-Products Widget?
- How To Add Rows And Columns to the Table?
- Table Widget
- How to add Table Header with Table Widget?
- How to add Table Content with Table Widget?
- How to add Sortable and Searchable Table? How to Show Entries Dropdown?
- How to Merge Columns and Rows in Table?
- How to Style the Table?
- Create Table by Uploading CSV
- Facing Issues with CSV Import?
- Image Gallery Widget
- How to Set Categories for Images?
- How to Add an Image Caption
- How to Set a Custom Link for the Image?
- How to Design Filterable Image Gallery?
- How to Open a Webpage with the Click of an Image?
- How to Set Scale, Opacity, Effects, Overlay Color for Images?
- How to Display Specific Category Tab as a Default on Page Load?
- How to Set Icon on Image Hover?
- Video Gallery Widget
- How to Set Categories for Videos?
- How to Design Filterable Video Gallery?
- How to Display Specific Video Category Tab as a Default on Page Load?
- How to Set a Custom Placeholder Image for the Video?
- How to Set Overlay Color on the Video Thumbnail on Mouse Hover?
- How to Show Video Caption on Hover?
- How to Show Video Category on Hover?
- Bulk Editing for Video Category Names
- How to Style Particular Item / Icon?
- Timeline Widget
- How to Change the Vertical Position of Arrow & Icon?
- How to Set On-Scroll Color for Connector Line and Icon?
- How to Set the Alternate Alignment for the Card Content?
- How to Manage Timeline on Responsive View?
- How Query Builder Works for Post Timeline?
- How to Set Post as Sticky?
- Enable Infinite Load Pagination for Post Timeline
- Posts Widget
- How Query Builder Works for Posts Widget?
- How to Enable Infinite Load Pagination for Posts?
- Filters/Actions for Posts Widget
- Filterable Tabs for Posts Widget
- Layouts for Posts Widget
- Posts Widget Carousel Does Not Display Correctly?
- Displaying Portfolios in UAE Post Widget Using Custom Filters
Facing Issues with CSV Import?
There are two distinct types of issues you may encounter when using the CSV upload feature in the UAE Table widget:
- “File Could Not Be Opened” — a server-side file access error (covered first below)
- Incorrectly formatted CSV — causes malformed or missing table data (covered in the second section)
Make sure you identify which error you are seeing before following the steps below.
- For MAC Users
- For Windows Users
- For Google Sheets users (recommended)
File Could Not Be Opened
If you see the message “File could not be opened. Check the file’s permissions to make sure it’s readable by your server”, this is a server-side file permissions issue — not a problem with your CSV’s formatting or content.
This error appears when the UAE Table widget can locate your uploaded file but the web server does not have permission to read it.
What to Check
1. Upload via WordPress Media Library
The CSV must be uploaded directly through the widget’s upload field, which uses the WordPress Media Library. Linking to an external URL or a file outside the uploads directory will not work.
2. Confirm the File Has a .csv Extension
The plugin checks the file extension before attempting to open it. A file named “data.CSV” or “data.txt” will fail even if the content is valid CSV. Rename the file to use a lowercase .csv extension before uploading.
3. Check File Permissions on Your Server
The uploaded file must be readable by your web server process. In most cases, WordPress handles this automatically. However, on some shared or managed hosting environments, files in wp-content/uploads/ may be assigned restrictive permissions.
To resolve:
- Contact your hosting provider and ask them to confirm that files in wp-content/uploads/ are readable by the web server (PHP process).
- If you have server access, check that the file permission is at least 644.
4. Re-upload the File
Sometimes a failed or interrupted upload leaves a corrupted file on the server. Delete the existing file from the Media Library and upload a fresh copy
Still Seeing the Error?
If the steps above do not resolve the issue, please reach out to our support team with the following information:
- Your hosting provider name
- WordPress version, UAE version, Elementor version
- A screenshot of the error as it appears on the front end
Incorrectly Formatted CSV
For MAC Users
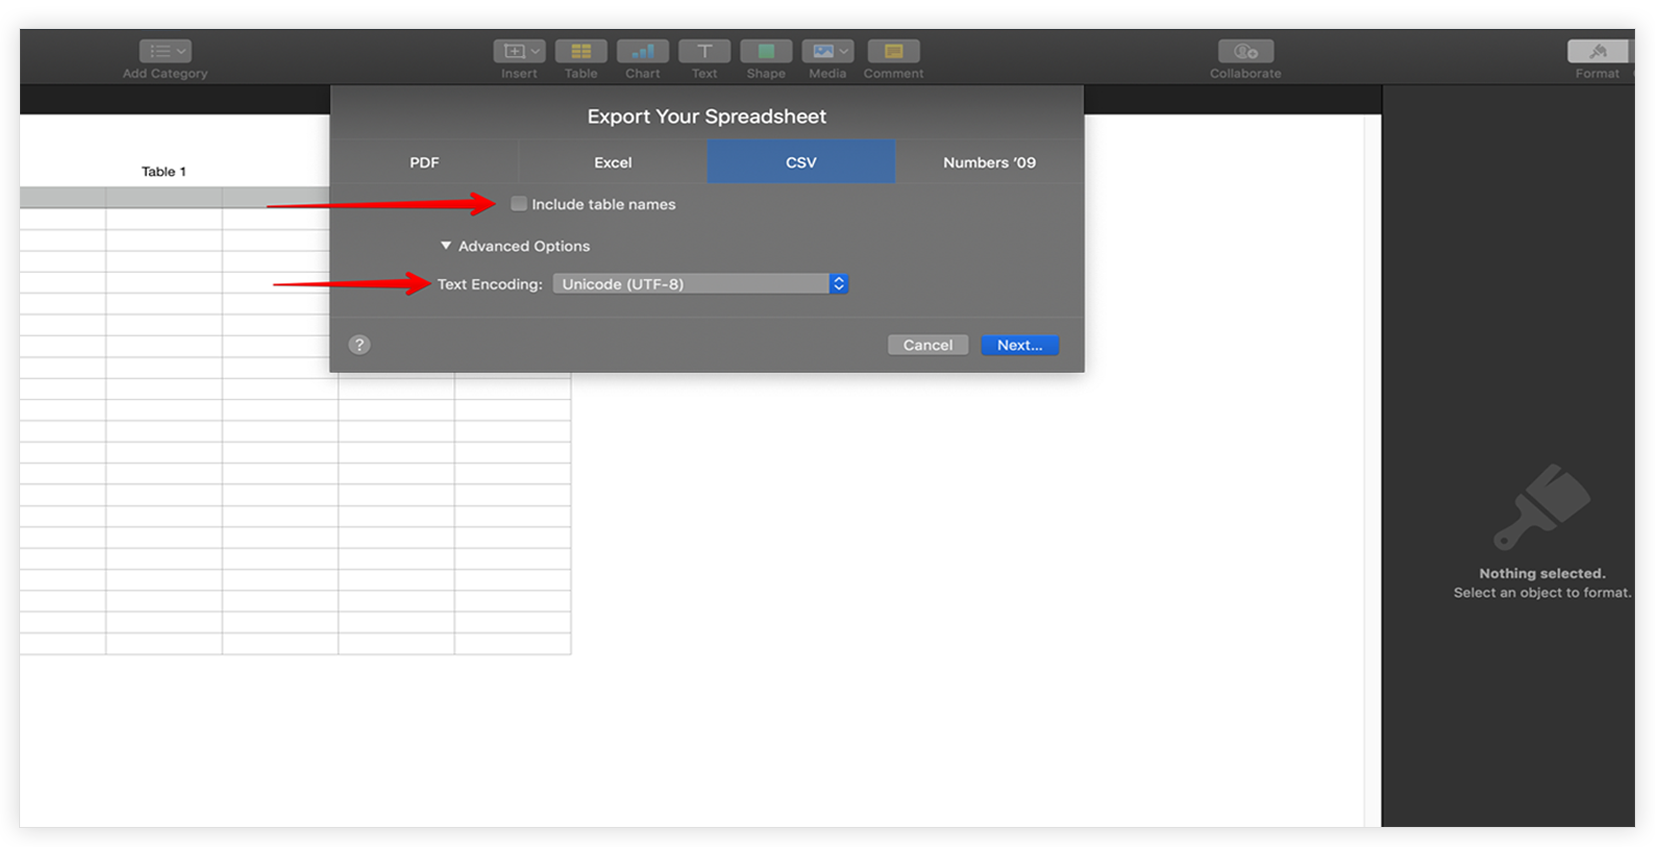
File that is created with Numbers app can be exported as CSV as shown below:
Step 1 – Open a file with Numbers and click on File -> Export To -> CSV

Step 2 – Set the following options:
2.1 Uncheck “Include table names“
2.2 Set Text Encoding as Unicode(UTF-8)
For Windows Users
If you have a file created with MS Office then below are the steps to export the file as CSV:
Step 1 – From the top bar, click on Data menu.
Step 2 – Click on the From Text icon.
Step 3 – Go to the location of the file that you want to import. Click on the filename and then click on the Import button. The Text Import Wizard – Step 1 or 3 windows will now appear on the screen.
Step 4 – Choose the file type 65001: Unicode (UTF-8) from the drop-down list that appears next to File origin. Click on the Next button.
Step 5 – It will display the ‘Text Import Wizard – Step 2 or 3’ window. Select the Comma delimiter. Click on the Next button.
Step 6 – Select Column data format as general and click on Finish button.
For Google Sheets users
This is the easy and sure way to export CSV files. It works well even with your old files. Just import your old files with Google Sheets from File > Import and download it again. You can create/upload file to Google Sheets and then download them as CSV using following steps –
Click on File -> Download as -> Comma-separated values (.csv, current sheet)
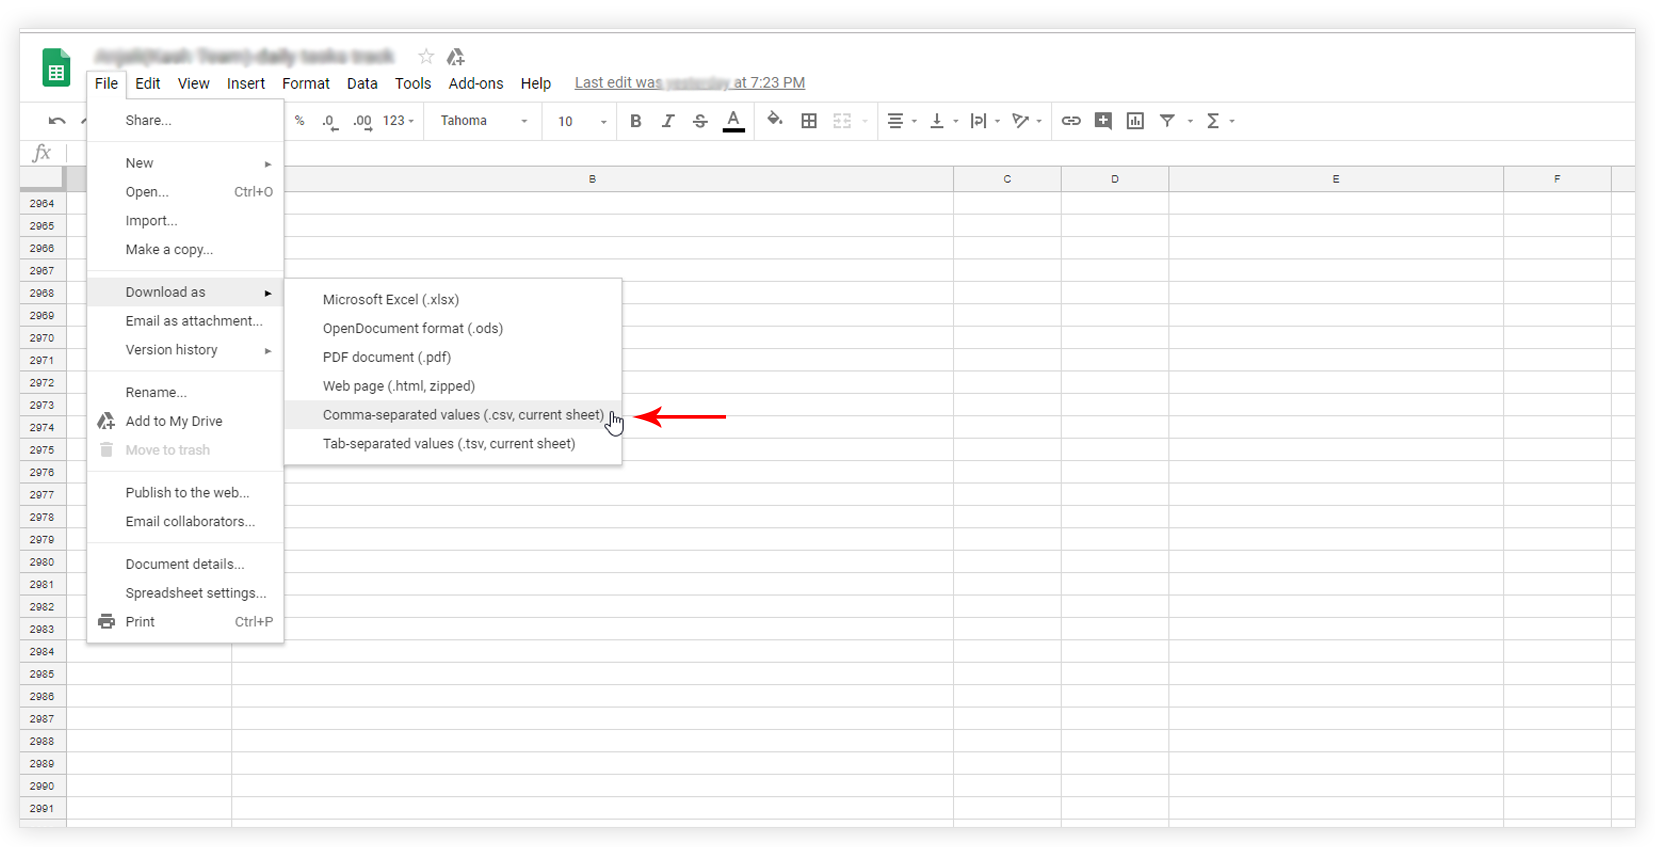
You can even import CSV files to Google Sheets that are now working with the Table Widget, download them again and import to the widget.
After successfully exporting CSV files, upload it with UAE Table widget to create a table. Refer a link here.
We don't respond to the article feedback, we use it to improve our support content.