- Getting Started with Ultimate Addons for Elementor
- Getting Started with Ultimate Addons for Elementor Pro
- How To Install The Ultimate Addons For Elementor Pro Plugin?
- How to Get License Key of Ultimate Addons for Elementor?
- Activate Ultimate Addons for Elementor Pro License
- How Can I Upgrade the License?
- How to Update Ultimate Addons for Elementor Plugin?
- How to update any plugin manually through FTP?
- About Beta Versions
- About Beta Versions
- How to Enable / Disable Widgets in UAE to Reduce Server Requests?
- How to White Label UAE?
- Getting Started with Ultimate Addons for Elementor Pro
- UAE Saved Sections
- How to create Google API key in Google Maps Widget of UAE?
- White Screen /500 Error After Plugin Installation
- How to Increase the Memory Limit of your site?
- Unable to see the Font Awesome 5 Icons in UAE’s widgets?
- Introducing User Registration Form Widget
- How to Create a User Registration Form using Elementor?
- How to Create a User Registration Form with Only Email Field in Elementor?
- Frequently Asked Questions about User Registration Forms
- Google reCAPTCHA v3 in User Registration Form for Elementor
- Honeypot field in User Registration Form for Elementor
- Filters/Actions for User Registration Form Widget
- How to Integrate hCaptcha with UAE Login & Registration Forms
- How to Create a Facebook App ID for Login Form Widget?
- How to Create a Google Client ID for Login Form Widget?
- Introducing a New Login Form Widget for Elementor
- Filters/Actions for Login Form Widget
- Google reCAPTCHA v3 in Login Form for Elementor
- How to Integrate hCaptcha with UAE Login & Registration Forms
- How to Open a Modal Popup on the Click of an Elementor Widget?
- Modal Popup Widget
- How to Trigger a Modal Popup on the Click of a Menu Element?
- How To Close a Modal Popup on the Click of a Button or Text?
- How to Insert a Video in the UAE Modal Popup?
- What are the Various Options to Close a Modal Popup in UAE?
- How to Display a Modal Popup on Exit Intent?
- Modal Popup JS Triggers
- Woo – Products Widget
- How to display exact WooCommerce product with Query Builder?
- How to set Grid and Carousel layout for WooCommerce products?
- Filters/Actions for WooCommerce Products
- How to enable Quick View for WooCommerce Products?
- How to Exclude WooCommerce Products with Woo-Products Widget?
- How to Set Featured Products in WooCommerce?
- Woo – Products Carousel Does Not Display Correctly?
- How to Display Related Products with Woo-Products Widget?
- How To Add Rows And Columns to the Table?
- Table Widget
- How to add Table Header with Table Widget?
- How to add Table Content with Table Widget?
- How to add Sortable and Searchable Table? How to Show Entries Dropdown?
- How to Merge Columns and Rows in Table?
- How to Style the Table?
- Create Table by Uploading CSV
- Facing Issues with CSV Import?
- Image Gallery Widget
- How to Set Categories for Images?
- How to Add an Image Caption
- How to Set a Custom Link for the Image?
- How to Design Filterable Image Gallery?
- How to Open a Webpage with the Click of an Image?
- How to Set Scale, Opacity, Effects, Overlay Color for Images?
- How to Display Specific Category Tab as a Default on Page Load?
- How to Set Icon on Image Hover?
- Video Gallery Widget
- How to Set Categories for Videos?
- How to Design Filterable Video Gallery?
- How to Display Specific Video Category Tab as a Default on Page Load?
- How to Set a Custom Placeholder Image for the Video?
- How to Set Overlay Color on the Video Thumbnail on Mouse Hover?
- How to Show Video Caption on Hover?
- How to Show Video Category on Hover?
- Bulk Editing for Video Category Names
- How to Style Particular Item / Icon?
- Timeline Widget
- How to Change the Vertical Position of Arrow & Icon?
- How to Set On-Scroll Color for Connector Line and Icon?
- How to Set the Alternate Alignment for the Card Content?
- How to Manage Timeline on Responsive View?
- How Query Builder Works for Post Timeline?
- How to Set Post as Sticky?
- Enable Infinite Load Pagination for Post Timeline
- Posts Widget
- How Query Builder Works for Posts Widget?
- How to Enable Infinite Load Pagination for Posts?
- Filters/Actions for Posts Widget
- Filterable Tabs for Posts Widget
- Layouts for Posts Widget
- Posts Widget Carousel Does Not Display Correctly?
- Displaying Portfolios in UAE Post Widget Using Custom Filters
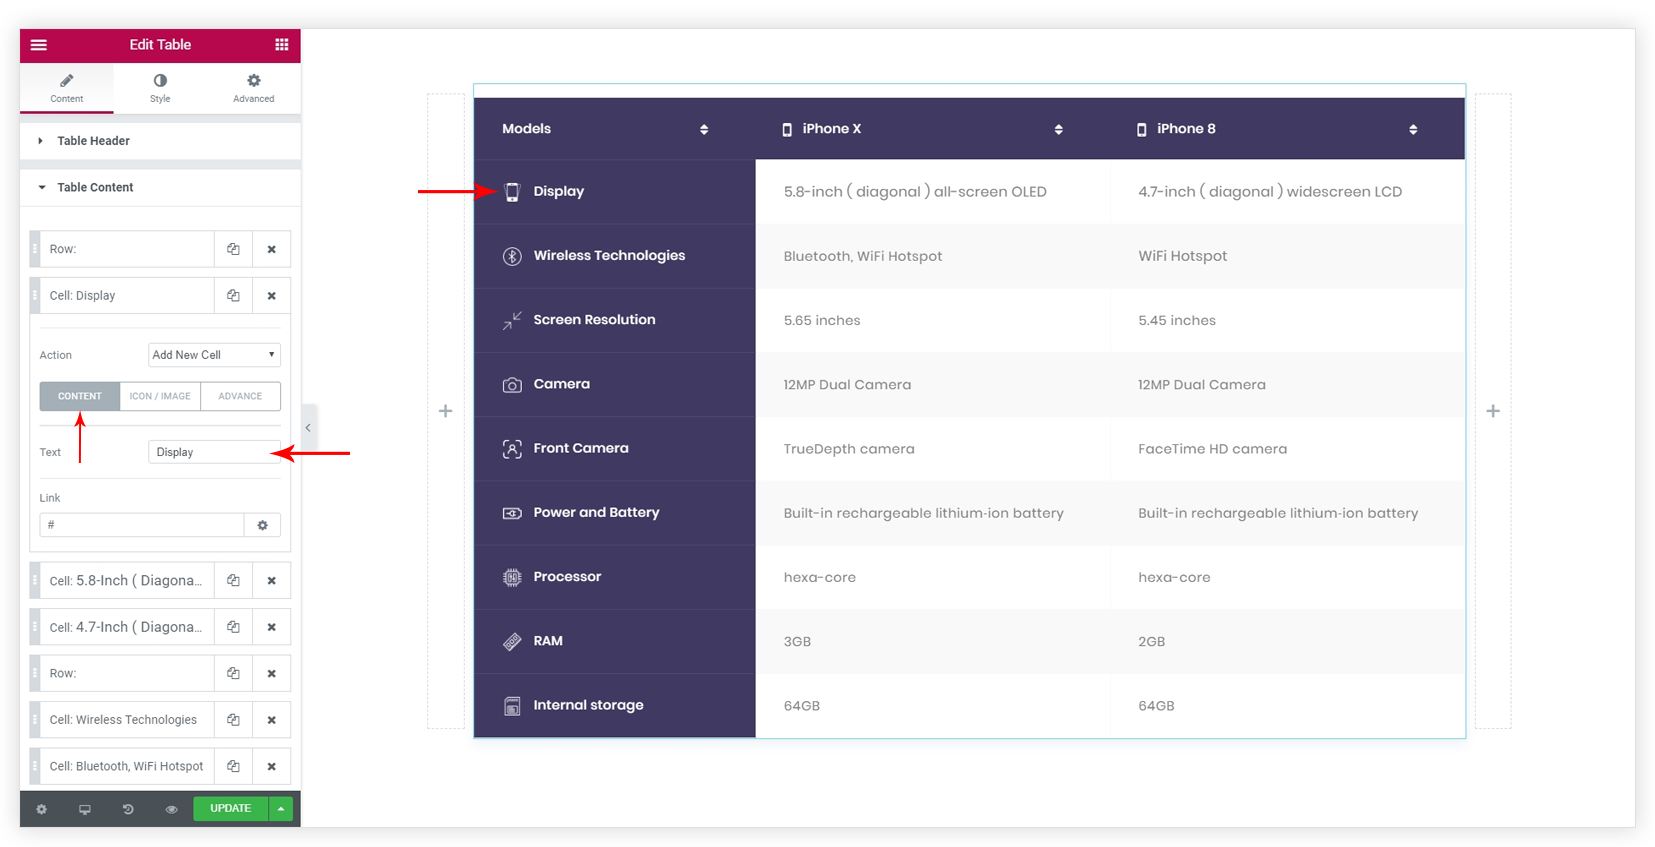
How to add Table Content with Table Widget?
Table widget allows adding text, number, HTML, image, icon in the content area.
After adding Table Header, content can be added to Table Content in the table.
Multiple rows and columns can be added to Table Content. See How To Add Rows And Columns to the Table?
After adding columns to Table Content following option will appear for Cell-
- CONTENT (?)
- Enter a content for the column. Content can be in the form of text, number, HTML or special characters.
- For Example- If you want to add button add HTML for a button like <button>Click Me</button>
- You can link the content easily by entering the URL in given Link field.
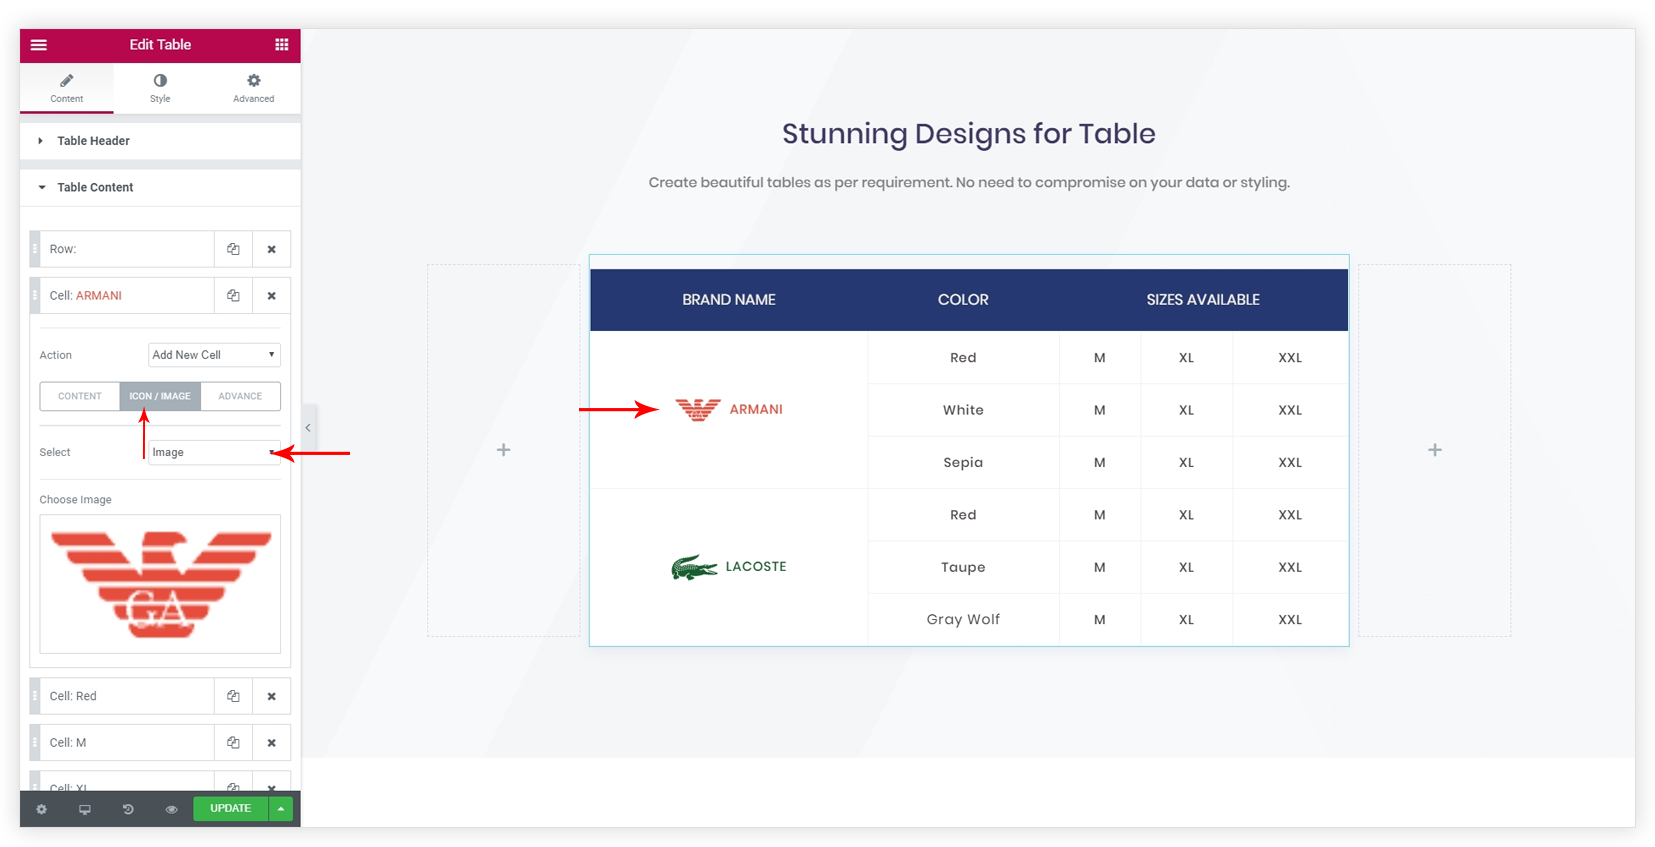
- ICON / IMAGE (?)
- This allows you to add icon from the provided list or image to the content field.
- Icon/Image can be added with or without content.
- For Example- If you have created a table to compare A and B products. And want to show the logo of both products then you can just use their logo images in the content. It will give a nice look to the table.
To resize or style images in your table, go to the Style tab and open the Icon / Image section. These controls apply to all image cells in the table at once, there is no per-cell image sizing.
- Scale: Sets the image width in px (default: 30px, range: 1–500px)
- Image Position: Places the image Before or After the cell text
- Image Spacing: Sets the gap between the image and text
- Border Radius: Rounds the image corners
If you need different image sizes in individual cells, that requires custom CSS.
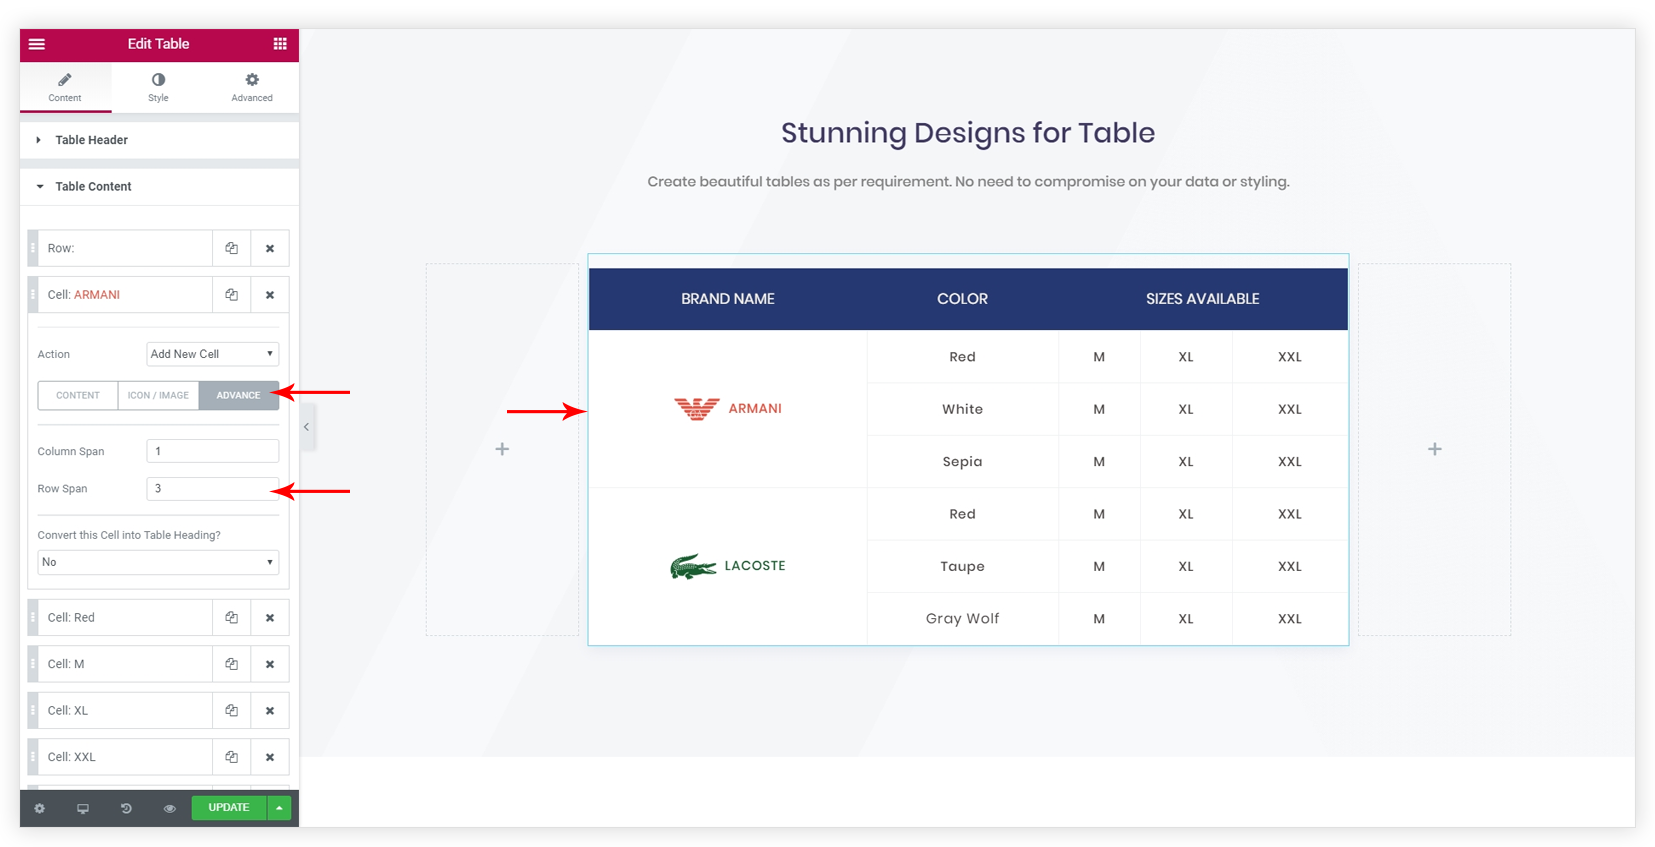
- ADVANCE (?)
- This allows merging two or more table cells located in the same row or column into a single cell.
- By default value for Column Span and Row Span will be 1. Add the number for column and row that needs to merge.
- For Example- If you wish to combine 2 columns to the current cell then add Column Span value 3. It will add 2 columns to the current cell.
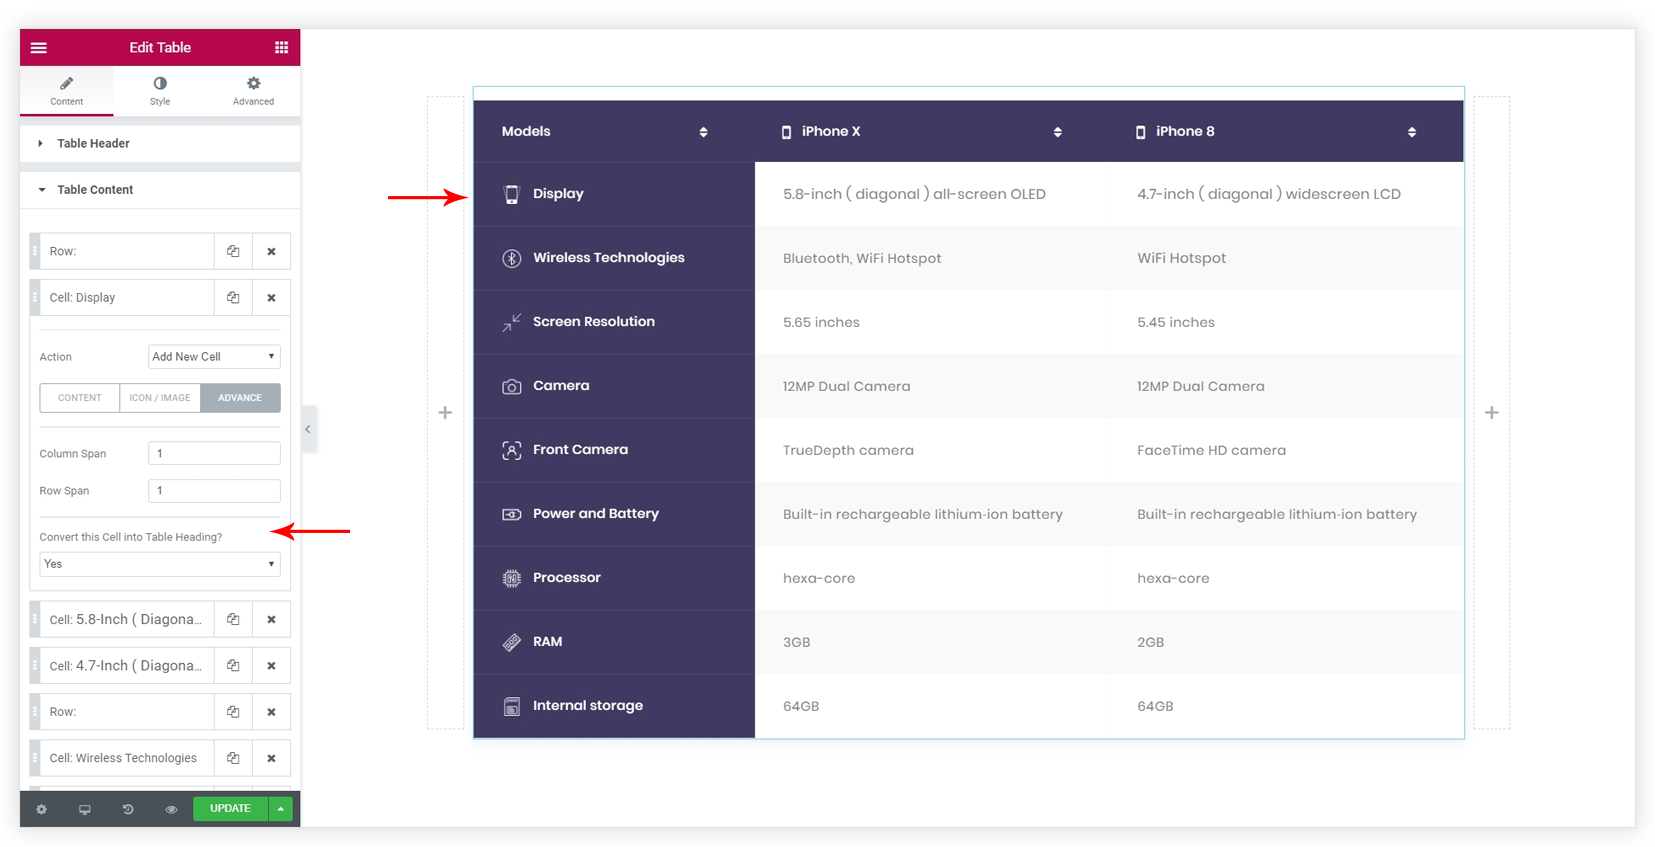
- Convert this Cell into Table Heading? option will allow setting current cell as a header cell. It will inherit all styles set for Table Header from Style tab. It is useful when one wants to show vertical headers for the table. (?)
Notes:
- To change the row and column structure simple drag and drop the cell from left edge with three vertical dots.
- To duplicate the cell click the copy icon.
Was this doc helpful?
What went wrong?
We don't respond to the article feedback, we use it to improve our support content.