- Getting Started with Ultimate Addons for Elementor
- Getting Started with Ultimate Addons for Elementor Pro
- How To Install The Ultimate Addons For Elementor Pro Plugin?
- How to Get License Key of Ultimate Addons for Elementor?
- How to activate Ultimate Addons for Elementor Pro license?
- How Can I Upgrade the License?
- How to Update Ultimate Addons for Elementor Plugin?
- How to update any plugin manually through FTP?
- About Beta Versions
- About Beta Versions
- How to Enable / Disable Widgets in UAE to Reduce Server Requests?
- How to White Label UAE?
- Getting Started with Ultimate Addons for Elementor Pro
- UAE Saved Sections
- How to create Google API key in Google Maps Widget of UAE?
- White Screen /500 Error After Plugin Installation
- How to Increase the Memory Limit of your site?
- Unable to see the Font Awesome 5 Icons in UAE’s widgets?
- Creating a Sticky Header With Elementor Header & Footer Builder Plugin
- Is Ultimate Addons for Elementor Compatible with the Latest Elementor/Elementor Pro?
- Translating UAE Content with WPML
- Enable Font Awesome 4 Support in Elementor
- Getting Started with Ultimate Addons for Elementor
- Introducing User Registration Form Widget
- How to Create a User Registration Form using Elementor?
- How to Create a User Registration Form with Only Email Field in Elementor?
- Frequently Asked Questions about User Registration Forms
- Google reCAPTCHA v3 in User Registration Form for Elementor
- Honeypot field in User Registration Form for Elementor
- Filters/Actions for User Registration Form Widget
- How to Open a Modal Popup on the Click of an Elementor Widget?
- Modal Popup Widget
- How to Trigger a Modal Popup on the Click of a Menu Element?
- How To Close a Modal Popup on the Click of a Button or Text?
- How to Insert a Video in the UAE Modal Popup?
- What are the Various Options to Close a Modal Popup in UAE?
- How to Display a Modal Popup on Exit Intent?
- Modal Popup JS Triggers
- Woo – Products Widget
- How to display exact WooCommerce product with Query Builder?
- How to set Grid and Carousel layout for WooCommerce products?
- Filters/Actions for WooCommerce Products
- How to enable Quick View for WooCommerce Products?
- How to Exclude WooCommerce Products with Woo-Products Widget?
- How to Set Featured Products in WooCommerce?
- Woo – Products Carousel Does Not Display Correctly?
- How to Display Related Products with Woo-Products Widget?
- How To Add Rows And Columns to the Table?
- Table Widget
- How to add Table Header with Table Widget?
- How to add Table Content with Table Widget?
- How to add Sortable and Searchable Table? How to Show Entries Dropdown?
- How to Merge Columns and Rows in Table?
- How to Style the Table?
- Create Table by Uploading CSV
- Facing Issues with CSV Import?
- Image Gallery Widget
- How to Set Categories for Images?
- How to Add a Caption for the Image?
- How to Set a Custom Link for the Image?
- How to Design Filterable Image Gallery?
- How to Open a Webpage with the Click of an Image?
- How to Set Scale, Opacity, Effects, Overlay Color for Images?
- How to Display Specific Category Tab as a Default on Page Load?
- How to Set Icon on Image Hover?
- Video Gallery Widget
- How to Set Categories for Videos?
- How to Design Filterable Video Gallery?
- How to Display Specific Video Category Tab as a Default on Page Load?
- How to Set a Custom Placeholder Image for the Video?
- How to Set Overlay Color on the Video Thumbnail on Mouse Hover?
- How to Show Video Caption on Hover?
- How to Show Video Category on Hover?
- Bulk Editing for Video Category Names
- How to Style Particular Item / Icon?
- Timeline Widget
- How to Change the Vertical Position of Arrow & Icon?
- How to Set On-Scroll Color for Connector Line and Icon?
- How to Set the Alternate Alignment for the Card Content?
- How to Manage Timeline on Responsive View?
- How Query Builder Works for Post Timeline?
- How to Set Post as Sticky?
- Enable Infinite Load Pagination for Post Timeline
- Posts Widget
- How Query Builder Works for Posts Widget?
- How to Enable Infinite Load Pagination for Posts?
- Filters/Actions for Posts Widget
- Filterable Tabs for Posts Widget
- Layouts for Posts Widget
- Posts Widget Carousel Does Not Display Correctly?
- Displaying Portfolios in UAE Post Widget Using Custom Filters
Translating UAE Content with WPML
In WPML 4.7 takes automatic translation to a whole new level. It allows you to translate your website’s content faster, easier, and more affordably, ensuring that translations are always up-to-date.
Translate Everything Automatically & Review Before Publishing
WPML 4.7 offers a seamless way to translate all your Ultimate Addons for Elementor (UAE) content, including pages, posts, custom post types, products, taxonomies, and custom fields.
- Translation: Content is automatically translated in the background whenever you publish new content or update existing pages.
- Review Options: You can choose to review translations before publishing or review them after publication. This ensures your translations are accurate while saving time.
- Up-to-date translations: Your UAE-powered site’s content is automatically updated with translations, reducing manual intervention.
How to Translate UAE Content Using WPML
Step 1: Install and Configure WPML
- Download WPML: After purchasing the WPML Multilingual CMS plugin, download the zip file from your WPML account.
- Install WPML: Upload the zip file to your WordPress dashboard and activate it.
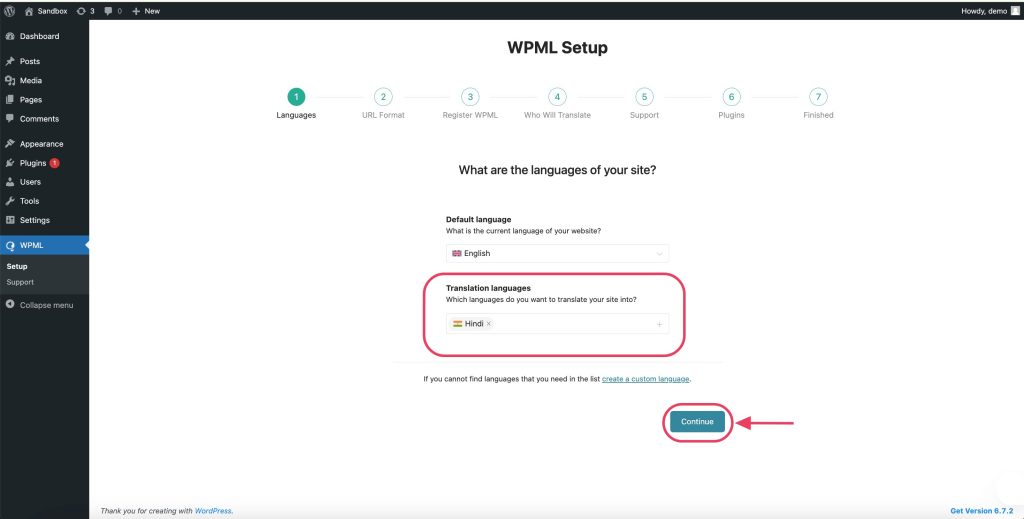
Step 2: Language Setup Wizard
Select Languages: In the WPML setup wizard, choose the languages you want to translate your site into by clicking the + icon. Click the Continue button.
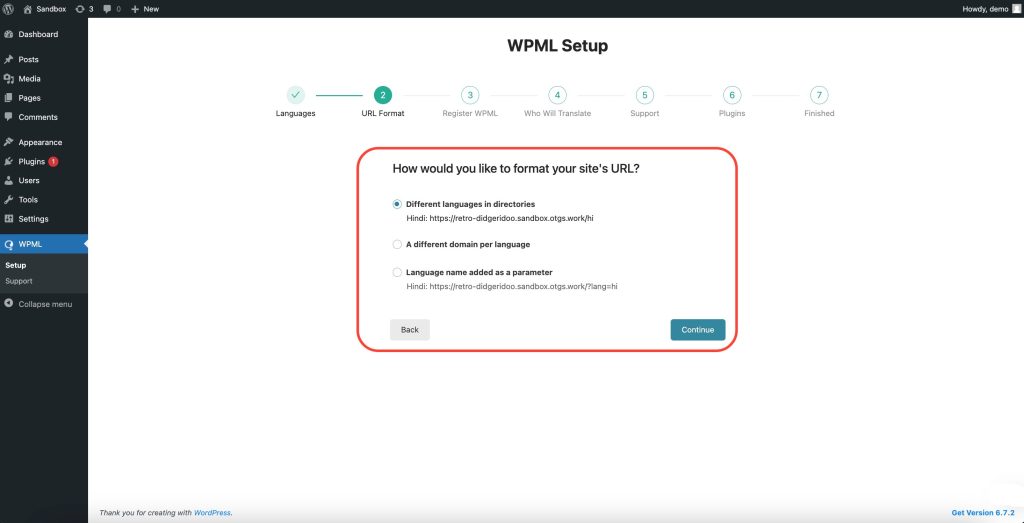
Step 3: URL Format Setup Wizard
Configure URL Format: Choose your site’s URL format for different languages (e.g., subdirectories or subdomains) and click Continue.
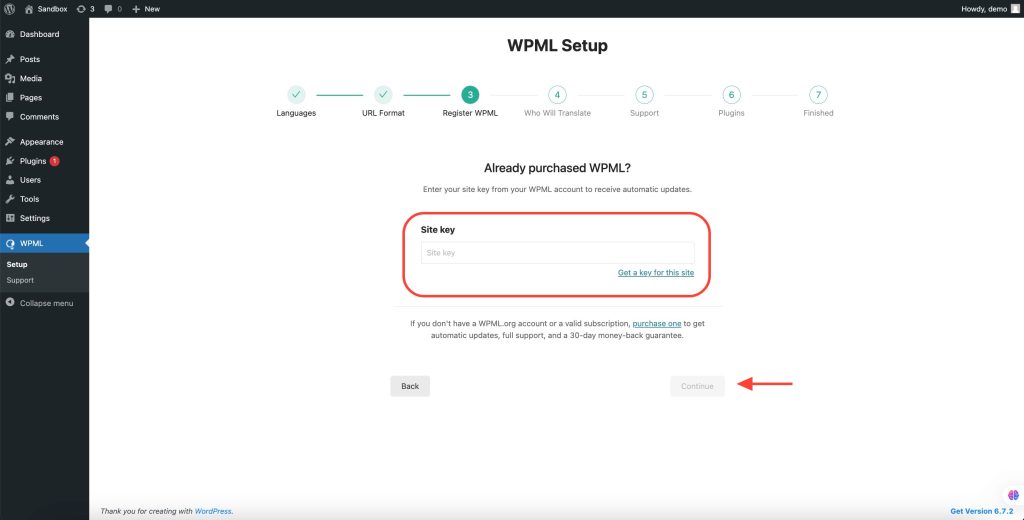
Step 4: Register WPML Setup Wizard
Register WPML: Enter your site key from your WPML account to enable automatic updates. Click Continue.
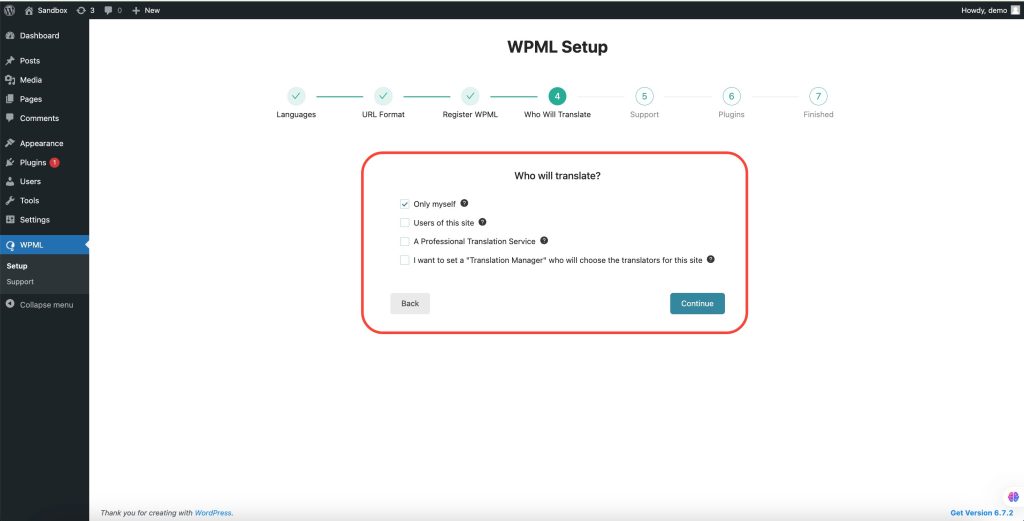
Step 5: Choosing Who Will Translate
When setting up WPML for your WordPress website, you need to determine who will be responsible for translations. WPML provides several options to suit different needs:
- Only Myself
- You will be the sole translator for this site.
- This option is ideal if you prefer full control over translations.
- You will manually translate all content using WPML’s translation tools.
- Users of this Site
- You can select existing users or create new users to serve as translators.
- This option allows you to build a translation team with different language pairs.
- You can also assign yourself as a translator.
- A Professional Translation Service
- WPML integrates with over 70 professional translation services.
- You can choose your preferred translation service.
- This option provides a streamlined process for sending and receiving translations directly within WPML.
- Set a “Translation Manager”
- A designated Translation Manager will select and manage translators for the site.
- Ideal for websites built for clients where the client or a designated user will handle translations.
- The manager can assign translation jobs to users or external translation services.
Choose the option that best fits your website’s translation needs to ensure smooth multilingual content management.
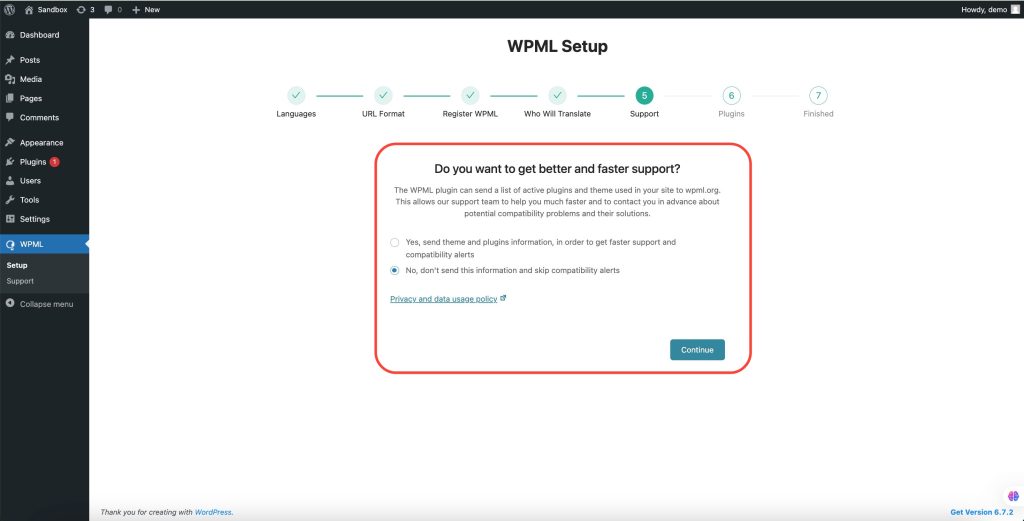
Step 6: WPML Compatibility Alerts & Support
WPML can send your site’s active plugins and theme details to wpml.org. This helps their support team provide faster assistance and notify you about potential compatibility issues.
- Yes – Shares theme and plugin info for quicker support and compatibility alerts.
- No – Skips sharing this information and disables compatibility alerts.
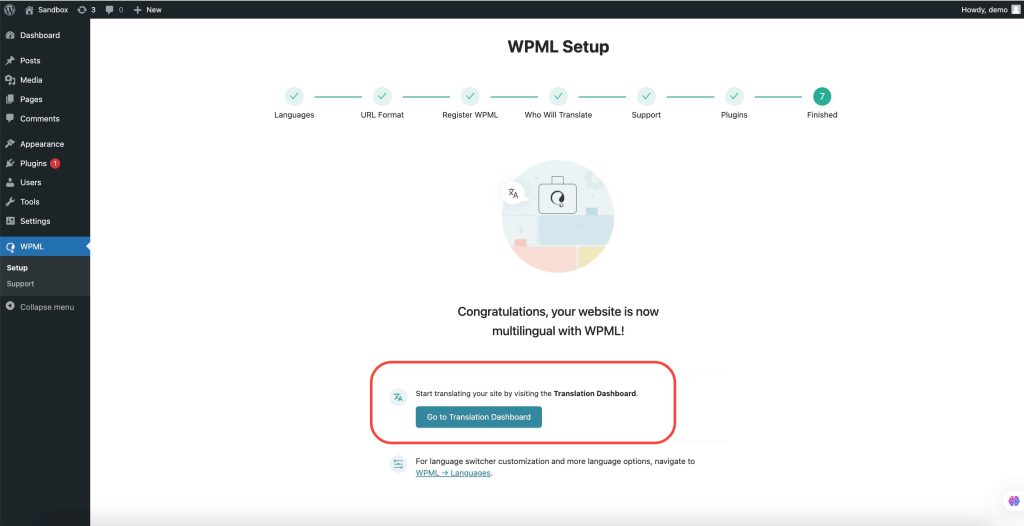
Step 6: Complete Your WPML Setup
With WPML, your website is now fully multilingual, allowing you to translate content and customize language settings effortlessly.
- Start Translating – Go to the Translation Dashboard to begin translating your content.
- Customize Language Switcher – Adjust settings under WPML → Languages for better user experience.
- Manage Language Options – Configure additional language settings in the WPML Languages section.
- You’re All Set! Your multilingual site is ready—start adding translations!
You’re All Set! Your multilingual site is ready—start adding translations! After the translation is complete, click Finish in the WPML setup wizard.
With WPML’s translating your Ultimate Addons for Elementor content becomes faster and easier, giving your multilingual audience a seamless experience. Start automating your translations today!
Congratulations! Your site is now multilingual with WPML. 🎉
We don't respond to the article feedback, we use it to improve our support content.