- Getting Started with Ultimate Addons for Elementor
- Getting Started with Ultimate Addons for Elementor Pro
- How To Install The Ultimate Addons For Elementor Pro Plugin?
- How to Get License Key of Ultimate Addons for Elementor?
- Activate Ultimate Addons for Elementor Pro License
- How Can I Upgrade the License?
- How to Update Ultimate Addons for Elementor Plugin?
- How to update any plugin manually through FTP?
- About Beta Versions
- About Beta Versions
- How to Enable / Disable Widgets in UAE to Reduce Server Requests?
- How to White Label UAE?
- Getting Started with Ultimate Addons for Elementor Pro
- UAE Saved Sections
- How to create Google API key in Google Maps Widget of UAE?
- White Screen /500 Error After Plugin Installation
- How to Increase the Memory Limit of your site?
- Unable to see the Font Awesome 5 Icons in UAE’s widgets?
- Introducing User Registration Form Widget
- How to Create a User Registration Form using Elementor?
- How to Create a User Registration Form with Only Email Field in Elementor?
- Frequently Asked Questions about User Registration Forms
- Google reCAPTCHA v3 in User Registration Form for Elementor
- Honeypot field in User Registration Form for Elementor
- Filters/Actions for User Registration Form Widget
- How to Integrate hCaptcha with UAE Login & Registration Forms
- How to Create a Facebook App ID for Login Form Widget?
- How to Create a Google Client ID for Login Form Widget?
- Introducing a New Login Form Widget for Elementor
- Filters/Actions for Login Form Widget
- Google reCAPTCHA v3 in Login Form for Elementor
- How to Integrate hCaptcha with UAE Login & Registration Forms
- How to Open a Modal Popup on the Click of an Elementor Widget?
- Modal Popup Widget
- How to Trigger a Modal Popup on the Click of a Menu Element?
- How To Close a Modal Popup on the Click of a Button or Text?
- How to Insert a Video in the UAE Modal Popup?
- What are the Various Options to Close a Modal Popup in UAE?
- How to Display a Modal Popup on Exit Intent?
- Modal Popup JS Triggers
- Woo – Products Widget
- How to display exact WooCommerce product with Query Builder?
- How to set Grid and Carousel layout for WooCommerce products?
- Filters/Actions for WooCommerce Products
- How to enable Quick View for WooCommerce Products?
- How to Exclude WooCommerce Products with Woo-Products Widget?
- How to Set Featured Products in WooCommerce?
- Woo – Products Carousel Does Not Display Correctly?
- How to Display Related Products with Woo-Products Widget?
- How To Add Rows And Columns to the Table?
- Table Widget
- How to add Table Header with Table Widget?
- How to add Table Content with Table Widget?
- How to add Sortable and Searchable Table? How to Show Entries Dropdown?
- How to Merge Columns and Rows in Table?
- How to Style the Table?
- Create Table by Uploading CSV
- Facing Issues with CSV Import?
- Image Gallery Widget
- How to Set Categories for Images?
- How to Add an Image Caption
- How to Set a Custom Link for the Image?
- How to Design Filterable Image Gallery?
- How to Open a Webpage with the Click of an Image?
- How to Set Scale, Opacity, Effects, Overlay Color for Images?
- How to Display Specific Category Tab as a Default on Page Load?
- How to Set Icon on Image Hover?
- Video Gallery Widget
- How to Set Categories for Videos?
- How to Design Filterable Video Gallery?
- How to Display Specific Video Category Tab as a Default on Page Load?
- How to Set a Custom Placeholder Image for the Video?
- How to Set Overlay Color on the Video Thumbnail on Mouse Hover?
- How to Show Video Caption on Hover?
- How to Show Video Category on Hover?
- Bulk Editing for Video Category Names
- How to Style Particular Item / Icon?
- Timeline Widget
- How to Change the Vertical Position of Arrow & Icon?
- How to Set On-Scroll Color for Connector Line and Icon?
- How to Set the Alternate Alignment for the Card Content?
- How to Manage Timeline on Responsive View?
- How Query Builder Works for Post Timeline?
- How to Set Post as Sticky?
- Enable Infinite Load Pagination for Post Timeline
- Posts Widget
- How Query Builder Works for Posts Widget?
- How to Enable Infinite Load Pagination for Posts?
- Filters/Actions for Posts Widget
- Filterable Tabs for Posts Widget
- Layouts for Posts Widget
- Posts Widget Carousel Does Not Display Correctly?
- Displaying Portfolios in UAE Post Widget Using Custom Filters
Woo Thank You Widget
Woo – Thank You Widget
The Woo – Thank You widget from Ultimate Addons for Elementor allows you to create a personalized, branded, and fully customizable order confirmation experience for your WooCommerce store. When a customer completes a purchase, this widget displays a tailored Thank You message along with key order information, helping you provide clarity, build trust, and enhance the post-purchase experience.
Follow this documentation to learn how to set up, configure, and customize the Woo – Thank You widget on your WooCommerce store.
Key Features
- Display a customizable Thank You card
- Edit title, description, and icon
- Show or hide order details like Order Number and Order Date
- Fully customizable Order Summary section with products, quantities, and pricing
- Display shipping and billing addresses
- Show payment method with editable labels
- Complete styling controls for typography, spacing, backgrounds, and more
- Ideal for custom checkout flows, upsells, client branding, and tailored post-purchase experiences
How to Set Up the WooCommerce Thank You Page
Before using the Woo – Thank You widget, ensure your Thank You page is properly configured in WooCommerce.
1. Create or Use an Existing Thank You Page
You can either:
- Use WooCommerce’s default Thank You page, or
- Create a new custom page for your Thank You flow.
If you create a new page, you must set it as the Thank You (Order Received) endpoint in WooCommerce.
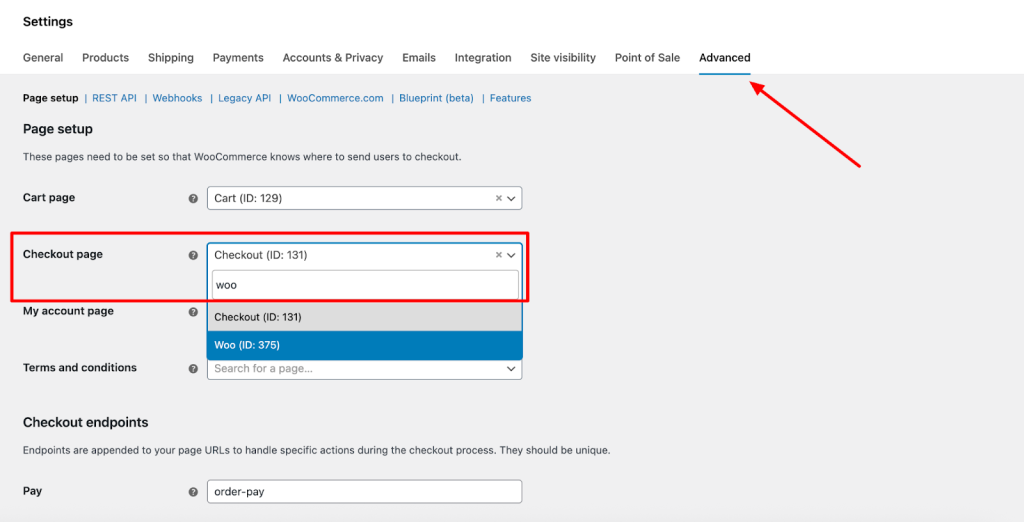
2. Assign the Page in WooCommerce
- Go to WooCommerce → Settings
- Click the Advanced tab
- Here set the Checkout page as the one that you created as thank you page.
- Click Save Changes
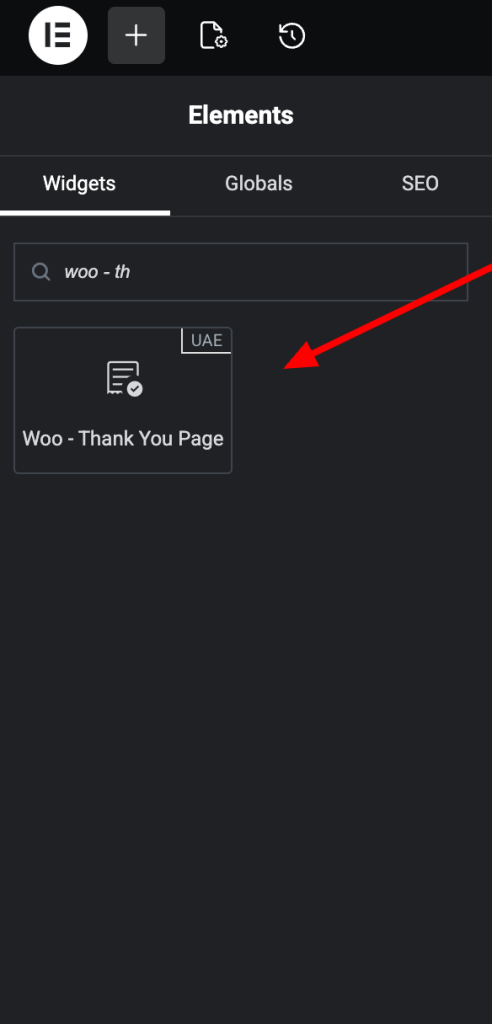
How to Add the Woo – Thank You Widget to Your Page
- In your WordPress Dashboard, go to Pages and open the Thank You page created through WooCommerce or your custom setup.
- Edit the page with Elementor.
- In the Elementor panel, search for Woo – Thank You.
- Drag and drop the widget onto your page.
- Customize the widget using the Content, Style, and Advanced tabs.
Content Tab
The Content tab controls what information is displayed on the Thank You page. It includes:
- Thank You Card
- Order Details
- Order Summary
- Addresses & Payment
1. Thank You Card
This is the section customers see at the top of the page immediately after placing an order.
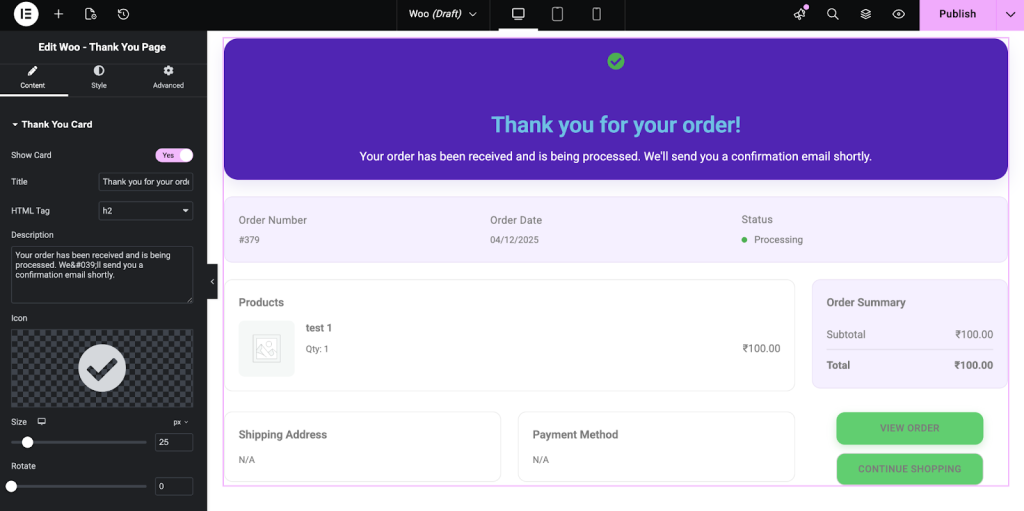
Show Card
Toggle the entire Thank You card visibility.
Title
Add or edit the Thank You headline (e.g., “Thank you for your purchase!”).
HTML Tag: Choose the semantic tag for the title:
h1, h2, h3, h4, h5, h6, p, div, span
Description
Add a supporting message, such as:
“Your order has been successfully placed. A confirmation email has been sent.”
Icon
Choose an icon from the library or upload your own SVG.
Useful for adding brand-specific illustrations or animations.
Size: Adjust both width and height (in px).
Rotate: Rotate the icon if needed.
2. Order Details
This section shows essential order information.
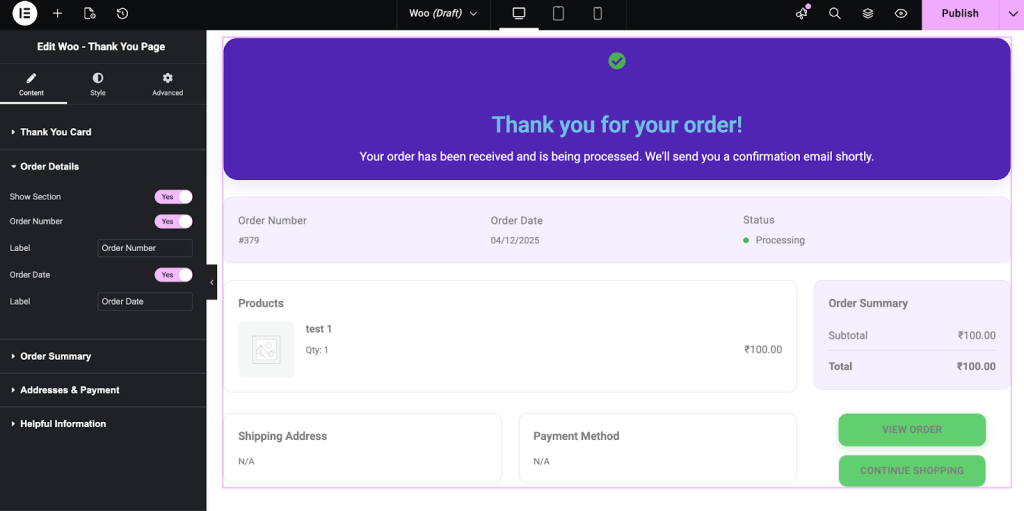
Show Section
Toggle to enable or disable the Order Details section.
Order Number
- Label: Customize the label (e.g., “Order ID”, “Your Order Number”).
Order Date
- Label: Customize the label for the purchase date.
Tip: Use clear labels to help customers quickly identify their order information.
3. Order Summary
Control how product information is displayed after purchase.
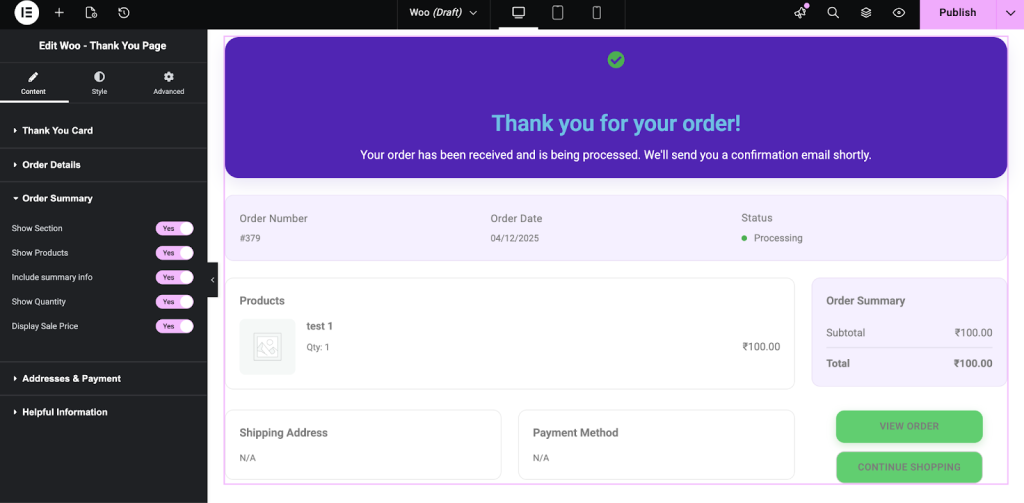
Show Section
Enable or disable the entire Order Summary block.
Show Products
Toggle whether customers can see a list of purchased products.
Include Summary Info
Enables additional line-item details such as product totals, tax, and shipping—depending on your WooCommerce setup.
Show Quantity
Choose whether to show product quantities next to each item.
Display Sale Price
If products were purchased at a discount, you can choose to show the original price alongside the sale price.
Best Practice: Keep the summary clean and simple so customers can validate their order quickly.
4. Addresses & Payment
Control the display of customer billing, shipping, and payment method.
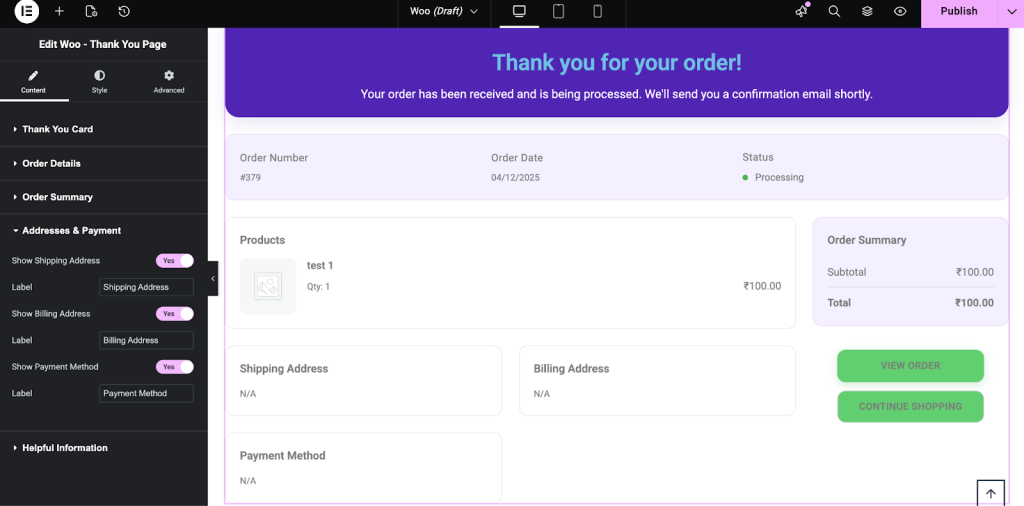
Show Shipping Address
Toggle shipping address visibility.
- Label: Edit the section label (e.g., “Shipping Details”, “Deliver To”).
Show Billing Address
Toggle billing address visibility.
Show Payment Method
Display the method the customer used at checkout.
- Label: Customize label (e.g., “Payment Method Used”, “Paid Via”).
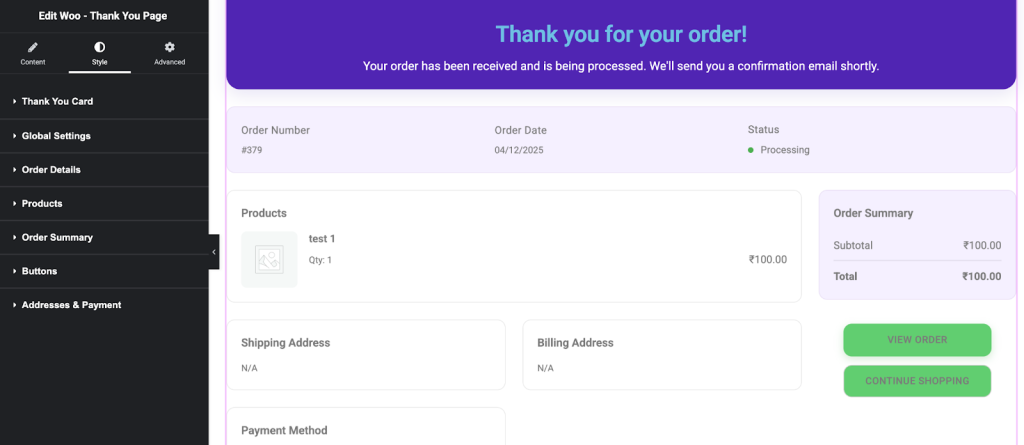
Style Tab
The Style tab gives you full control over the appearance of all sections of the Woo – Thank You widget. Each part of the Thank You page can be styled individually to match your brand and design preferences.
The available styling sections include:
- Thank You Card
- Global Settings
- Order Details
- Products
- Order Summary
- Buttons
- Addresses & Payment
We don't respond to the article feedback, we use it to improve our support content.