- Getting Started with Ultimate Addons for Elementor
- Getting Started with Ultimate Addons for Elementor Pro
- How To Install The Ultimate Addons For Elementor Pro Plugin?
- How to Get License Key of Ultimate Addons for Elementor?
- Activate Ultimate Addons for Elementor Pro License
- How Can I Upgrade the License?
- How to Update Ultimate Addons for Elementor Plugin?
- How to update any plugin manually through FTP?
- About Beta Versions
- About Beta Versions
- How to Enable / Disable Widgets in UAE to Reduce Server Requests?
- How to White Label UAE?
- Getting Started with Ultimate Addons for Elementor Pro
- UAE Saved Sections
- How to create Google API key in Google Maps Widget of UAE?
- White Screen /500 Error After Plugin Installation
- How to Increase the Memory Limit of your site?
- Unable to see the Font Awesome 5 Icons in UAE’s widgets?
- Is Ultimate Addons for Elementor Compatible with the Latest Elementor/Elementor Pro?
- Translating UAE Content with WPML
- Enable Font Awesome 4 Support in Elementor
- Getting Started with Ultimate Addons for Elementor
- How to make Ultimate Addons for Elementor – Sticky Header On Scroll Documentation
- Introducing User Registration Form Widget
- How to Create a User Registration Form using Elementor?
- How to Create a User Registration Form with Only Email Field in Elementor?
- Frequently Asked Questions about User Registration Forms
- Google reCAPTCHA v3 in User Registration Form for Elementor
- Honeypot field in User Registration Form for Elementor
- Filters/Actions for User Registration Form Widget
- How to Integrate hCaptcha with UAE Login & Registration Forms
- How to Create a Facebook App ID for Login Form Widget?
- How to Create a Google Client ID for Login Form Widget?
- Introducing a New Login Form Widget for Elementor
- Filters/Actions for Login Form Widget
- Google reCAPTCHA v3 in Login Form for Elementor
- How to Integrate hCaptcha with UAE Login & Registration Forms
- How to Open a Modal Popup on the Click of an Elementor Widget?
- Modal Popup Widget
- How to Trigger a Modal Popup on the Click of a Menu Element?
- How To Close a Modal Popup on the Click of a Button or Text?
- How to Insert a Video in the UAE Modal Popup?
- What are the Various Options to Close a Modal Popup in UAE?
- How to Display a Modal Popup on Exit Intent?
- Modal Popup JS Triggers
- Woo – Products Widget
- How to display exact WooCommerce product with Query Builder?
- How to set Grid and Carousel layout for WooCommerce products?
- Filters/Actions for WooCommerce Products
- How to enable Quick View for WooCommerce Products?
- How to Exclude WooCommerce Products with Woo-Products Widget?
- How to Set Featured Products in WooCommerce?
- Woo – Products Carousel Does Not Display Correctly?
- How to Display Related Products with Woo-Products Widget?
- How To Add Rows And Columns to the Table?
- Table Widget
- How to add Table Header with Table Widget?
- How to add Table Content with Table Widget?
- How to add Sortable and Searchable Table? How to Show Entries Dropdown?
- How to Merge Columns and Rows in Table?
- How to Style the Table?
- Create Table by Uploading CSV
- Facing Issues with CSV Import?
- Image Gallery Widget
- How to Set Categories for Images?
- How to Add an Image Caption
- How to Set a Custom Link for the Image?
- How to Design Filterable Image Gallery?
- How to Open a Webpage with the Click of an Image?
- How to Set Scale, Opacity, Effects, Overlay Color for Images?
- How to Display Specific Category Tab as a Default on Page Load?
- How to Set Icon on Image Hover?
- Video Gallery Widget
- How to Set Categories for Videos?
- How to Design Filterable Video Gallery?
- How to Display Specific Video Category Tab as a Default on Page Load?
- How to Set a Custom Placeholder Image for the Video?
- How to Set Overlay Color on the Video Thumbnail on Mouse Hover?
- How to Show Video Caption on Hover?
- How to Show Video Category on Hover?
- Bulk Editing for Video Category Names
- How to Style Particular Item / Icon?
- Timeline Widget
- How to Change the Vertical Position of Arrow & Icon?
- How to Set On-Scroll Color for Connector Line and Icon?
- How to Set the Alternate Alignment for the Card Content?
- How to Manage Timeline on Responsive View?
- How Query Builder Works for Post Timeline?
- How to Set Post as Sticky?
- Enable Infinite Load Pagination for Post Timeline
- Posts Widget
- How Query Builder Works for Posts Widget?
- How to Enable Infinite Load Pagination for Posts?
- Filters/Actions for Posts Widget
- Filterable Tabs for Posts Widget
- Layouts for Posts Widget
- Posts Widget Carousel Does Not Display Correctly?
- Displaying Portfolios in UAE Post Widget Using Custom Filters
Creating a Sticky Header With Ultimate Addon Elementor Header & Footer Builder Plugin
Ultimate Addon for Elementor is a free WordPress plugin that allows creating custom header, footer and blocks easily.
You can design a section in Elementor and set it as a header/footer or use it as a custom block on the website. You can even choose specific pages/posts and other locations to display this custom section.
In this article we will explain how you can create header with this plugin and make it sticky in easiest way.
We have divided this article in two parts –
- Designing a section with Elementor and set it as a header.
- Make this header sticky.
In case you already know how to create header with Ultimate Addon for Elementor(Header & Footer Builder) Plugin you can directly jump to second part.
Creating Custom Header
Before beginning make sure you have Elementor plugin activated. Then follow the steps below –
Step 1 – Install and activate the Ultimate Addon for Elementor plugin from WordPress dashboard.
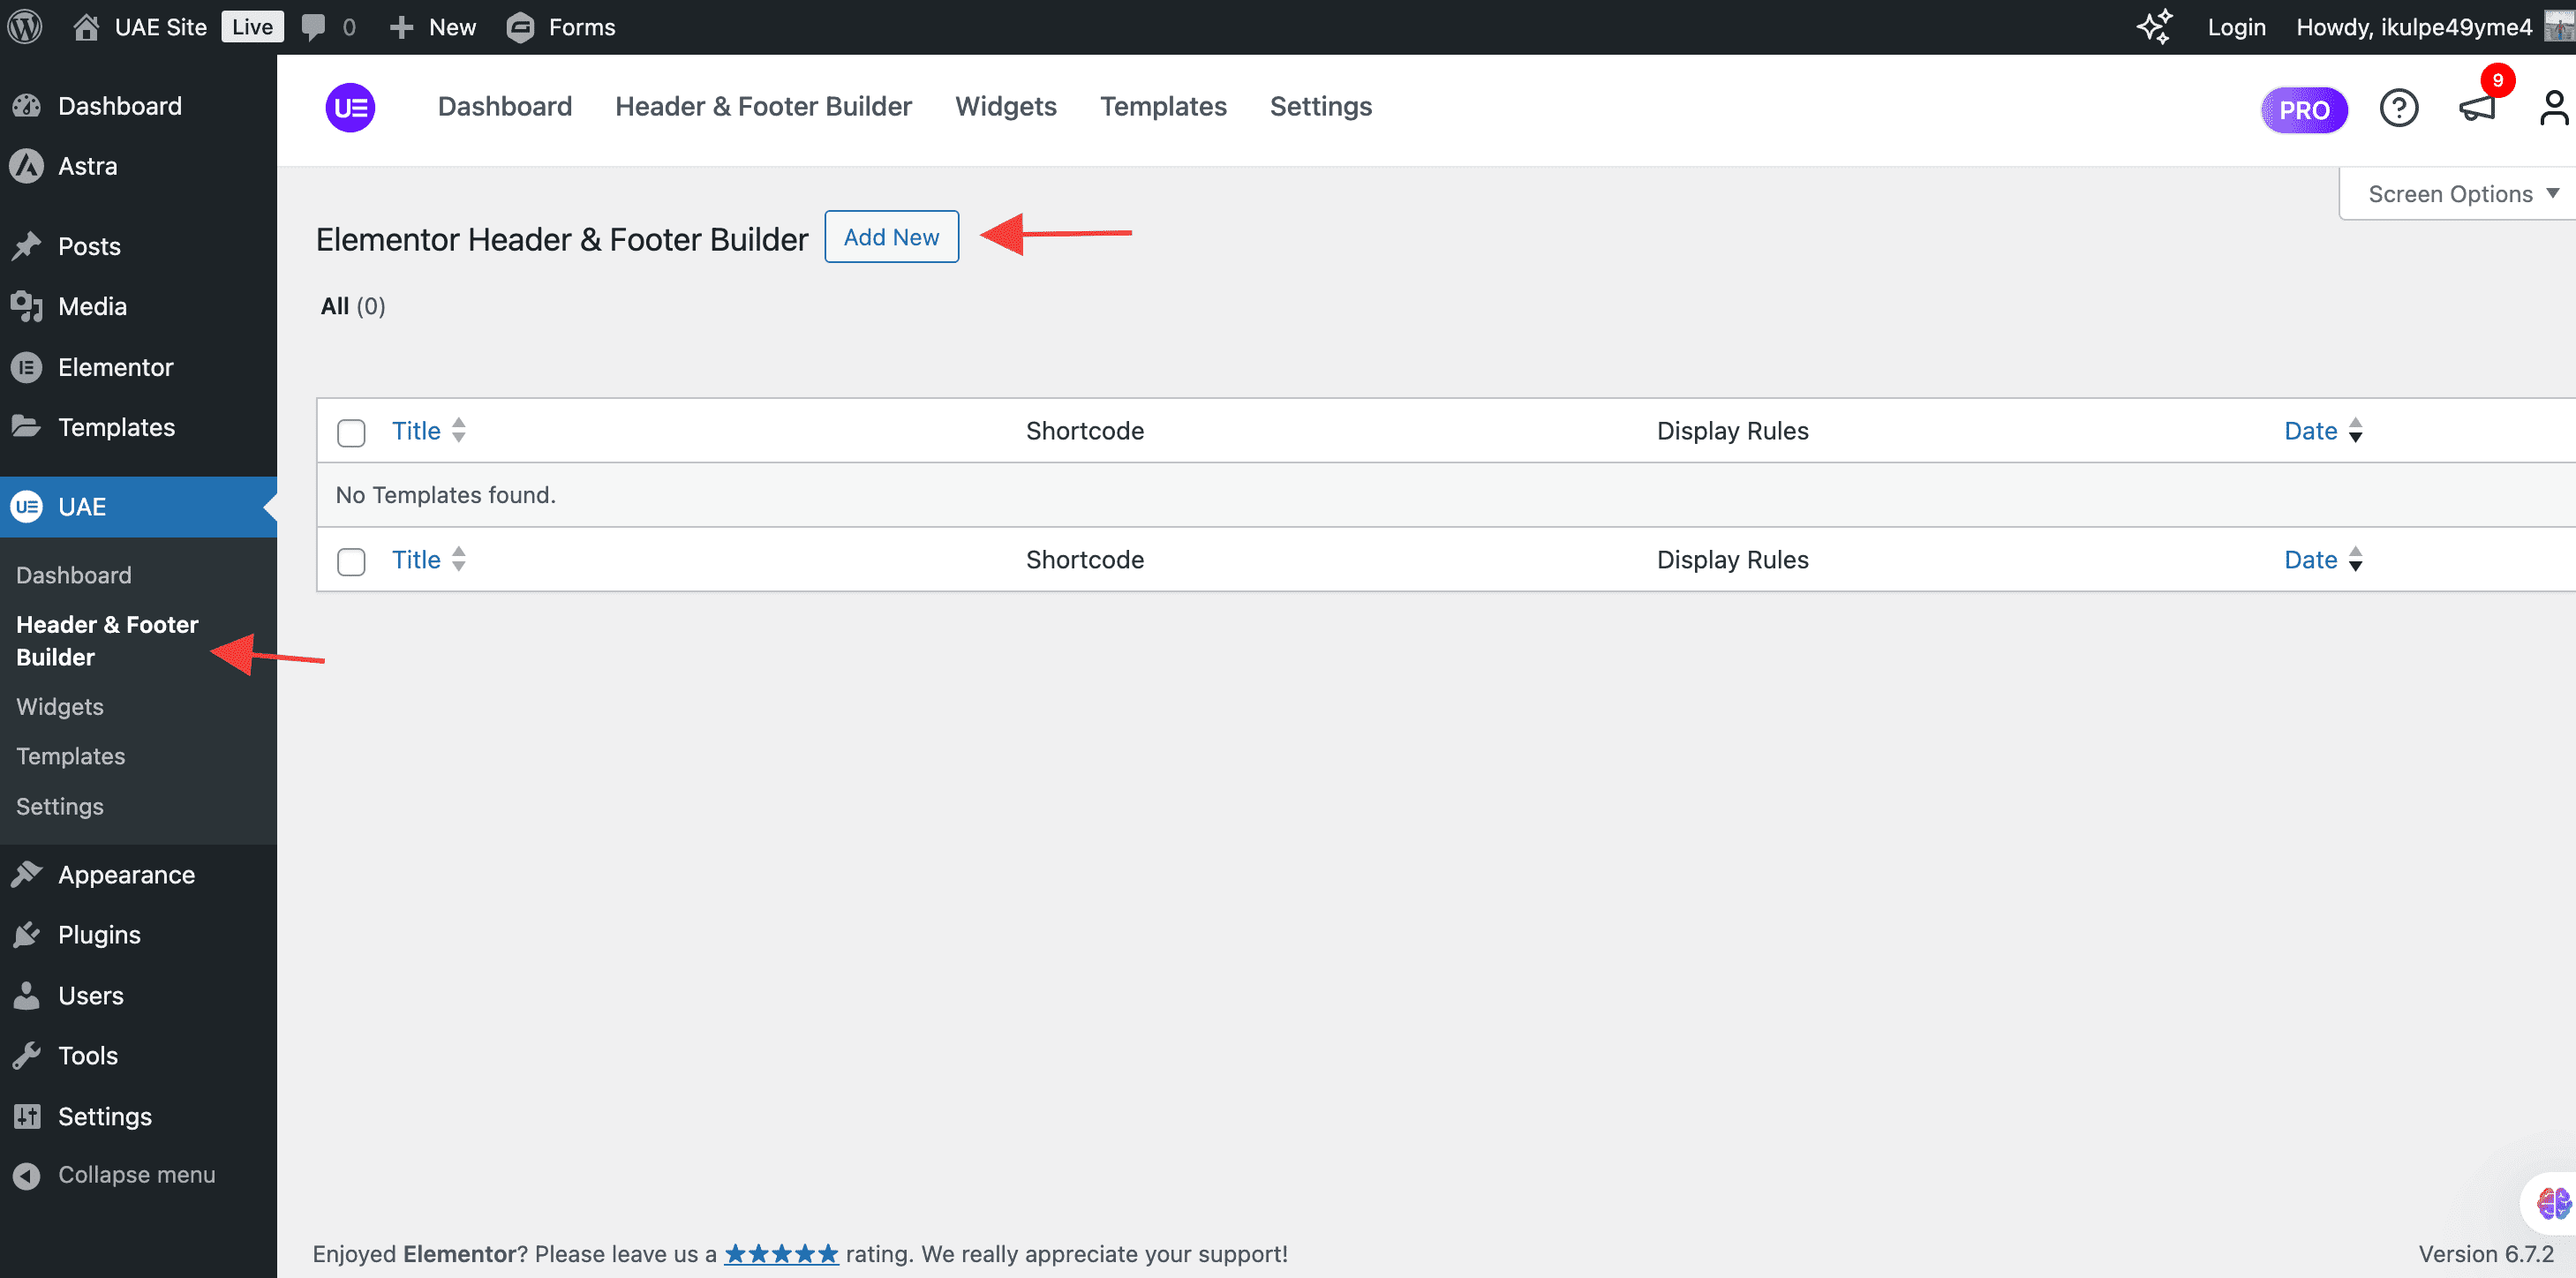
Step 2 – Visit Dashboard > UAE > Header & Footer & Builder > Add New.

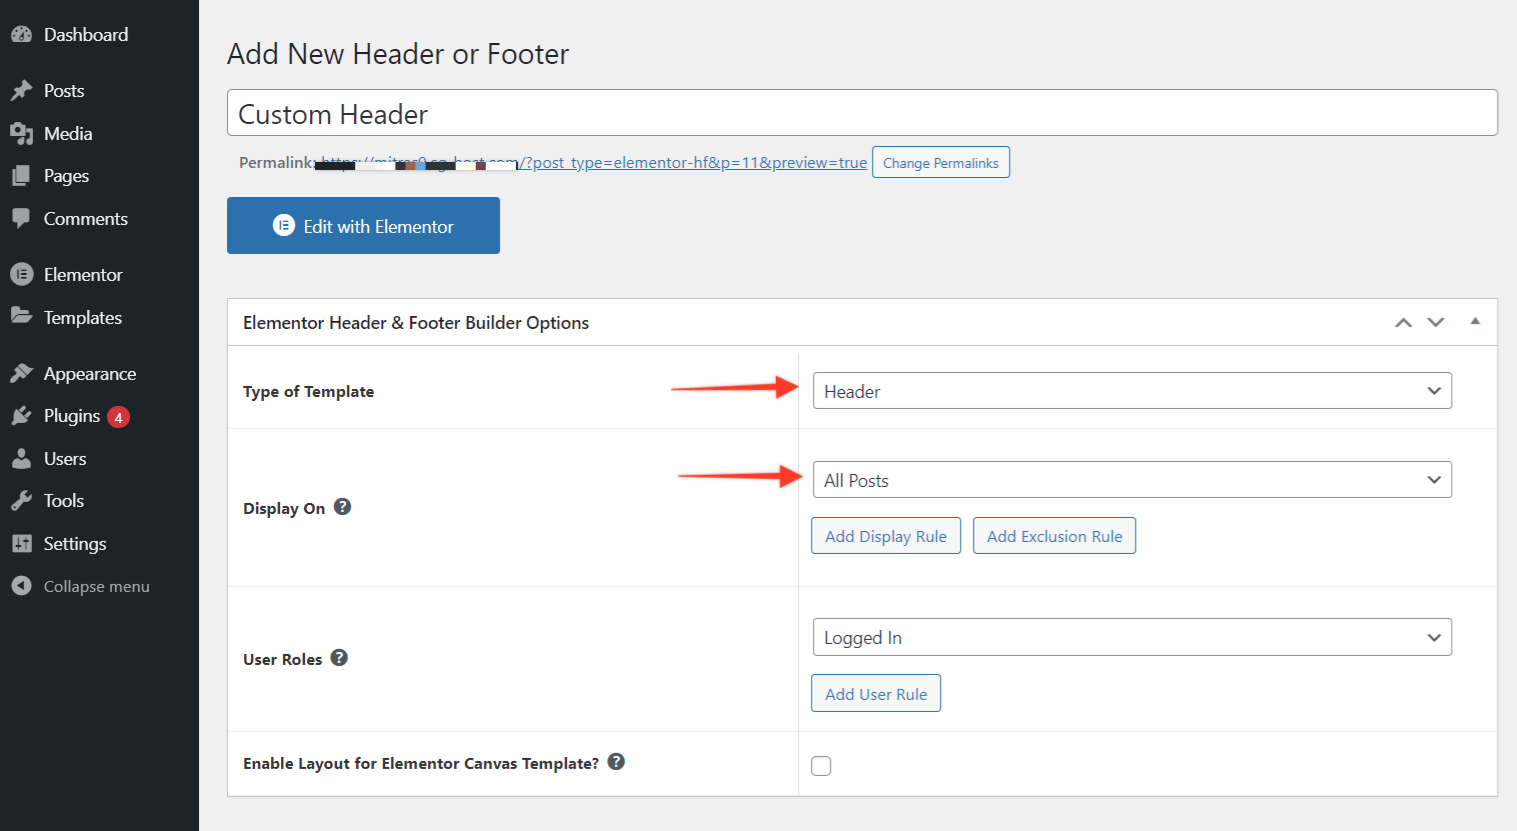
Step 3 – Give a nice title to the section. Set ‘Type of Template’ as Header. You can select display rules. That means your custom header will be displayed only on chosen location.

Step 4 – Now open the Elementor editor and design a custom header as per your requirement.
Save the design and your custom header will display at selected location. 🙂
Once your custom header is up follow the next part to make it sticky.
Making Custom Header Sticky
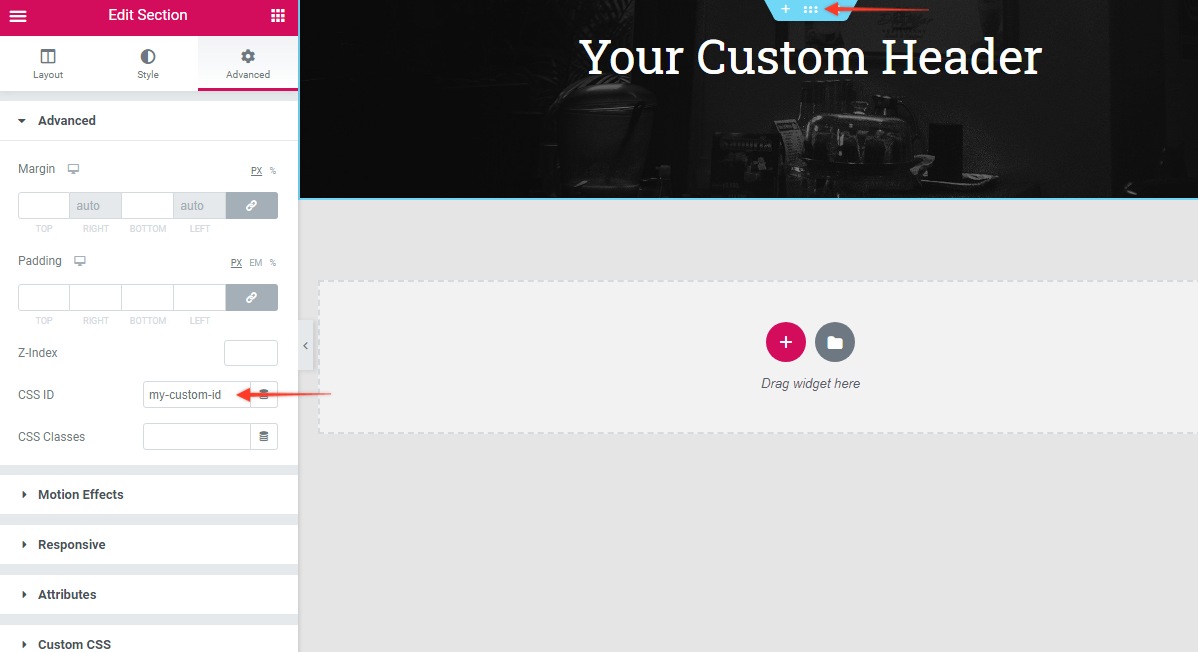
Step 1 – Now edit the above header in Elementor and add a Custom ID to the outermost section (here we are using my-custom-id ).

Step 2 – Now add following custom CSS. You can add it to the customizer under the ‘Additional CSS’ section or use any external plugin that provides an area to add custom CSS.
#my-custom-id.elementor-section{
position: fixed;
left: 0;
width: 100%;
}
Note – In the above code, please replace ‘my-custom-id’ with your ID.
This step will make your header stick to the top.
IFurther, if you want to make your header sticky as soon as users scrolls the page add following JS and CSS code.
First, add the following JS snippet in the functions.php file of your child theme. In case you are not sure about how to install a child theme, kindly contact your theme author.
// WordPress custom function
function my_custom_function(){
    ?>
    <script>
    	window.onscroll = function() {myFunction()};
		// Get the header
		var header = document.getElementById( "my-custom-id" );
		// Get the offset position of the navbar
		var sticky = header.offsetTop;
		// Add the sticky class to the header when you reach its scroll position. Remove "sticky" when you leave the scroll position
		function myFunction() {
		  if ( window.pageYOffset > 40 ) {
			header.classList.add( "hfe-sticky" );
		  } else {
		  	setTimeout(function(){
				header.classList.remove( "hfe-sticky" );
		  	}, 100);
		  }
		}
    </script>
    <?php
}
add_action('wp_footer', 'my_custom_function');
Then add following CSS to customizer under the ‘Additional CSS’ section or use any external plugin that provides an area to add custom CSS. [In case you have added previous CSS at Step 2, please remove it and add following one].
#my-custom-id.elementor-section.hfe-sticky{
position: fixed;
left:0;
width:100%;
	animation:slide-down 0.8s;
}
@keyframes slide-down {
    0% {
        opacity: 0;
        transform: translateY(-100%);
    }
    100% {
        opacity: 0.9;
        transform: translateY(0);
    }
}

@media( max-width: 767px ){

	#my-custom-id.elementor-section.hfe-sticky{
		top: 0;
	}
}
That’s it! Here is how your custom sticky header will look like –
Extra – More Customization using Custom CSS
In case you want to apply some styling for your sticky header you can use Custom CSS ID we added in Part-2 Step-1 (i.e. my-custom-id). Below is the template you will need to use.
#my-custom-id.elementor-section.hfe-sticky{
//your code here
}
Note – Replace ‘my-custom-id’ with your ID and add the necessary code inside.
Here is an example that shows how you can use above CSS snippet –
Consider you need to change the background color of the header after it sticks to the top. Then CSS you will add is –
#my-custom-id.elementor-section.hfe-sticky{
		background-color:red;
}We don't respond to the article feedback, we use it to improve our support content.