
- Getting Started with Ultimate Addons for Elementor
- Getting Started with Ultimate Addons for Elementor Pro
- How To Install The Ultimate Addons For Elementor Pro Plugin?
- How to Get License Key of Ultimate Addons for Elementor?
- Activate Ultimate Addons for Elementor Pro License
- How Can I Upgrade the License?
- How to Update Ultimate Addons for Elementor Plugin?
- How to update any plugin manually through FTP?
- About Beta Versions
- About Beta Versions
- How to Enable / Disable Widgets in UAE to Reduce Server Requests?
- How to White Label UAE?
- Getting Started with Ultimate Addons for Elementor Pro
- UAE Saved Sections
- How to create Google API key in Google Maps Widget of UAE?
- White Screen /500 Error After Plugin Installation
- How to Increase the Memory Limit of your site?
- Unable to see the Font Awesome 5 Icons in UAE’s widgets?
- Introducing User Registration Form Widget
- How to Create a User Registration Form using Elementor?
- How to Create a User Registration Form with Only Email Field in Elementor?
- Frequently Asked Questions about User Registration Forms
- Google reCAPTCHA v3 in User Registration Form for Elementor
- Honeypot field in User Registration Form for Elementor
- Filters/Actions for User Registration Form Widget
- How to Integrate hCaptcha with UAE Login & Registration Forms
- How to Create a Facebook App ID for Login Form Widget?
- How to Create a Google Client ID for Login Form Widget?
- Introducing a New Login Form Widget for Elementor
- Filters/Actions for Login Form Widget
- Google reCAPTCHA v3 in Login Form for Elementor
- How to Integrate hCaptcha with UAE Login & Registration Forms
- How to Open a Modal Popup on the Click of an Elementor Widget?
- Modal Popup Widget
- How to Trigger a Modal Popup on the Click of a Menu Element?
- How To Close a Modal Popup on the Click of a Button or Text?
- How to Insert a Video in the UAE Modal Popup?
- What are the Various Options to Close a Modal Popup in UAE?
- How to Display a Modal Popup on Exit Intent?
- Modal Popup JS Triggers
- Woo – Products Widget
- How to display exact WooCommerce product with Query Builder?
- How to set Grid and Carousel layout for WooCommerce products?
- Filters/Actions for WooCommerce Products
- How to enable Quick View for WooCommerce Products?
- How to Exclude WooCommerce Products with Woo-Products Widget?
- How to Set Featured Products in WooCommerce?
- Woo – Products Carousel Does Not Display Correctly?
- How to Display Related Products with Woo-Products Widget?
- How To Add Rows And Columns to the Table?
- Table Widget
- How to add Table Header with Table Widget?
- How to add Table Content with Table Widget?
- How to add Sortable and Searchable Table? How to Show Entries Dropdown?
- How to Merge Columns and Rows in Table?
- How to Style the Table?
- Create Table by Uploading CSV
- Facing Issues with CSV Import?
- Image Gallery Widget
- How to Set Categories for Images?
- How to Add an Image Caption
- How to Set a Custom Link for the Image?
- How to Design Filterable Image Gallery?
- How to Open a Webpage with the Click of an Image?
- How to Set Scale, Opacity, Effects, Overlay Color for Images?
- How to Display Specific Category Tab as a Default on Page Load?
- How to Set Icon on Image Hover?
- Video Gallery Widget
- How to Set Categories for Videos?
- How to Design Filterable Video Gallery?
- How to Display Specific Video Category Tab as a Default on Page Load?
- How to Set a Custom Placeholder Image for the Video?
- How to Set Overlay Color on the Video Thumbnail on Mouse Hover?
- How to Show Video Caption on Hover?
- How to Show Video Category on Hover?
- Bulk Editing for Video Category Names
- How to Style Particular Item / Icon?
- Timeline Widget
- How to Change the Vertical Position of Arrow & Icon?
- How to Set On-Scroll Color for Connector Line and Icon?
- How to Set the Alternate Alignment for the Card Content?
- How to Manage Timeline on Responsive View?
- How Query Builder Works for Post Timeline?
- How to Set Post as Sticky?
- Enable Infinite Load Pagination for Post Timeline
- Posts Widget
- How Query Builder Works for Posts Widget?
- How to Enable Infinite Load Pagination for Posts?
- Filters/Actions for Posts Widget
- Filterable Tabs for Posts Widget
- Layouts for Posts Widget
- Posts Widget Carousel Does Not Display Correctly?
- Displaying Portfolios in UAE Post Widget Using Custom Filters
UAE AI Tools: Connect AI to Your Elementor Site
The UAE AI Tools feature lets you connect AI clients like Claude, Cursor, and VS Code directly to your WordPress site, or use Elementor’s built-in Angie assistant, to build and manage headers, footers, templates, pages, and widgets using natural language.
There are two independent ways to use UAE’s AI tools:
| External AI Clients (MCP) | In-Editor (Angie) | |
|---|---|---|
| Where it runs | Your AI app (Claude, Cursor, VS Code…) | Inside the Elementor editor, in the browser |
| Transport | Model Context Protocol over HTTP | Elementor’s Angie assistant |
| Needs | Application Password + client config | Angie plugin active + a single toggle |
| Best for | Power users, agencies, automation | Everyday editing while designing a page |
Both paths use the same underlying abilities and the same WordPress capability checks. You can enable one or both independently.
Requirements
| Requirement | Details |
|---|---|
| WordPress | 7.0+ recommended. |
| UAE Plugin | Ultimate Addons for Elementor (2.9.0+) and/or Ultimate Addons for Elementor Pro (1.46.0+) |
| Elementor | 3.0 or later |
| For MCP clients | Node.js 18+ installed on your computer; Application Passwords enabled (WordPress default); HTTPS site for production |
| For Angie | The Angie plugin installed and active |
Step 1: Enable AI Tools
Before connecting any AI client, turn on the feature in your WordPress admin.
- Go to UAE → Settings → AI Tools.
- Turn on Enable AI Tools (off by default).
- If you want the AI to create or modify content, also turn on Allow Modifications. Without this, the AI is read-only.
- Optional: turn on Standalone UAE Server to create a dedicated endpoint that exposes only UAE tools.
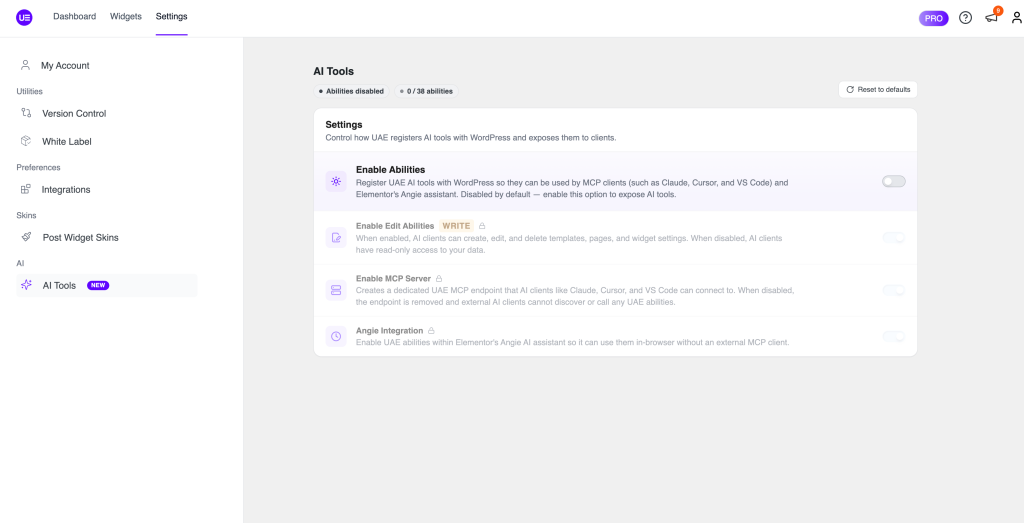
Default is off. Until you enable AI Tools, nothing is exposed and no abilities are registered. Existing sites are unaffected by the update.
Method 1: AI Setup Prompt (Easiest)
Once AI Tools is enabled, UAE generates a ready-made setup prompt for you.
- On the UAE → Settings → AI Tools page, click the sparkle (✨) button to copy the setup prompt to your clipboard.
- Open your AI client (Claude, Cursor, VS Code, etc.) and paste the prompt into the chat.
- The AI will guide you through the rest of setup by asking:
- Which AI client you use and your operating system
- Your WordPress Application Password (see how to create one)
- To run which npx && node –version && echo $PATH and paste the output
- The AI writes the correct config file for your setup, using your actual paths and credentials.
- The AI confirms everything is in place and your connection is working.
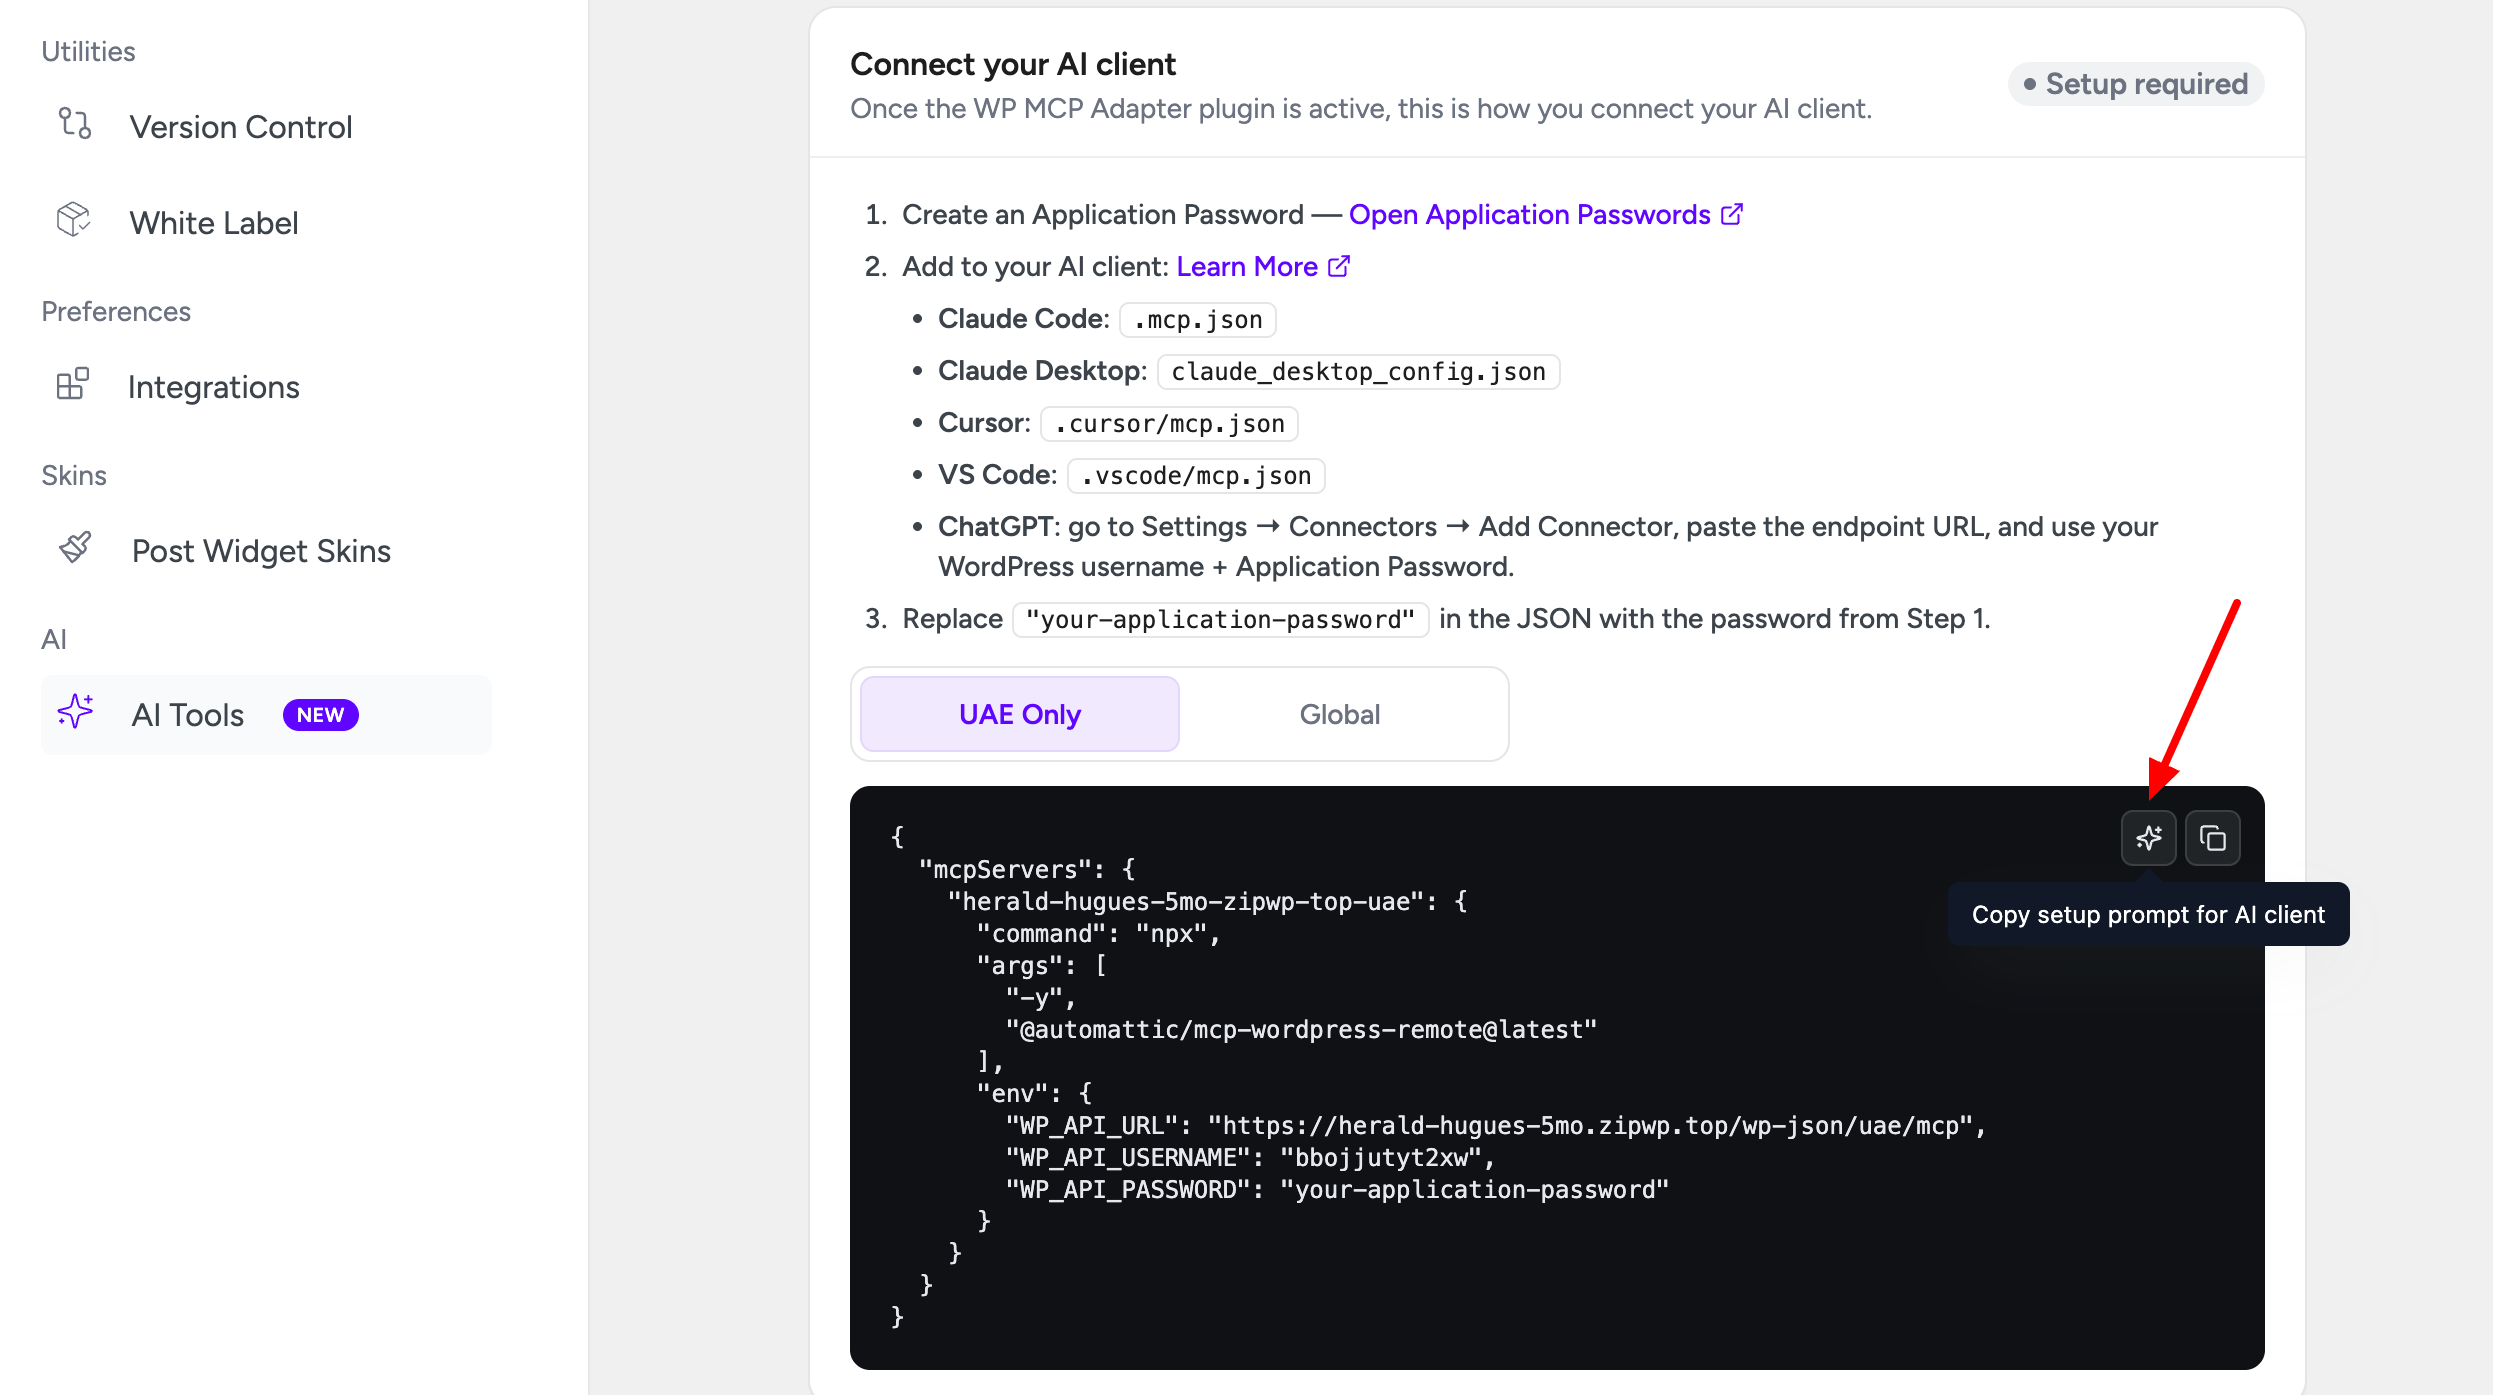
This method works for all supported clients. The AI detects your OS and client automatically and places the config in the right location, no manual file editing required.
Method 2: Manual Setup
If you prefer to configure the connection yourself, see the Integration Setup guide for step-by-step instructions for each supported client: Claude Desktop, Claude Code, Cursor, VS Code (GitHub Copilot), Windsurf, and Codex.
Use AI Inside Elementor (Angie)
Angie is Elementor’s in-editor AI assistant. When the Angie plugin is active, UAE makes its abilities available to Angie so you can build and edit pages directly while designing, no Application Password or MCP config required.
See: Use UAE AI Tools with Angie
MCP and Angie are independent. You can use Angie without configuring any external MCP client, and vice versa.
Settings Reference
All options live on UAE → Settings → AI Tools.
| Setting | Default | What it does |
|---|---|---|
| Enable AI Tools | Off | Master switch. When off, no abilities are registered and nothing is exposed. |
| Allow Modifications | Off | When off, AI can only read your site. When on, AI can create, edit, and delete. |
| Standalone UAE Server | Off | Creates a dedicated endpoint at /wp-json/uae/mcp exposing only UAE tools. When off, UAE tools appear on the default WordPress MCP endpoint. |
| Angie Integration | Off | Exposes UAE abilities to Elementor’s in-editor Angie assistant. |
| Ability Toggles | All on | Per-ability switches to hide individual tools you don’t want AI to access. |
Recommendation: For your first rollout, keep Allow Modifications off until you have confirmed the AI behaves as expected. Then enable writes deliberately.
Available AI Tools
Read-Only Tools
(Available whenever AI Tools is enabled)
| Area | Examples |
|---|---|
| Plugin info | Version, health status, active hooks |
| Templates | List and read headers, footers, and blocks; which template renders on a given URL |
| Pages | List WordPress pages |
| Widgets | List all widgets and their status; widget usage across templates |
| Extensions | Scroll to Top and Reading Progress Bar status |
| Display rules | Available display-rule locations |
| Theme | Theme detection, compatibility, and rendering method |
| Settings & design | Read plugin settings and Elementor design tokens (colors, fonts, spacing) |
| Builder | Read page/template structure, widget schemas, and custom CSS |
Write Tools
(Require Allow Modifications to be enabled)
| Area | Examples |
|---|---|
| Templates | Create, update, delete, restore, and duplicate headers/footers/blocks |
| Pages | Create, delete, restore, change status, and update metadata |
| Widgets | Activate, deactivate, bulk-toggle, and deactivate unused widgets |
| Extensions & rules | Toggle extensions; update display rules |
| Settings | Update plugin configuration (administrator only) |
| Builder | Build a full layout, insert/update/remove/move elements, add sections and columns, regenerate CSS |
| Builder: Undo | Revert the most recent AI builder change on a post |
| Maintenance | Clear Elementor and plugin caches |
Security Best Practices
- Use a dedicated WordPress user for AI access with only the roles and capabilities it needs.
- Use Application Passwords they can be revoked individually without changing your main password.
- Start read-only. Enable Allow Modifications only when you need the AI to make changes.
- Disable abilities you don’t need using the Ability Toggles on the settings page.
- Always use HTTPS on production sites.
- Revoke Application Passwords when a client no longer needs access (Users → Profile).
Having trouble? See the UAE AI Tools Troubleshooting guide or contact our support team.
We don't respond to the article feedback, we use it to improve our support content.